

Through to this final film, the world of Harry Potter has been a magic place for VFX artists to test their talents
and achieve some of their best work. Cinesite and Double Negative discuss dragons, wand duels and infinite
staircases for 'Harry Potter and the Deathly Hallows Pt 2'.
 |
  |
| When Double Negative started on ‘Deathly Hallows Part 2’ in 2008, the facility was still at work on ‘Half Blood Prince’. Producer Emma Norton and overall VFX Supervisor Tim Burke approached Double Negative about the feasibility of creating an entirely digital Hogwarts to replace the scale miniature used for all the Harry Potter films up until this point. The team was also to be responsible for the cg dragon imprisoned at Gringotts Wizarding Bank, the heart-stopping cart ride that takes them to it as well FX sequences during the final battle. While preparing for this work on ‘Deathly Hallows Part 2’, the same crew were also completing shots for Part 1.
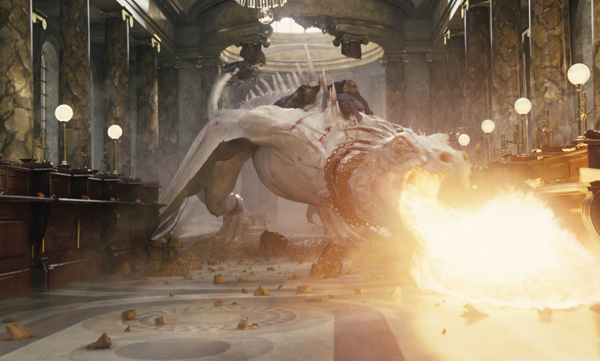
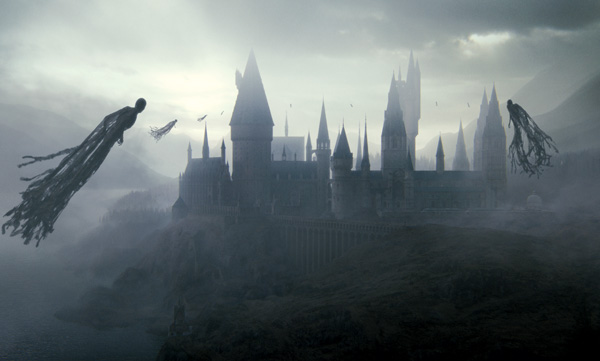
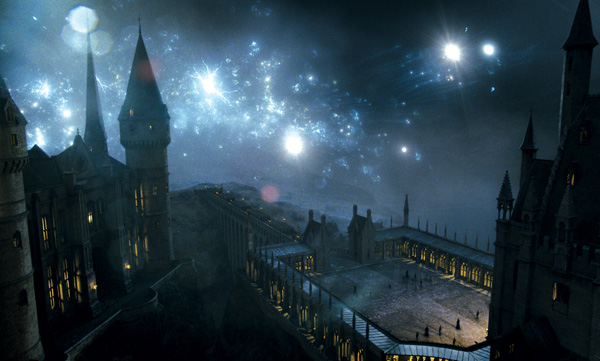
The pipeline they set up from the beginning was geared toward the final film. The digital artists and supervision were working well together by then and able to continue straight through to the end. Double Negative’s VFX Supervisor David Vickery, CG Supervisor Rick Leary and Compositing Supervisor Sean Stranks all kept the same roles. “There was a lot of overlap between the two films and for almost nine months we were in full production for both movies simultaneously,” said David. Gringotts Bank Because so much of the bank foyer set had to be destroyed, Double Negative built a complete cgi version. Once the dragon escapes, the Diagon Alley roofscape where he emerges is digital also. David said, “A beautiful, detailed set had been built for the bank, plus a section of the dragon’s enclosure to provide for actor interaction, but although the photography was helpful, once the artists began adding the dragon, light, interactions with fire, destruction and magical spells to the plates, we realised it would be easier to build a cg environment and work within that. A number of plates had to be replaced almost entirely, only retaining the foreground section of the set where the actors were standing. “For all the shots featuring the dragon, for example, replacing the live action set gave us absolute control over the integration of the dragon with its surroundings. It was much simpler to get the dragon to perfectly occlude and shadow the floor around it. Magical spell blasts would cast light onto the walls and the dragon’s fiery breath lights up and wraps around the set perfectly.” Roller Coaster “We didn't want to use a motion controlled camera in combination with our motion controlled cart rig as it put too many creative constraints on a shoot that was already pressed for time,” explained David. Instead they drove the cart motion using their previs and let the cameramen react to the shots on the day. “This created a much more fluid set of shots as the operators running the cameras could react to directorial changes much faster than we would have been able to re-programme a motion control rig.” 3D Mapping “However, as soon as we shot the live action to match the previs, the editors changed and re-cut the action, moving various shots around which unravelled much of the continuity within the environment. Fortunately, Kieron had built the cave maquette as a modular system. He could move pieces of it around himself to fill new shots in, using it like a Lego cave so that shots could be moved but still create a sequence that felt continuous and coherent.” The cart sequence needed a team of about twenty 3D and 2D artists working for nine months. Camera Tracking To help with the match move and the eventual manipulation of the green screen elements they positioned two HD witness cameras either side of the cart through the whole shoot, which were locked off and synced with a bloop light. “As the whole cart was not always visible in our plates it wasn't always easy to tell when it was the cart moving and when it was the camera. Getting the relationship between cart and camera correct was critical to make sure the shots worked in stereo. The multiple sources of footage were used to determine what part of the match moves should be cart animation and which were to be camera animation, enabling us to re-create the cart and camera moves very accurately in Maya.” Rock Formations Because Double Negative had no live action elements to composite into early look development tests, the shots they first presented to Tim and David Yates were all POVs. “The lighting was designed to recall a dark, dank cavern with an eerie glow, as if a distant source of light was bouncing off the wet surfaces of the cavern. These early tests guided the lighting for the live action plates.” Test Renders “Once we had believable looking shots with the live action elements in place we would show the director for feedback on the overall creative look. In the end they went through half a dozen looks for the sequence, all of which took hundreds of test renders in 2D and 3D to perfect,” David said. “Making something look believable isn’t always the real challenge anymore. It’s delivering a creative solution that the Director and VFX supervisor like. You often have to work hard to understand what people want when they give you creative briefs...” Goblins' Dragon The extensive concept artwork from production depicted the dragon in a dark cavernous environment. Double Negative’s concept artist Kristin Stolpe used these as the basis for a series of sculpts in Mudbox, creating a 3D model to develop his character and show a poor, mistreated, emaciated wild animal. Work began on the dragon in summer 2008 with a small team dedicated to the build and scripting tools needed to animate the motion control rig used on set. Later the dragon team grew to include almost 100 crew, a small army of lighting artists, creature FX TDs, compositors, match move and rotoscope artists. The most challenging aspect of the dragon was developing a way to get the actors to sit on and interact with it believably. Double Negative provided SFX supervisor John Richardson and creature FX supervisor Nick Dudman with the digital model of the creature, which they used to build a life-sized 12ft CNC machined foam sculpt of the dragon’s back, a flexible foam laytex skin and a mechanical rig driven with six moog actuators to control the movement in the dragon’s shoulders, neck, spine and tail. This rig was then mounted on the motion control base at Leavesden. Taking Flight Some shots were filmed at 18fps so they could be re-sped later to make the dragon back appear to move faster. Other shots needed to be filmed locked off to allow the resulting plates to be reprojected into 3D camera moves. “Rick and Sean’s presence on set proved invaluable. Every time a shot was filmed, they would take the video rushes and run a quick match move and comp to check that they would be able to make it match the previs. The director was on hand to give immediate.” Digital Hogwarts Double Negative’s digital set recreated over 10 miles of terrain at its widest point and used over 3,000 individually painted 4K textures. The school itself comprised over 70 individual assets, all built to three levels of detail as specified in nearly 1,400 blueprints provided to them by Production Designer Stuart Craig’s Art Department. |
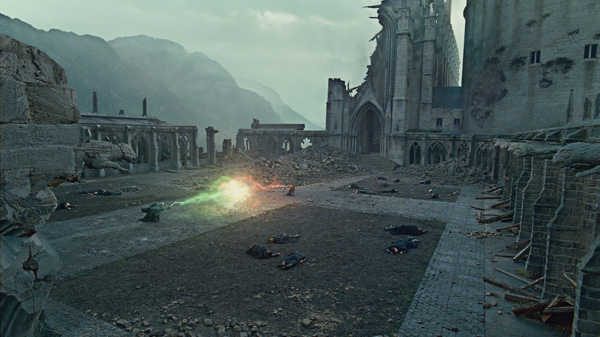  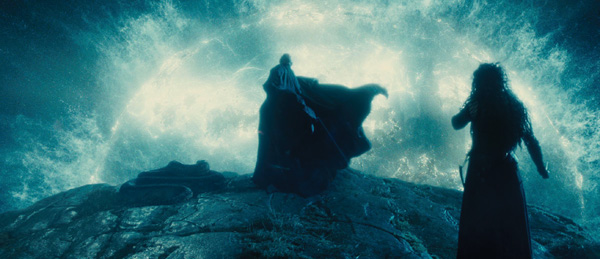 |
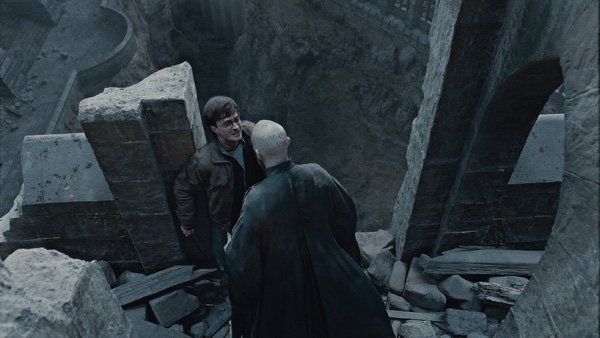
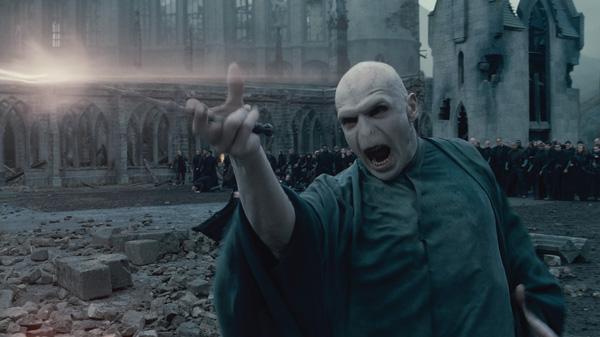
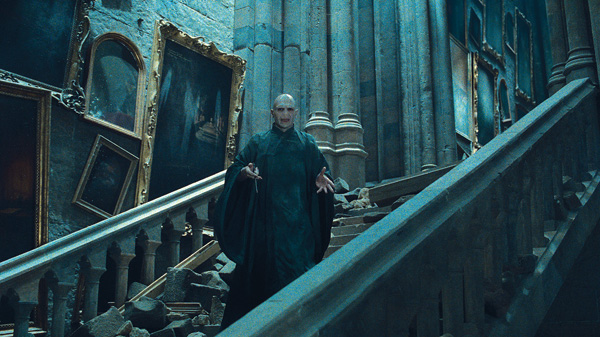
| Creative Destruction During the main battle sequence, Double Negative oversaw the Hogwarts shield creation and ultimate destruction when Voldemort’s spell fires into it. “Tim Burke and David Yates briefed the creation effect as an 'ethereal wave of energy, its leading edge described by beads of pulsing light'. But it also needed to look incredibly powerful as it combined numerous spells,” David said. “VFX Artist Tania Richard started the creative process through a series of concept studies to present to Tim and David Yates. For the shapes and look of the shield we took inspiration from natural forms - deep sea bio-luminescent creatures and jelly fish. The micro details in the shield mimic the fine structures in insects’ wings and the huge branching cords of magic feeding the shield take their structures from acacia trees.” FX lead Alexander Seaman and his crew worked in Maya and Houdini creating a series of 3D renders and animated geometric structures. These were passed to compositing lead Christine Wong who used Nuke to craft the graceful looks in the finished shots. Multiple Hogwarts Burning Bridges The first model was built from set construction plans and was for shots where they had to use CG to extend the partial set build in live action plates. The second model was built from architecturally accurate scale technical drawings. “We built all the roof timbers, slates, floor joists, down to the individual types of join used to connect the structures to each other. This information was all used in Dynamite to create physically accurate FX simulations as the bridge was blown up. This 3D model was incredibly dense and took a long time to render. Smoky Plumes David said, “We had to use a couple of different fluid effects in Maya. On top of these were cloth-like ribbons that twisted and spiralled through the smoke and particle effects that gave the tail of the smoke a grittier look. The integration of all of these components in 2D is what gives the trails their beautiful, roiling aesthetic.” Infinite Staircase The set piece extended about 1 ½ stories, each way, and appeared dressed according to the sequence. Although large, it actually only represented a small section of the staircase. “We took a pretty standard approach, collected all textures, took a Lidar scan and total station survey and built a module that we could re-use and replicate. At the time we re-built it we still didn’t know the level of destruction, type of lighting or the size of the environment, so we tried to be prepared.” The principle photography for Deathly Hallows Part 2 was done back to back with Part 1, and because the sequences had already been shot when the team started, the practical set had been destroyed and built up again. They had some blueprints showing that it needed to essentially extend into infinity. From these, Cinesite developed the looks and produced basic renders to submit for approval. Perfect Lighting Flexible Compositors Cinesite’s artists have made the animated portraits in all the Potter films and it has become the specialty of one of their compositors, Karen Wand. The technique, updated this time to work in Nuke, involves a 2D approach, starting with motion analysis on the character and using brush strokes, canvas and varnish textures found on paintings with colour correction to make the colours more muted. “We have some proprietary motion vector analysis tools, and using this motion analysis data we stick the textures to the characters as they move through the painting to make the canvas itself appear to move. A physical painting is supplied for the background into which the characters are composited. When Ariana walks back into the painting, they shrunk her down slightly,” said Andy. One shot involves 15 portraits on a wall in the marble staircase environment. Production shot various scenes of characters fleeing a set piece, and then choreographed the same characters to flee through the set piece of what would be the portrait next to it on the wall. Editorial carefully pieced the vignettes together as a line-up sheet for the team to match. Head Tracking Skin Shader The build of Voldemort’s head was based on a Cyberscan of the actor, and the geometry was used to generate a detailed displacement, showing pores and wrinkles. To help preserve the integrity of his performance and achieve an accurate match move, the team built a rig with three levels of animation controls, accessing the full set of tracking markers attached to his head with enough flexibility to match the action in each sequence. They had developed a skin shader tool to generate the snake nose, generating textures by using specialised photography and lenses, and extracted detailed pore maps. Multilevel subsurface scattering improved the photorealism. Some shot-specific dirt maps and dirt textures were also added where Voldemort picks up dust and dirt during the fights. Green Gunfight For Harry’s and Voldemort’s crtical battle on the staircase, Cinesite created the first portion of an effect that MPC finished with a ribbon effect. This was handled like a gunfight with green bolts that Harry deflects, all done in 2D. "We designed and executed the first part of their wand fight using Nuke, trying to use the green of the Avada Kedavra spell and incorporating some explosive shield effects as Harry tries to defend himself. Harry deflects the wand duel effect into the staircase ceiling. This allowed for one of our biggest effects in the film, where our staircase completely crashes down onto Voldemort. Wrapped in Chains The actor, a Deatheater, who was wrapped in chains was shot reacting to something, as if he had been hit, giving them an opportunity to try various concepts – a boulder, a cloud of dust. His movements required a match move to help animate the chains coming from Harry’s wand. Since there was a lot of cloth movement in the character, they also assisted the match move in 2D for a more fluid approach to stick the chains to the character’s body. “’Harry Potter’ has such a strong visual sense. That’s what makes it satisfying to be asked to use this as a starting point to come up with something new. |
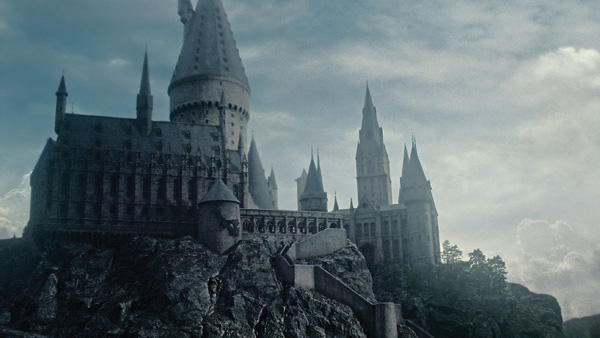   |
| Mountain Survey Acquiring the data to recreate the imposing landscape surrounding the school was a major challenge. “When we went to photograph and survey the Scottish locations we still weren't sure how close the camera would approach the school or mountains around it. We had to cover every angle,” said David. “We couldn’t simply have gone back to collect more data because we would have encountered different light and weather conditions.” Hogwarts lead environment artist Pietro Ponti devised a rig made up of three Canon 1DS MkIV DSLRs mounted side by side and designed to shoot out of a helicopter. The three cameras were remote triggered with shutters synced. Pietro studied Google Earth and plotted out semi-circular flight paths around all of the mountains the environment required. The shoot generated over half a terabyte of photography which Double Negative’s team used inside proprietary geometry reclamation tools to re-build the terrain, using the photography to create textures as well. The result was the mountain mosaic seen in the film around the outside of the school. Thus the Hogwarts location is both invented and real, made up of remodelled, real places, moving the mountains around and blending them together to create the ideal landscape. The team was able to build the entire exterior structure and terrain, from wide shots to the battle scenes in the main courtyard, in the Great Hall looking out and from the battlements, even the inner courtyard where Harry meets the Grey Lady. In short, whenever the camera is outside the structure. |
 |
| Rubble and Debris At that early stage, it was important to build the staircase to be able to achieve as much destruction as was called for in any plate, revealed by how much rubble and debris had been included, for example. For speed and flexibility, they built it in real pieces, every brick and part, and wrote some software so they could paint in the destruction and then run a simple rigid body simulation to drop the rubble onto the staircase. They had investigated various rigid body solvers to destroy the staircase with, and chose PullDownIt from Thinkinetic in Spain, the group that wrote the first solver for RealFlow. “Cinesite bought a site license for it early on and we extended its functionality to do some set dressing by painting onto the steps where you want to apply certain types of debris or rubble. The solver would drop this material onto the steps accordingly, so that nothing was intersecting or floating, in nice believable piles using physical parameters of gravity, mass and centre of mass,” said Holger. This process was carried out per scene, depending on plates and the story. 2D Digital Supervisor Andy Robinson said, “When Harry Potter and Voldemort are fighting, Harry deflects a big wand effect up into the staircase and rubble comes crashing down. We never had a definitive shot for it, just a couple of wide shots, plus a medium shot of Harry cowering under a shower of debris. So we came up with some dramatic camera angles and interesting lighting to use in production, backlit and dark, as look development for the destruction in the sequence. |
|
MORE HARRY POTTER ONLINE: I.E. Effects Gets Immersed in the World of Harry Potter Cinesite’s Antony Hunt Looks Back at Harry Potter – and Beyond |
| Words: Adriene Hurst Images: Courtesy of Warner Bros |
| MORE FEATURE ARTICLESFeatured in Digital Media World. Subscribe to the print edition of the magazine and receive the full story with all the images delivered to you. Only $79 per year. PDF version only FREEsubscribe |


