
‘Underworld: Awakening’, the fourth film from the dark and dangerous realm of ‘Underworld’, finds
terrifying new creatures wreaking havoc on the human race, thanks to the work of Luma Pictures,
Spin VFX, Fido and Company 3.
 |
|
| Luma Pictures’ involvement in ‘Underworld: Awakening’ began several months before production, contributing to the concept work for the tunnel Lycans and 2D concepts for the giant Über Lycan monster who were the main focus of the team’s creature work for the movie.
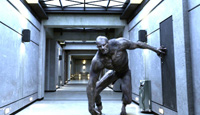
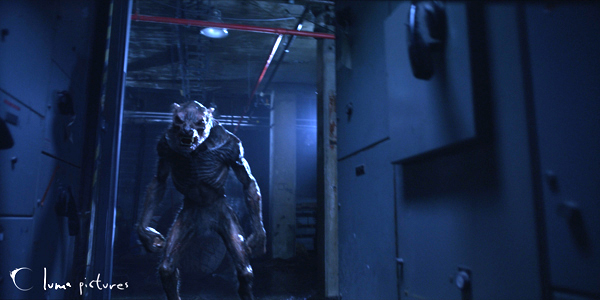
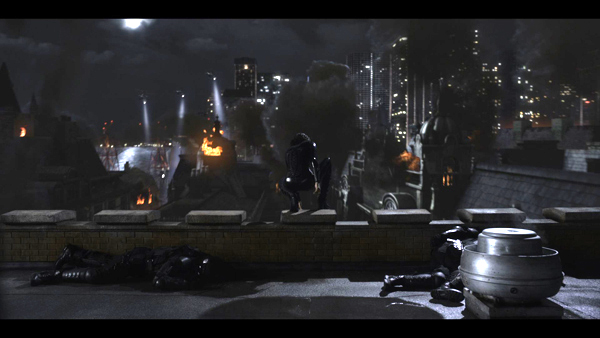
Luma was responsible for over 100 shots involving the tunnel Lycans, vicious emaciated underground dwellers who emerge after many years and spread out into the city, attacking, destroying and taking their revenge. Following their emergence onto the scene are other high action sequences in a car park, clashes with vampires and humans, and detailed transformations changing the character Quint from his human form to the Über Lycan. |
|
 |
|
| Model Refinements Starting with the initial concept art and maquettes from the Art Department, they refined and adjusted the tunnel Lycans’ designs to work from all angles in stereo 3D and in the film’s different environments and lighting scenarios. As the action got underway, it was also important to ensure that they would work well with the animation, shortening some limbs to function effectively in their quadruped pose as they ran out on the streets. “Moving on from the Art Department’s work, it was up to us to sculpt realistic muscles and make sure the muscle simulations worked as expected,” explained Luma’s VFX Supervisor Vincent Cirelli. “We used wolves, lions, tigers and dogs as reference, as well as human anatomy. Because the Lycans’ skin had to appear translucent, we needed to develop and model a lot of underlying geometry so that in close up shots the audience can read and feel this translucent skin sliding over muscle, tendons and veins. These looks required an extensive development cycle.” Once production got underway, as well as working on creatures, Luma were re-conceptualising a number of sequences and feeding sections of their animations to the production VFX Supervisor and Executive Producer James McQuaide while he was still on set. Although quite a bit of useful previs had been completed for the movie, many sequences were changed after Luma received the photography and the footage was reviewed. |
|
| Underworld Dwellers “Our team wasn’t on set, but we’ve worked several times with James on other projects and have a similar workflow. He has a precise knowledge of our pipeline and, therefore, how to provide us with everything we need to execute our shots. He knew exactly what to shoot for us, what the CG elements would be and how they were to be integrated into the plate. He captured diagrams for the set and for lighting, HDRIs, whatever we needed to get started,” said Richard Sutherland, CG Supervisor. Luma has now worked on all four ‘Underworld’ films. Their experience helped them for this film on a technical level because they know how to execute the fur, rigs, skin deformations and dynamics, muscle systems and so on. But when it comes to building the creatures and putting the actual shots together, beginning the processes for each creature and story makes every film feel new. Richard said, “The tunnel Lycans are quite different creatures to any others we’ve created, and the Über Lycan is very different from other werewolves, although he comes from the same species.” The team’s sequences comprised heavy creature work including scenes with multiple creatures and complex interactions with vehicles and the environment. In their first sequence, three Lycans jump onto cars, some of which had to be full CG to achieve effective interactions. Likewise, when they break into a van and attack the young vampire-Lycan hybrid Eve, she had to be replaced with a digital double to interact with the Lycan attacking her. They also built up the cab of the van in detail and added digital doubles of Selene and another vampire, all due to the amount of interaction. “For many shots in this sequence we used larger parts of the live action plate. In others the elements were almost completely CG. Decisions were based on what the actors were doing and their proximity to the CG,” said Vince. |
|
 |
|
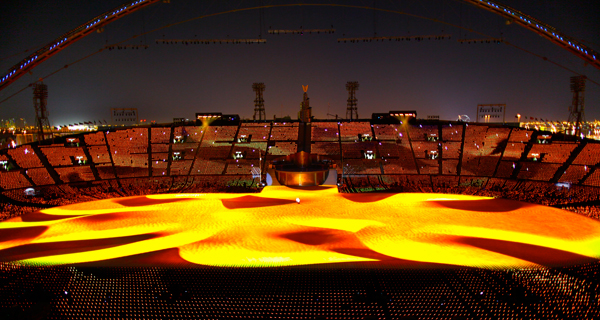
| Designed for Action “The tunnel Lycans had to perform an extensive range of motion, and designing them for action and animating them required various approaches. Sometimes they were bi-pedal, swapping to quadruped and had to shift naturally from one the other in a believable manner. We have a motion capture studio in our facility that we used to help us ‘proof out’ the motions of going from bi-pedal mode to the crouching quadruped position, which required much more hand-keyed animation for run cycles and other moves.” The Über Lycan was similar, using the maquette as a foundation and then defining muscles, proportions and some facial features, so that the model looked and functioned realistically during animation. The motion capture sessions done with the actor for Quint, the character transforming into the Über Lycan, were critical in order to capture his essential performance, improving the transformation cycles and getting as many of his human traits as they could to transfer over into the creature’s performance and prevent dissociation between monster and character. |
|
 |
|
| Light Stage They also worked with Paul Debevec at the Institute for Creative Technologies lab at the University of Southern California, where Paul has led the development of several Light Stage systems that capture and simulate how people and objects appear under real-world illumination. Light Stage scans were taken of Quint, which capture all surface properties. Maya with the Arnold renderer was used in the pipeline for this kind of work, and they built their own interpreter and wrote a number of shaders. One of the custom shaders helps read in the Light Stage data, crucial for the transformations. The transformations were carefully previs’d with animatics by an in-house concept designer. The production really wanted to explore the idea of an asymmetrical transformation that doesn’t happen uniformly over the character’s whole body. For example, his left arm might become fully elongated while his right arm remained human, overall looking quite deformed. To avoid going too far or making the look either too monstrous or too human-like, the designer developed a series of drawings of the different stages, from human to Über Lycan and back again, to put into the animatic, and got these signed off. These drawings prepared the artists to build out the models, from pose to pose. “The development of the transformations was very complex and we were keen to avoid the pitfalls of the past, especially since this transformation was pretty long, a few hundred frames. Previous transformations had been quicker, moving the characters in and out of the different forms, and a lot of the detail could be hidden through lighting and other means. Slowing it down increased the risk of hitting the Uncanny Valley region where the CG can become uncomfortable for the viewer,” said Vince. Between Human & Monster Several in-house tools were developed as well to accommodate these requirements. Luma’s pipeline is heavily customised. It incorporates off the shelf software including Maya, ZBrush, Arnold and Nuke but what gives Luma’s pipeline its ‘horsepower’, as Vince describes it, tying the commercial applications together, is their custom tools. He explained, “We have bridge tools that stream the passes into Nuke, for example. You can line up passes, see how they look and make changes, which can affect the shaders inside of Maya, creating cross talk between tools. In addition we have our own shader library, dynamics packages and simulation programs for our rigging section. |
|
 |
|
| Robust Rigging “As we are a very experienced creature house and many of our projects involve digital doubles or creature work, we have a very robust rigging pipeline. Most parts of it are proprietary and work with Maya as plug-ins, but are developed here. This is what allows the realistic muscle simulations, sliding skin and so on that, at the same time, work properly in the renderer. We can extend the capabilities of packages as well. For example, if we are working with FumeFX, we can add it to our pipeline and port it over to Maya.” The rigging pipeline focusses on effective movement and deformation because these factors are what bring the lighting and modelling to life. Consequently, motion is what Luma have dedicated resources and time to developing in-house. “In the past few years,” Vince said, “we have been integrating feed-back loops and metadata into the rig that allow it to drive shaders and the render and custom attributes as required, resulting in a homogenised system that responds to the information plugged into it. Justin Johnson, DFX Supervisor, explained that Luma is a bit different in that they tend to hire generalists who excel at one or two particular skills but are aware of and able to handle many others in a CG pipeline. “All of the compositors, for instance, can light shots, although we use them mostly for compositing right now,” he said. “Luma also has several lighters who can composite shots. In fact, because we find the industry is pushing towards a lighter/compositor hybrid, many of our tools accommodate this trend. We can essentially assign shots to a single artist who can complete them from start to finish, except for the animation.” |
|
| Flickering Lights The lighting in their shots mainly followed the scenario on set but some tricky issues arose that also needed special tools. One of these was the frequent use of flickering lights. “In one sequence in particular we had dirty lights, all flashing at different times. Our tools analysed where lights were placed and we used James’ accurate lighting diagrams, balancing the lighting. By analysing the plate we could figure out which CG lights needed to flash, when and how intense they should be. This method worked well to allow us to run shots through for about half of the time. The remainder needed further attention from the lighters to bring them into line.” The team had access to full LIDAR scans of all sets, which made tracking much easier because, combined with the measurements they had from set, it showed them exactly where everything was located and allowed them to build their proxy sets very quickly. They would then choose between PFTrack, Boujou and Syntheyes tracking software, using whichever gave them a proper track. Especially for the sequence with the Über Lycan in the car park structure, Luma were responsible much of the action in their shots. Therefore, editorial would change the edit in response to the animation, if required. Luma would receive the edits and, in turn, check to see if they needed to make further changes as well, resulting in considerable exchange and iteration before finalising shots. The team started working on concepts and creature design about one year before submitting final shots. Executive VFX Supervisor and CEO at Luma Payam Shohadai said, “We had about four months from receipt of the first plates from set. It was a considerable amount of work for the team of 83 to complete in that time frame. The directors Mars Mårlind and Bjorn Stein visited several times during post to comment on the creature designs and their expectations on the shots, which we screened in the theatre here in our facility.” |
|
 |
|
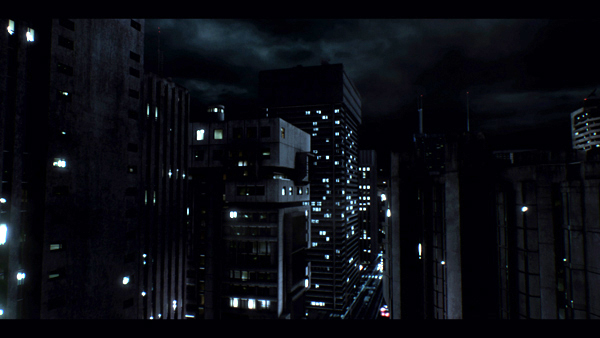
| SPIN’s City SPIN VFX supplied the opening and the closing sequences of ‘Underworld: Awakening’, enhancements to the vampire face of the young Lycan-vampire hybrid Eve, and the city set environment extensions. The team got involved quite late in the production and had only 12 weeks to complete and deliver some major shots in stereo. Initial discussions with James McQuaide centred on the opening shot of the film which needed to set the tone. “The humans are essentially exterminating the vampires and the Lycans from the old city,” said VFX Producer George Macri. “In the opening shot we needed to see humans executing Lycans and vampires, dragging them out of buildings, throwing them from the balconies and setting fire to these ‘body piles’. It also had to be clear that a new city was surrounding the old city, which was burning.” Subsequent shots were to show various types of city extensions, either the burning old city, the new city or a combination of both. Building styles in the old city had a gothic look, intended to resemble Budapest, while the new city required extensive buildings in the Brutalist style of architecture resulting in much more aesthetic visuals than typical skyscrapers. In all SPIN completed 66 city shots. |
|
  |
|
| Aggressive Schedule We started late September 2011 and were finished by mid December,” George said. “It was definitely an aggressive post schedule given the stereo delivery requirement on all shots – this was probably the most challenging aspect of the project. The shots themselves were difficult enough, but it was a huge exercise in pipeline and resource management. We were lucky enough to have a talented and seasoned crew on both the CG and compositing end, and almost everyone had extensive experience in stereo feature VFX projects. “James supplied us with a previs for the opening that we used for the overall timing and feel for the major structures that needed to be evident for the shot. Without the previs, I think we would have had far too many creative options to explore, which our schedule wouldn’t have allowed for.” James also provided the set reference, camera data and HDRI for their shots. Using the PIX system for online collaboration, he always made himself available for feedback, which VFX Supervisor Jeff Campbell feels was a key factor in accomplishing the shots as required and delivering on time. SPIN’s city extensions were either fully 3D rendered in Vray/Renderman, texture/matte painting projections in Nuke or 2.5D using multiplane cards and displacements to add dimension. “Camera moves, the extent of the city and the amount of geometry we would require were the main factors to consider for the approach,” Jeff explained. “For the shots that had a slight camera move, we rendered a lit frame from Maya, sent this render to a matte painter to add all the details and then re-projected back onto the same geometry in Nuke. We would also provide all matte passes needed to isolate areas in Nuke such as window reflections, glows, key, fill lights as well as street level lighting like store fronts, street lights and cars. Having control of lighting and textures in Nuke’s 3D space has many creative advantages.” |
|
  |
|
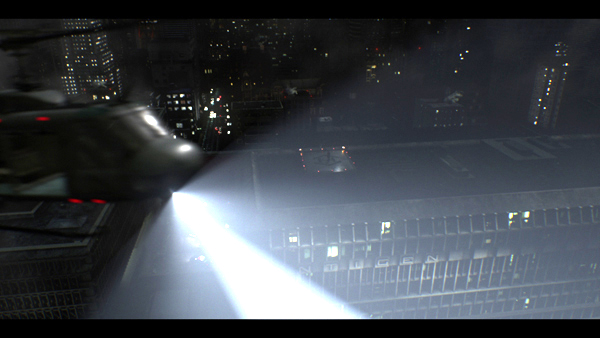
| Opening Shots The opening sequence was critical to the story for the audience and has so much going on in it that SPIN didn’t have the time for second chances to get it right. It had to be planned extremely well, and Jeff explained that the previs the production provided helped them with timing and expectations. “It was very ambitious with an extreme camera move starting out straight down at ground level and pulling back up over a building to reveal Selene examining all of the devastation around her. We added CG body pile fires, CG guards with flamethrowers, CG Lycans and vampires being tossed out of windows, CG victims being executed in the streets and CG helicopters searching the city - all in an extremely heavy CG environment. Furthermore, old bag of tricks you’d usually use to speed things up wasn’t available because you can’t get away with much in stereo. “We brought as much geometry into Nuke as possible but the composite was taking 16 hours to render at one time. Fire fluid simulations were done in Maya and rendered in 3ds Max using FumeFX. City models were built in Maya and rendered in V-Ray.” Epic Footage Jeff remarked on the footage from the RED Epic cameras. “Some shots were finished in 5k but we mainly received and delivered 2560 x 1280, 2.5k DPXs. Plates were converted to an EXR linear colourspace. We were getting some very nice keys from the green screens with very little grain or noise to deal with. There were the expected anomalies in one eye you get from shooting through a mirror but overall, the Epic footage was really good to work with. We didn’t need to use Ocula on many of the plates.” |
|
 |
|
| Vampire Face The team completed 54 shots of Eve, or Subject 2, involving vampire face augmentations and transitions from and to human. Jeff said, “Eve was required to have a combination of vampire features like her mother Selene and Lycan features like her father Michael. During look development our goal was to sort out a hybrid look that was menacing, yet attractive. The shots in which Eve transforms are when you see more of the Michael influence as her face momentarily takes on a more animalistic shape. “We used three blend shapes during her human to Lycan to vampire transformation. Veins were also added to signify an increased blood flow that initiated her transformation. The veins and her face were projected onto a geometry .obj sequence that was fed into Nuke. Most of the shots involved manipulating her live action makeup by tracking a series of mesh warps in order to shape her eyes and brow. We also gave Eve new irises, changed her skin tone and added CG fingernails.” SPIN’s work included the challenge of a digital double of the lead character, Selene in a shot showing her running across a bridge between two buildings. “We had lots of reference footage of her running to match to,” said Jeff. “A laser scan of the actress was provided, which we rigged, textured and animated in Maya. Joe Alter’s Shave and Haircut was used for the hair.” |
|
 |
|
| Varied Palette By now, in its fourth title, the ‘Underworld’ series has a well-established look – steely blue with rich blacks and strong contrast. For colourist Siggy Ferstl at Company 3, who graded this and the two previous films, ‘Underworld: Awakening’ was no different. “However, the filmmakers did want to freshen up this look somewhat, without losing the original feel,” he said. “The cinematographer Scott Kevan, the directors and series producer Len Wiseman all discussed ways to update the look. We introduced a slightly more varied colour palette with more colour separation, instead of the overall wash used previously.” Siggy, who was using the DaVinci Resolve grading system, said that the RED Epic camera Scott Kevan used for this movie proved especially effective for working on a project shot in dark settings, and it allowed them to push the contrast and to style and shape the images without degradation. He said, “The Epic images were very clean and made increasing the contrast easier because I didn’t have the problem you have with film images, where you risk enhancing the grain at the same time. The keying capabilities were also improved by starting with such a crisp, sharp image. Because the image had so much detail, I was able to isolate and key areas of the picture more readily than with other cameras I had worked with before. I had more freedom to adjust the look without worrying so much about preserving original detail and qualities.” Stereo Alignment Because of the production’s shortened post schedule, the 3D and 2D version of ‘Underworld: Awakening’ had to be delivered within only a couple of days of each other. Normally, after the 2D version is locked, there would be a week or two before the 3D delivery was required. “We set up specific workflows to handle the lack of time, allowing us to colour both versions simultaneously, keep working on alignment errors, convergence and windows in the background on the stereo side, and meanwhile lock down the 2D version,” Siggy said. “Visual effects updates were arriving up until the last minute, even after rendering out and delivering 2D and 3D versions. These updates then had to be cut into the DCP. The same happened with the edit, requiring new shots to be cut into the final version.” In the Shadows Blood, obviously, is a major issue for the ‘Underworld’ films and because the new palette, less biased toward blue, allowed more colour separation – and more red to show through – Siggy didn’t need to force its colour as much as in the other films. “The blood feels more like a part of the image. But one thing I do have to be careful about in these films is what is hidden in the shadows. Sometimes the action becomes very fast-moving, and you need to brighten the image enough to let the audience follow what is happening. On slower-paced films you can afford to keep a darker look.” |
|
  |
|
| Elaborate Transformation Fido VFX and animation studio in Sweden developed the concept and completed effects for one of the movie’s elaborate transformation sequences changing a human character into a Lycan monster. Fido had worked with directors Måns Mårlind and Björn Stein before on Swedish features, television and various pitches, although this was their first major production with them, and also their first ‘Underworld’ film. “We had been in contact with the production quite early but due to tax rebates in Canada, as well as a library already filled with assets, there was no chance to bid,” said Fido’s Creative Director and VFX Supervisor Kaj Steveman. “But when the final edit was getting closer, they realized it would need over 800 effects shots and therefore more VFX than the companies in Canada could handle. At this point the directors suggested we make a new approach toward Lakeshore and production VFX supervisor James McQuaide. This second round paid off. “The sequence included an elaborate transformation, and when we sent Lakeshore some references we included a shot we did for the Swedish vampire movie ‘Frostbiten’ some years ago, with similar kinds of effects,” said Fido’s Creative Director and VFX Supervisor Kaj Steveman. The references impressed James McQuaide and he offered Fido the job. The team was given creative freedom to develop a concept for a transformation in which a malevolent character, Dr Lane, would transform into a monstrous Lycan hybrid.” Having Kaj in Fido’s team was useful because he is also a make-up effects artist with 25 years of practical FX experience. Lakeshore had made it clear from the beginning that the ‘Underworld’ franchise would demand a more practical than digital CG look for the effects. |
|
 |
|
| Sequence Design Although they were not required to visit the set, Fido were supplied with data and set up a core team of creative artists headed by Kaj, Animation Supervisor Staffan Linder and VFX Supervisor Anders Nyman to devise a sequence that would stand out from transformations of this type seen in other films. Staffan explained, “We wanted to avoid a classic linear transformation from A to B, and developed a concept in which the character goes through a middle phase before becoming a fully developed Lycan hybrid. His body grows emaciated and the muscles and fat withdrew and shrivelled to a mummy-like character making way for the bone structure to re-form first and then re-grow new muscle groups and underlying fat tissue. The Lycan tissue and muscle growth then turn him into the tall, muscular Hybrid shot at the set.” Lakeshore were in favour of this concept, and Fido planned their approach. Most of the shots had been captured with body doubles and stuntmen, and after first considering using parts of the live character, they later used mainly full CG for the initial sequence. VFX Supervisor Anders Nyman said, “We had originally planned to use as much as possible of the live footage, but soon realized that CG was more practical and only used Stephen Rea’s real eyes and hair, in the very last shot. The rest was CG. “From set, we were given laser scanned environments, HDRI images and Cyberscans of the actors with and without makeup and lens info. We also received Stephen Rea’s teeth casts, to be able to replicate them when we created our CG assets of Dr Lane.” Modelling and texturing were done with ZBrush and Mari, and they used Maya and Houdini for animation. |
|
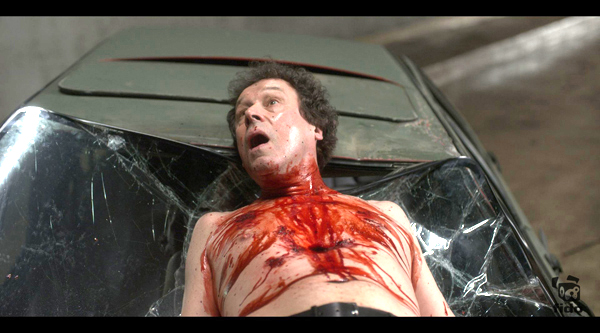
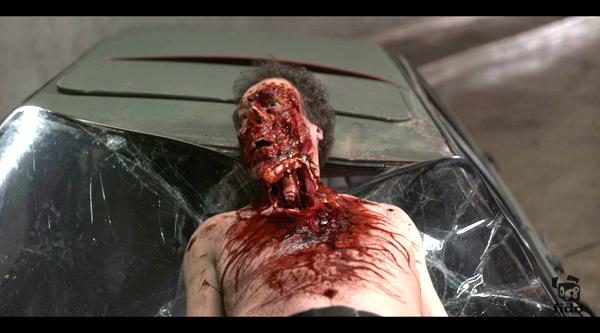
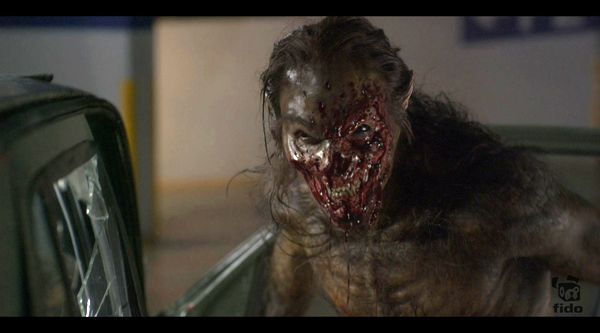
| Reverse Transformation The reverse transformation is unlike the first transformation in that it doesn’t use the middle step. The creative vision for the reversed transformation was that it should be more of a ‘fading out’, in which the hybrid desperately tries to heal himself while he’s drained of blood and ultimately dies. During this struggle to heal, he slips back into human form. In the following sequence, the young Lycan-vampire Eve rips the throat from the Hybrid before he transforms back into a dead Dr Lane. Fido modified the assets for both the monster and Dr Lane with a large sculptured hole in the throat and chest and added torn flesh and blood details. “Fido had experience working on stereoscopic pictures from our involvement in Sir David Attenborough’s documentary ‘Flying Monsters 3D’, and this helped us considerably. A lot of the material in ‘Underworld: Awakening’ was shot at very high resolution and at 77 fr/sec. This simplified the tracking process, but also put pressure on Fido’s pipeline and technical capacity and since all shots were stereo, it took twice as much space compared to other projects,” said Staffan. Fido has worked with very high resolution media for some time and developed their own workflow and asset management system called Ftrack (www.ftrack.com) enabling them to handle projects of all sizes, and is very helpful in projects like these, especially with tight deadlines. Fight Sequence Lakeshore asked Luma to make a concept design for the new face, and based on this, Magnus Eriksson at Fido created a CG replacement. Staffan said, “We modelled a 3D interpretation in ZBrush while preserving the impact of the original concept, which was basically an overpaint from one of the frames.” Further details were added to make it more convincing and Staffan added small animated pieces of flesh to hang from the face, covered in blood. Since Fido’s shots weren’t originally intended as VFX shots, they also had to overcome the lack of tracking markers or other technical data when tracking the shots. They had to rotomate most of the transform and throat-ripping shots by hand in Maya and stabilize them later in the composite, which was time consuming, and by the time they did the facial replacement shots they decided to use object tracking. They relied on a combination of Match Mover, Maya and Nuke for tracking and match moving. |
|


