

VFX Supervisor Soren Jensen and Colourist Dwaine Hyde from Digital Pictures joined forces with DP Mark Wareham to give ‘Underbelly: Razor’ its period looks, de-constructing the Sydney Harbour Bridge and creating the underworld of 1920s Sydney.
 |
  |
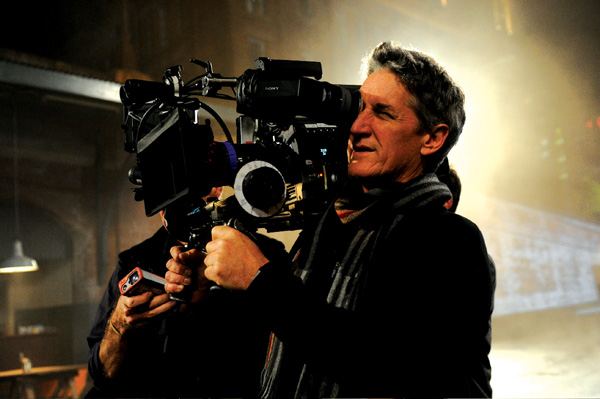
| VFX Supervisor Soren Jensen at Digital Pictures began working on ‘Underbelly: Razor’ very early in pre-production with the director of photography Mark Wareham and production designer Paddy Reardon, planning the best way to tell the story. Digital Pictures had completed the post and colour grade on all of the ‘Under Belly’ series with Screentime for Channel Nine, but this was the first time visual effects were to play an important role.
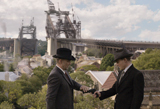
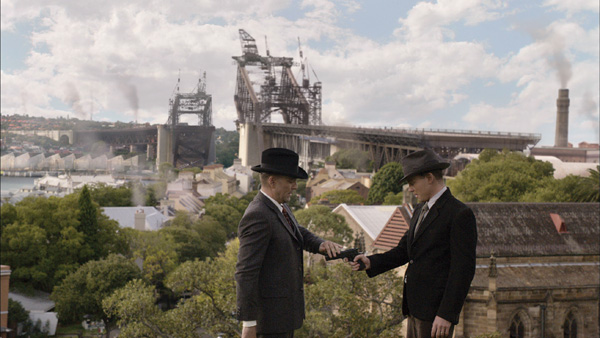
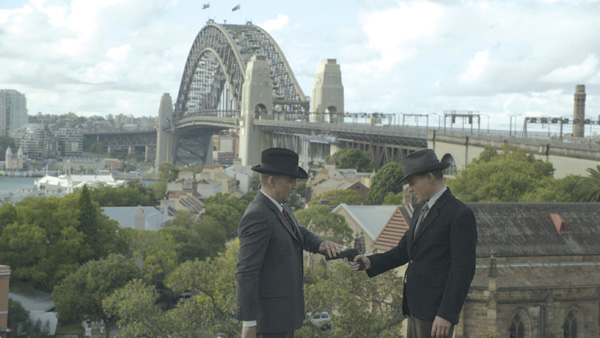
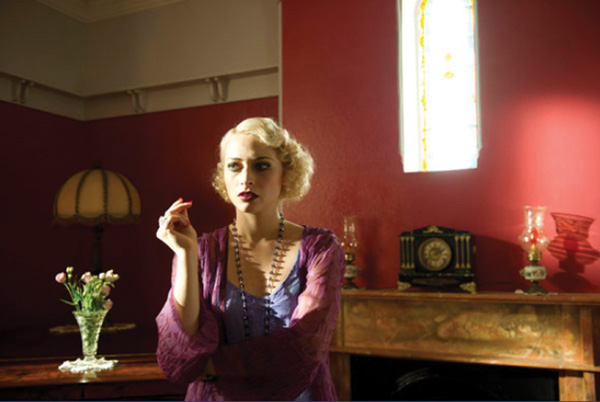
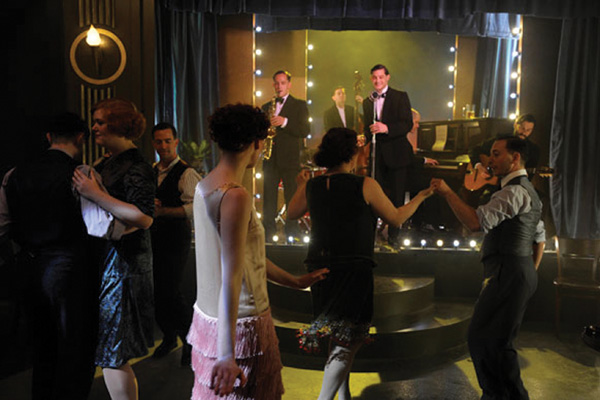
Historic Research The visual effects were required mainly for the location shoots, as most of their shots concerned transforming modern Sydney into 1920s scenes, removing and replacing high rise buildings and the Harbour Bridge, and adding smoke and atmospherics caused by the solid fuel people used at that time. “Fortunately, the shoot didn’t take place under blazing blue skies, which helped achieve the slightly gritty look the production wanted. Only a few sky replacements were needed,” said Soren. Building Bridges “The footage was captured as SR tape on the Sony SRW-9000PL, and we worked on ungraded plates. All material was captured at 4:4:4 and kept at HD resolution throughout production. Nothing needed upresing, including elements. It was of course heavy on space requirements but at that resolution the image quality and colour depth gave a much better result,” he said. Temporary Comps “Our pipeline ran from camera shoot to 3D placement, to matte painting, 2D work and finally to the grade. The colourist graded over our work and any subsequent tweaking was done on the treated shots. The 3D model was built in Maya, and Nuke and Flame were used for compositing. Most tracking could be done in Nuke as well, with some specific tasks done with Bijou. On Location The set location most often used was a couple of streets in the Block in Redfern, as well as Observatory Hill and in the historic Rocks area, which both give good views of the Bridge and include examples of the Bridge architecture, such as the 1930s stairwells. They also shot down along the wharf where the production found useful interiors and night exteriors in which Soren’s team replaced Luna Park with the original shed structures. They removed the Bridge and replaced it with progressively more complete versions of as it was built, until the final episode shows it complete. The 2D and 3D effects teams devoted to this project were small and efficient, working with a designer and two matte painters alongside colourist Dwaine Hyde. Soren said, “The producers at Screentime were very good to work with, with a realistic understanding of the resources production and post teams need to produce television programming. Furthermore, because this was the first time they had needed a visible, significant amount of visual effects they trusted our judgement on cost and time.” Colour Palette The production needed to stick to the same fast shooting schedule that all three previous series had adopted, although more scenes in ‘Razor’ needed to be shot on sets in a studio instead of on location. Therefore, taking time early on to work with Colourist Dwaine Hyde to develop the LUT for the rushes helped to establish many aspects of the looks in advance. Camera Testing “There were a number of other considerations as well, including a requirement that the show be shot on tape to meet various industry commitments in place for the series,” Mark said. “The production was also concerned about the storage implications of a file-based shoot because the previous series had generated a large volume of footage, and they wanted to view the rushes at midday to keep up with the tight delivery schedule.” The camera that seemed to meet everyone’s requirements was the SRW-9000PL, which he had recently used to shoot a TV series for Fox 8 called ‘SLiDE’. On that project, he found he could create in-camera speed ramps in the footage. This wasn’t necessarily of interest for ‘Razor’, but one of the directors, Tony Tilse, spotted the effect in the tests he liked the look and the ability to control them in various situations. Happy Surprises “Using the LUT also meant I could use my light metre to set up the lighting, instead of always checking the rushes. The nature of the costumes and props demanded that every shot be deliberately lit. The ‘Underbelly’ aesthetic called for a shadowy, gritty look but the sets needed to be highlighted in certain ways as well. We were always balancing between several competing factors act at any moment, including deciding whether to focus on being good, low-cost or fast!” Mark was mainly using Angenieux Optimo zoom lenses on the shoot, plus a set of Ultra Primes although he didn’t need these too often. He was mainly concerned about having enough depth of field and avoiding a high gamma, broadcast look. “The SRW-9000PL rolls off well in the highlights, though it doesn’t have the exposure range of the ALEXA, and I could control the contrast quite well with the on-set lighting.” The HD Potential Regarding ‘Razor’, he said, “I think it really paid off on this particular project. Shooting in HD has yet to reach its full potential. The SRW-9000PL for example, as a true 1920x1080 resolution camera, is almost ‘too good’ and you might be tempted to say it captures ‘too much’ data. But, based on the experience I’ve now had working with digital footage with post teams, I’m excited by the potential it has for look development.” Into Colour “We devoted three full days to testing the effects of different lighting scenarios on the costumes, textures and paints and checked how the sets looked on video tape. It meant making a few changes but also meant we all had the same expectations and knew what to expect. I helped Mark assess the tests he ran on different cameras, noticing in particular the level of detail captured, exposure and how colours looked. Mark felt the SRW-9000PL, which shoots using the S-log gamma, gave the best result under the lighting set up he wanted to use, aiming for a cinematic look with lots of contrast and depth,” Dwaine said. Storytelling During pre-production, they had discussed using colour to highlight different settings and scenes involving different characters. As the story unfolded on set and they could see the characters in their environments, they settled on the details of different looks. Dwaine also wanted to enhance the period feeling. Dwaine graded on a 2K DaVinci linear grading system, which suited the fast production schedule. “Mark’s images were quite easy and enjoyable to work with, well shot and lit. None of the shots needed fixing. I was just enhancing the in-camera looks,” Dwaine said. “Mark sat in on grading sessions for the first seven or eight episodes, which was really helpful. We spent about five days on the first one to establish the looks for different settings and scenes, and after that they only took a couple of days each.”www.omnilab.com |
  |
| Words: Adriene Hurst Images: Courtesy of Digital Pictures |


