Three Australian studios – Rising Sun Pictures, Method Studios and Iloura - put an array of VFX techniques to work to bring this classic superhero’s story to life for ‘The Wolverine’.
The Wolverine Lives Forever |
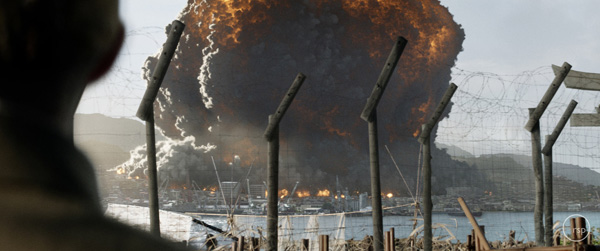
| Rising Sun Pictures’ work on ‘The Wolverine’ starts with a blast - a nuclear explosion that opens this superhero’s story in 1945 when Logan, the Wolverine, is in a World War 2 prisoner of war camp in Nagasaki, Japan. In all, the facility completed 266 shots for the movie over an eight-month period from October 2012 to June 2013. |
 |
 |
|
Before the BlastAlthough the team needed to avoid a ‘stock footage’ look for this explosion, they nevertheless did quite a bit of online research for it. Nick Pill, art director at RSP, found a front page of the New York Times showing a nuclear explosion captured in the moment before the mushroom cloud developed. This black-and-white image of Nagasaki represented important reference for them because they could use it to create that image the director wanted of a massive cloud of smoke looming over a street scene before the explosion. |
|
|
 |
|
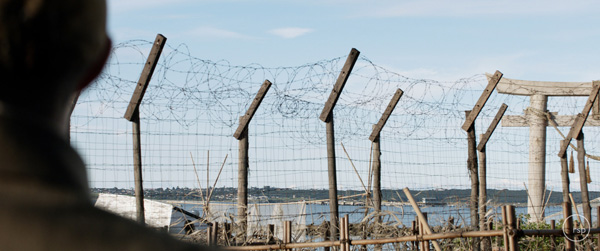
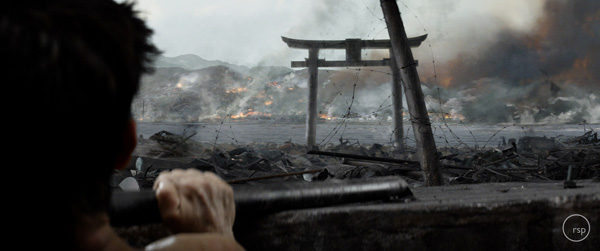
A further challenge was the destruction on the ground that had to be shown as well and the poignancy of this moment in history as the team researched their work. The shoot took place at Botany Bay, south of Sydney, where a POW camp set had been built. Because in the far horizon the plates reveal a small slice of Sydney, each time the camera looks out across the water they replaced the background with a section of a very large digital matte painting. This matte painting, originally built to recreate 1940s Nagasiki to replace Sydney as the pair of bombers emerge from the clouds, served as a master painting for the sequence and was also used for tighter shots when the explosion ignition occurs, followed by its progression stage. They developed further matte paintings based on historical information of Nagasiki at that time, projected onto simplified geometry matching this information. The geometry was also used as collision geometry for the explosion. |
 |
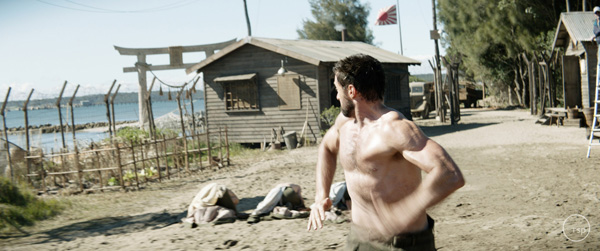 |
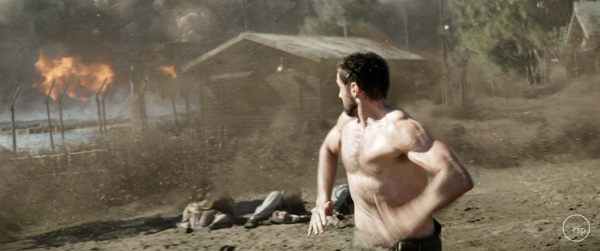
Expanding GeometryTo design the explosion itself, they first trialled different shapes, sizes and speeds, working in Houdini 12. Scale was a challenge. The bigger they made it, especially without also increasing the voxel size of the simulation, the more processing power it needed in order to increase the speed enough to work within the context of the sequence. Making it look massive meant devising short cuts in the code to avoid rendering every fleck of dust individually. Using proprietary tools, they combined the simulation with sculpted geometry that could also expand. Once the director approved the shape, timing and speed of their low-resolution examples, they spent another couple of months sculpting it in a way that could be efficiently rendered. Following the detonation and spread of the explosion, tighter shots of Logan and the young soldier Yashida running for shelter required pyroclastic waves, one of which lifts Logan from the ground and dumps him into a well where they both manage to survive the blast. “This was a challenge. In the original plates, there is a green screen behind them, and behind that green screen was the POW camp set. We had taken a LIDAR scan of the set, converted this data to geometry and rebuilt it in CG so that we could destroy it,” said Tim. |
 |
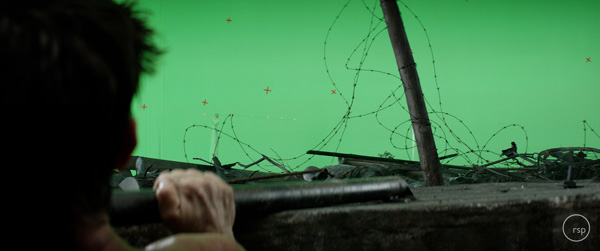 |
Waves of Destruction“At the same time, like the CG team, the effects artists also took the data apart to determine a ground plane and run their effects over the LIDAR grid. The sequence was an organic process involving several of our teams, first getting that wave of destruction moving towards us at the right pace, then plugging in the wave effects to bring it forward to reach Logan at just the right moment to appear to lift him up and throw him down the well. The elements we retained from the plates were Yashida, Logan, the turret of the well they were heading for, and the ground plane. Everything else was replaced. But without that live action set in place to refer to it would have been much harder to work out what we needed to build and how it should be put together. “Also, our simulations – such as wind whipping around objects - could be designed much more accurately this way. Developing the effects took about three months, including flying debris from broken buildings, simulated through Houdini with different fields and forces working in the background to explode them. Those bits would then turn into shrapnel, shards and planks of wood flying toward camera. Because the operators were using a wide lens for this, their path had to be consciously choreographed to travel toward the camera instead of quickly flying off screen. “We used fluid simulations to control the waves to move as if moving toward the viewer at 200mph. To manage the particle and debris effects, our compositor was rebuilding his Nuke tree every two weeks or so.” |
 |
|
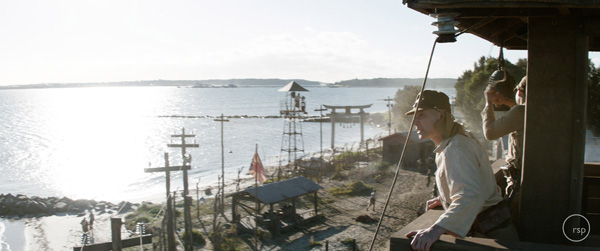
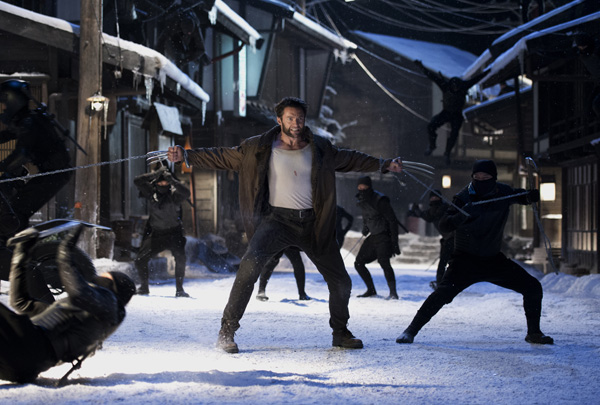
Tim commented that designing the final looks for the aftermath of the explosion made fairly grim research. They were based partly on general post-apocalyptic images found online from various places, and partly on how much destruction the production wanted to show, which was quite a lot - in short, total devastation. Maya’s Bullet Physics engine helped them generate the right level of destruction in their scene, and they could paint the resulting effects over their original Nagasaki matte painting, adding smoke elements and small CG explosions. Adamantium ClawsA primary climactic night sequence, in which Logan runs through a snow covered Japanese village under a rain of arrows, was shot on a live, built set constructed in a large car park near the Olympic Park in Sydney. The set was extensive enough so that most of what the audience sees as Logan is practical. The team’s work focussed on the action here, and their only environmental work was extensions at the end of a few roads, adding snow to background mountain scenery used in the matte paintings, and Yashida’s illuminated laboratory itself in the distance. Tim served as VFX supervisor overseeing the two-week shoot, working with 2nd unit, while the production VFX supervisor Phil Brennan worked on the main unit shoot taking place at Fox Studios. |
 |
|
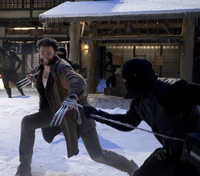
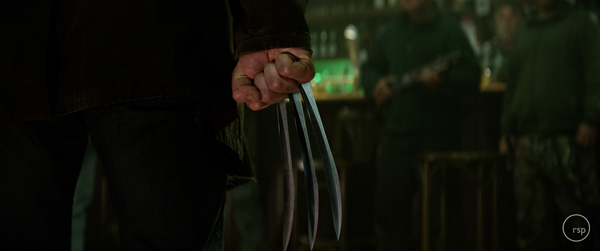
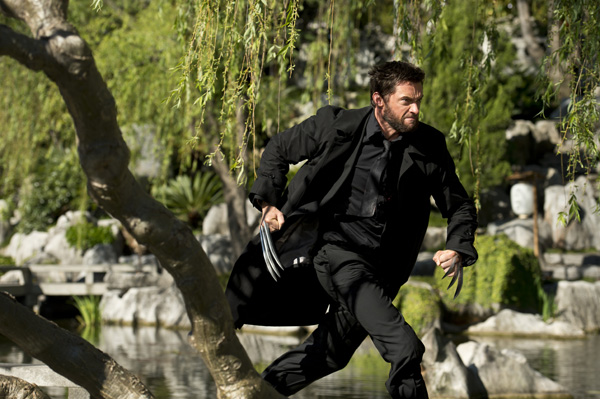
Throughout filming, Tim needed to make sure the team at RSP had a constant stream of data for this sequence because they needed to add claws to the Wolverine as part of the action. “The Wolverine stories introduce both bone and metallic ‘adamantium’ claws,” said Tim. “The best known are the adamantium version, based on an aluminium prosthetic prop about 12 inches long that the actor can hold so that they appear to emerge from his knuckles. When the pace of the fight choreography picks up and the full claws become a risk, the actor sometimes wears short stubs that the team could match move and base their CG claws upon.” The moves had to be quite accurate because the fights were a major focus. Therefore, a digital double of Logan was built from a Cyberscan of actor Hugh Jackman. By constructing this with a fairly simple rigging set-up, they could precisely follow all of the actor’s movements – but with the claws accurately positioned. The look of the metallic claws had to be refined as well, to sit correctly into the shots and stand out only as a point of interest, not unnaturally. Tim captured HDR images at each moment and place that the CG claws would be used, and the team was given a physical set of claws to base their models on. The more exciting and active the fight, the more likely it was that CG claws would be needed. If even the stubs were going to be too dangerous for the performance, the actor would only wear tracking markers on his hands. In some of the long distance shots, a set of lighter, safer plastic claws could be used. |
|
|
|
|
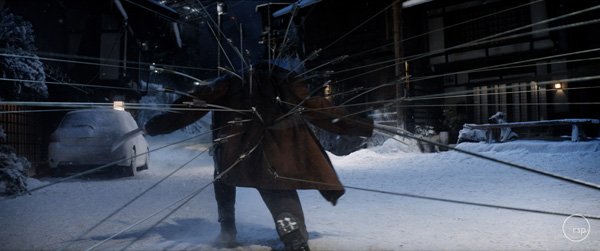
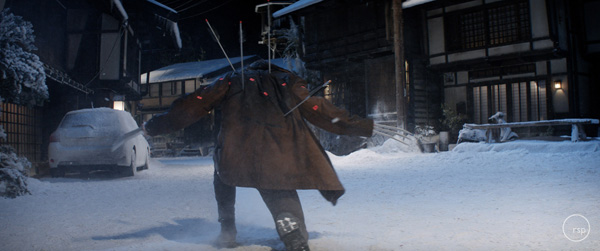
Performance-based CGThe RSP team created the arrows Yashida’s henchman shoot at him out in the dark snowy street of the Japanese village, and the long ropes that extend back from them. These very dramatic shots were thoroughly storyboarded for the essential action, but because the nature of the CG elements – arrows and long ropes – would need some precision to create, animate and composite into the scene, the team’s work was going to depend on how the performance actually played out in camera. Also, genuine pre-viz with animated arrows was difficult to work out correctly in advance. Therefore, they waited until after the shoot and carried out post-viz instead. When the cut was virtually locked, the lead animator Victor Glushchenko created the arrow animations as overlays on top of the action to show the director before they committed to any CG work. Only when Jim was happy with the plan, taking drama, realism and the feel of the original graphic novel into consideration, did they proceed with modelling and animation. The ropes attached to the arrows that Yashida’s henchmen fire at him to bring him down needed to bounce correctly to show that the archers were pulling them taught. The artists used Maya nHair, the curve-based dynamic simulator integrated with Maya’s other n modules, for this. Night ShiftTrue to the story, the village sequence was mainly shot at night. Stunt actors were taking over Logan’s action while the lead actor worked with the main unit. Tim said, “A challenge for lighting on a night shoot is the changing quality and position of the shadows as dawn approaches. The crew was using a huge moonlight rig positioned above the set, approximately 20m long by 10m wide, flooding the set with a cool-toned light. I worked with the DP on further lighting set-ups and captured abundant HDRIs. About 10 such set ups per night were required. We worked straight through for 10 hours most nights for the two weeks.” |
 |
|
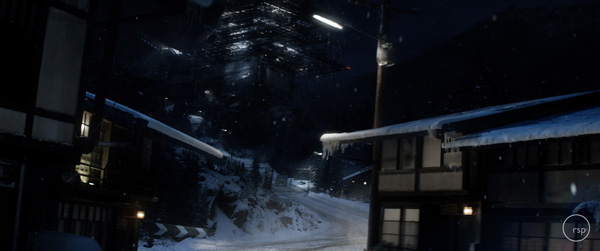
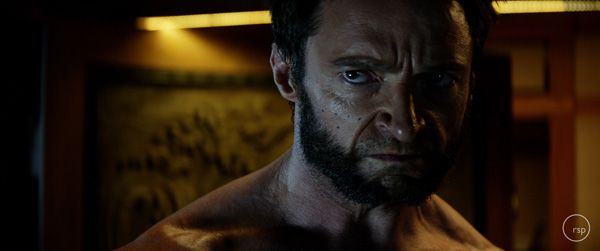
The sinister Yashida laboratory in the distance was a principle story point and one of the few parts of this environment the team had to build. All the views of the building among the reference from Art Department started at the base, looking up, but RSP had to show it almost straight on from a distance. Their approach was to build the structure in 3D and project a matte painting over this. As it was lit from within and appears in a dark setting, they had to use this lighting to reveal its Japanese style. Maya and Houdini form their main CG pipeline, so they can light in both as well. When setting up lighting rigs for effects elements built in Houdini, the FX team works with the lighting department, while the general CG lighting comes straight through Maya, using Mantra to render the Houdini elements and 3Delight for Maya. They use in-house proprietary code to switch between the two applications, and can bake out elements from Houdini and render them in Maya for example. This allows them to take advantage of the strengths of each software in the same shot if necessary. Blend ShapesOne of the Wolverine’s key characteristics is his body’s ability to heal severe wounds very rapidly. An example is when he rises from the pin bed in Yashida’s hospital, severely wounded, and the treacherous son Shingen attacks him, gashing his face. This wound immediately begins to heal over. “The low lighting on the set made it difficult to give an appreciation of the depth of the gash,” said Tim. “Also, during the shoot the actor had only worn a limited set of tracking markers. |
 |
 |
|
“We started with a Cyberscan of Hugh Jackman’s head, converting it to a polymesh that could be match moved to the live action using blend shapes, which allowed us to warp the mesh for a better fit to his movements and head. We could have rigged the mesh to match the separate facial muscles very perfectly but this is very time-consuming and usually only warranted for extensive head replacements. Once the mesh was in place we built the scar and then brought this into Houdini to procedurally animate the healing process. We supplied animation points along the progression but this technique meant we didn’t need to keyframe. Facing the WolverineThe team had one further, quite different environment to recreate – that of the Yukon setting where Logan is living alone up in the mountains when this story begins in the present day. Their sequence was shot at Picton, a small town outside Sydney. The set was dressed with practical snow, in which they added mountain scenery in the background and extended the street. The views were compiled from matte painting projected onto geometry, based on photography shot at a location chosen to match the looks the production wanted. |
 |
| All images above: The Wolverine © 2013 Twentieth Century Fox - Images supplied by Rising Sun Pictures. |
|
In some scenes that used stunt actors when Hugh Jackman had to work at another location, face replacements were required. One of these was a fight scene at a temple shot at Sydney’s Chinese Gardens, where RSP was responsible for both environmental and combat effects. They not only swapped out Sydney’s landmark buildings with imagery of buildings shot in Tokyo but also replaced the face of Logan’s stunt double as part of their combat effects, match moving 2D images taken from rushes shot in similar lighting. These were tracked onto the actor in Nuke. “As a 2D task, this work can take a lot of artistry, especially since this actor’s face is so recognizable. 3D elements can be more flexible to work with as the characters turn their heads, but using the 2D elements gave us his real face,” said Tim. Bed of PinsThe team at Iloura in Melbourne, led by VFX supervisor Glenn Melenhorst, completed just over 100 shots for the film, including a sequence featuring one of the most intriguing effects in the film, a medical ‘pin bed’, made up of steel pins that intuitively follow the contours and movements of a patient’s body. Glenn said that, as a 3D object, the bed’s primary challenge was the meticulous integration detail required with the actor that had to be maintained throughout over 60 shots. To get started on the build, the concept for the bed and its physical green screen prop already existed when the Iloura team was awarded the job. “Production had been hoping to lean more heavily on a physical pin bed they had made, but decided at the 11th hour to shoot quite a few more shots with the green screen bed instead, which then needed a CG replacement. As a result, no previz had been done for the sequence at all,” said Glenn. “There had also been no opportunity for us to visit the set, but we did have on-set data gathered for us by the production VFX supervisor Phil Brennan. We were provided a plate containing the actor on the green screen bed, which we replaced along with the floor and base of the bed, should it appear in shot. Closer Interaction“The green screen version of the bed was actually a green cloth draped over a series of poles with supports that the actor could lie on. The poles could then be lifted up and down to articulate the actor’s limbs. Apart from camera data, a few tracking markers had been placed along the hard surface rim of the bed - and that was all. Back at Iloura, we began by tracking the shot in Syntheyes before rotomating the actor and all of his subtle motions. We built a pin bed rig that drove the pins either up or down to meet the digital double, with controls for fall off and custom animation.” When trying to create close interaction, the biggest challenge for the animators was that the actor was supported by a series of slightly wobbling poles, not a unified surface made of pins. In almost all shots, Yashida’s limbs would sway left and right which, when placed on their pin bed, looked awkward. They would either need to make the pins rise and fall in rapid, twitchy movements or Yashida’s body would have to be fixed down. |
 |
| The Wolverine © 2013 Twentieth Century Fox – ILOURA |
|
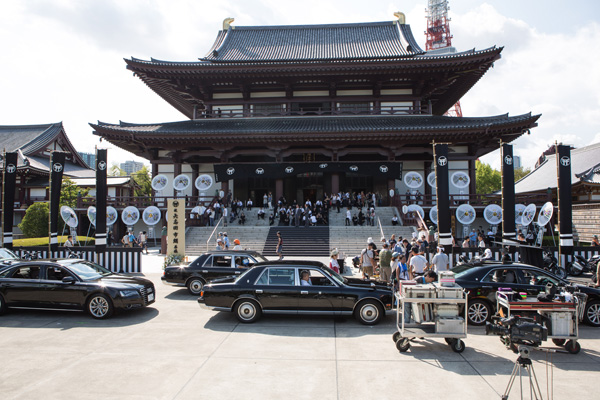
Glenn explained, “We elected to go for the latter option, animating the pins to meet his motions, then averaging out some of the high frequency jitters and jumps, and then pinning down and warping his body. Shoulders were pinned along with his arms and legs which were sometimes split into several sections and pinned and warped independently from each other.” Hall of MirrorsThe very shiny steel material that the pins are made of added some challenges to the job in terms of lighting and reflections. Oddly, they had to reflect the environment and Yashida into the pins more strongly than true pins, meaning that if the ray tracer reflected all the pin heads into each other, it made a kind of ‘hall of mirrors’ effect. “Our digi double served to project reflections back into the pins, and HDR images of the environment, animated to reflect the changing lighting in the room – from the lightning in the sequence - provided the reflection maps for the rest of it. At times, an actor passed between the lens and the pins, when we would create simple reflection blockers to simulate their reflections as well,” said Glenn. Iloura also brought to life to a small robotic medical ‘beetle’, a tiny but vicious parasite that Yashida’s evil doctor attaches to Logan’s heart while he sleeps to interfere with his self-healing power. The crew modelled, rigged and animated the 3D beetle based on production artwork and gave it an aggressive personality by drawing on outside reference for the animation. “You know instinctively, from childhood memories perhaps, how a beetle or a crab struggles when you hold one in your hand,” Glenn said. “From that start point, we just exaggerated the movements. We wanted it to look as though it was thrashing about just trying to escape and survive. I think treating these creatures more like animals than machines is the key to imbuing them with personality. “The beetle came to us a one piece of concept art that we developed and evolved into the creature you see on screen. We tried different legs and tentacles and colour schemes and internal functions until we had a convincing result. The tendrils of the beetle were rigged to be animated as IK, Forward K and as a dynamic solve to give our animators the flexibility to get whatever they needed for the action.” Tracking and RotomationLike Rising Sun Pictures, Iloura also worked on shots showing the Wolverine’s superhuman healing power but because these shots involved severe total upper body and facial burns and included full hair regrowth, their approaches were somewhat different to RSP’s, using complex body tracking and rotomation among other techniques. The progressive healing effect, transitioning from wounds to healed skin, and from no hair to full re-growth was mainly achieved by hand painted maps, mixed and blended before application to their 3D model. “Procedural noise patterns always reveal themselves,” Glenn explained. “They can form a good basic starting point but the progression and detail of the healing always works best when planned and executed manually. For reference, fortunately or fortunately depending on your point of view, the internet furnished us with all manner of pretty graphic imagery. “The plates we worked with were challenging in themselves. They contained no tracking markers, his skin was wet and glossy, he was convulsing and shaking, his highlight often peaked out to flat white and he was shot in a smoky environment. Two of our artists, Paul Buckley and Sam Jensen, spent over two months just creating a matching digital double for the shots.” They hand-sculpted blend shapes for muscles and laboriously screen space-pinned the double’s mesh to Logan, roughly tracked. Broad skin patches, moles and details pulled from the plate by aggressively grading it were used to hand track each point. Glenn remarked, “There was nothing automated about the process, unfortunately, and we put a massive effort into it.” Streets of TokyoMethod Studios’ Sydney facility completed 122 shots for the movie, divided into five sequences that mainly focused on complex environment work and 3D compositing to extend sets or create specific views. In particular, the live action shot for sequences taking place in Japan needed enhancing in post to make it work for the purposes of the film, especially in terms of continuity. |
 |
| The Wolverine © 2013 Twentieth Century Fox |
|
“We were sent a series of selections that editorial thought would work, but we had long takes of material. During some back and forth with production to hone the backgrounds, they were open to our suggestions. Visually, the edit looks very close to the first cuts we received, but the detail in the backgrounds is fairly heavily manipulated by our team for perspective, alignment, lighting and so on.” Shinjuku StationAlthough they did not have a chance for on-set supervision, James had an advantage in that he is very familiar with Japan, especially Tokyo, to help guide their general visual approach to those sequences. Also, the on-set database Phil Brennan provided to them contained a generous amount of information. One of their sequences was to take place on a platform at Shinjuku station, an active, working station in Tokyo where the crew wasn’t able to shoot. “The production built an impressive set, comprising a nicely detailed partial platform with a partial carriage, shot on a green screen background. With those elements in the plates, plus a bit of the bullet train,” said James. “Our job was to extend both the train and the platform, as well as add extra people into the background to make it feel crowded and full. Given the amount of shiny surfaces, the train particularly, we also needed to restore some pretty heavy green spill throughout. “A series of 3D matte paintings was produced for the environment based on stills provided by production and from many of my own stills. We could rely on the in-camera lighting to light the CG platform. While the paintings were developed as 3D objects, they were projections created in Nuke, so we didn’t really need to worry about getting a match to on-set lights - if the light didn’t look right in any shot, we were able to alter the painting to match the live action.” |
 |
| The Wolverine © 2013 Twentieth Century Fox |
|
For a driving sequence, a group of actors had been shot inside a car on a green stage under some interactive lighting. Otherwise there were no other visual links to an exterior scene. The background plates were shot while driving through Tokyo using a multi-camera rig. Method’s team then needed to put the two together, adjusting and adding further interactive light to match the foreground elements, and adding interior and exterior reflections to pull all elements together. Penthouse ViewsAnother example was creating views across Tokyo from a penthouse apartment. The production provided the team with plates of the backgrounds, which they manipulated to show what would be seen from each window. In the end, they also went ahead and located the exact building in Tokyo and calculated the height to make a simple light map for the sequence. James said, “We were given R3D source material for the backgrounds. We stitched these images together, depending on the camera angle, and placed some activity into the background such as lights, billboards, fogging and so on. Most of the projections for this sequence were straight forward eye-matching. Because we knew where the actual building was, and how far away the other buildings were, we could be reasonably accurate with placement, but we didn’t go for extreme accuracy on the positions. If it looked right, it was right enough for this sequence. Where point cloud techniques were useful was in dealing with objects like the billboards for shots in downtown Tokyo, produced in Nuke and based on a camera track. “We tend to use point clouds for almost everything we do, and most of those we generate are quite simple. In this case we could use point clouds and the Nuke modelling tool to generate geometry for the matte painters to base their work on – not highly detailed by any means, but we were able to turn around those shots in days, and simultaneously start 3D and matte painting at the same time. We used Maya to create the lighting for neon signs, and the associated light spill. Brute ForceAccording to James, their techniques for patching the scenes together mainly involved brute force. They would align the cameras in 3D space in Nuke and get the plates to sit together optically as best they could. If a stray car came too close to camera, it would distort. They would rotoscope or remove that car and correct the perspective. The same could happen in the background as well, with people or with buildings. James said, “There was no real magic to it unfortunately, it was just hard work. For example, we occasionally used elements from different shots to patch backgrounds together or hide something that we simply couldn’t fix. In doing this, we quite often needed to correct perspective on these elements, usually vertically, which we usually did using a projection. Sometimes, if the element wasn’t moving in the shot much, we’d adjust using a simple distort. “Because the average downtown Tokyo street has light spill everywhere, foreground elements were generally shot with this in mind. We did do some relighting, simply using 2D techniques, but most of it sat well together.” The tracking work was done in Nuke, and 3D modelling in Maya except where Nuke was used for 3D matte paintings with textures produced in Photoshop. All 2D was Nuke as well, with the exception of some of the animated signage, for which After Effects was the tool. |
| Words: Adriene Hurst Images: The Wolverine © 2013 Twentieth Century Fox |