|
MPC’seffects team in Vancouver started testing shooting methodologies and technical solutions for their samurai sequence in June 2009, six months before the shoot. The R&D team also started work on their destruction toolkit and retiming solution. About 70 artists worked on the production overall, under VFX Supervisor Guillaume Rocheron.
Techvis
They used a process they called ‘techvis’ to show different options and help production VFX supervisor John DJ DesJardin and fight choreographer Damon Caro decide how to practically approach each beat of the sequence. Guillaume said, “Techvis captured action beats performed by the stunt team with three witness cameras, transferring the action onto the samurai and then positioning the cameras and action within the digital set. Traditional motion capture can produce great data, but it can definitely be a constraining capture process.
“Our idea was to minimise intervention on set to avoid constraining either the director or the stunt team. We designed a performance capture suit for the stunt actors, hoping to track and retarget their performance directly onto our CG characters. But we quickly realized that because of their size and proportion differences, a lot of editing would be required. The footage worked better as a reference for our animation team rather than mechanically tracking and transferring the animation. We adjusted the performances to our characters while capturing the body mechanics and language of the stunt performers.”
Stunts vs CG
Using techvis also helped decide what should be practical and what would be CG. Early on in the project, they could identify how and where a CG character for Baby Doll could be used to help the stunt work. The rule was generally to let the stunt performers begin or end a move, taking over in between in CG for the extreme hits, jumps or flights. Tracking tools were Boujou and 3DEqualizer.
“For example, when Baby Doll defeats the second samurai, riding on his shoulders until he crashes to the floor, we took over from the CG character to live action once she jumps down from him, to make her fall feel connected to the samurai,” said Guillaume.
Techvis impacted on the set itself. The art department had designed blueprints for the pagoda and everyone had a rough idea of the progression of the fight and where each action beat should happen. For example, they knew that Baby Doll had to be close to the very back wall after defeating the first samurai so she could slalom between all the columns that the second samurai destroys. Constructing this first fight led into adjusting how far back that wall was and how large that section had to be, which determined how much distance she had to travel back to kill the second samurai.
Armour Cladding
The process also helped define how far the various light sources would be from her at each stage of the fight and let the actors see the context of the shots and eyelines. “Internally, this has been great as we knew exactly how our shots would look ahead of principal photography,” said Guillaume. “Techvis gave us camera and set coverage information as well. While we realised that there weren’t many areas that were never visible in any shot, we could optimise how much detail to provide for each section based on camera proximity. We knew that the side walls of the courtyard, for example, were never seen close up. They just had to work within a certain distance.”
Cladding the samurai models in armour had to accommodate their moves, while looking authentic. Traditional samurai armour is designed for fast sword fights, allowing a maximum range of movement with the minimum weight. It is made of leather and ropes, the strongest part being made of wood. They kept this basic concept, referencing real samurai armour pieces. It naturally allowed the characters to perform the broad range of movements the sequence required but presented serious challenges when articulating and deforming the hundreds of pieces around the strings and ropes.
Samurai Scale
“In the end, however, the character team, led by Angela Magrath, had to do very little in-shot rigging tweaks since most of the samurai actions were achievable within the limits of their armour. We did what we call a techanim pass on the animation on every completed shot, to add secondary motion to the armour plates, for example. Animation was done with Maya and in-house tools,” he said.
“From an animation standpoint, the samurais had to combine agility and weight. They are so large that each of their hits inflicts dramatic damage to the environment. The first sends Baby Doll flying 150 feet into the air. We used a fair amount of digital takeovers on her for those hits, since each one sends her 30 feet back - huge and unrealistic from a human perspective but showing what would happen at ‘samurai scale’.
No Guess Work
“Director Zack Snyder paid great attention to camera lensing, moves and positions while we were doing the techvis for this sequence, right up until he got exactly what he wanted. This was great for us because there was no guess work to do during principal photography,” said Guillaume. “It’s always a challenge for the DP and the actors to shoot a massive moving character that is in fact not there. With our techvis in mind, a 12ft samurai stand-in was used for eyelines and a stunt performer played the samurai for hits and travelling.”
They aimed to base all assets and textures on real world references, as they did for the armour. The entire pagoda environment was based on various temple pieces. They used a column from one temple, a candle rack from another one and so on to give a degree of grittiness to all CG elements suggesting that these samurai had endured many fights and that their temple had been standing there for ages.
“Dealing with such stylized material needed this attention to detail to ground the big CG world in some sort of reality. Our asset management system used MPC’s packaging system, designed to deal with the increasing complexity and dependencies of our assets so we can put more time into creative work,” he said. “For modelling and texturing, we used Maya, Mudbox, Zbrush, Photoshop, Bodypaint and our custom software.”
Colour and Contrast
Most of the extreme coloration and contrast in this sequence actually comes from grading in the DI. They knew Zack would apply a fairly heavy grade, but decided to deliver a realistic colour balance to give him more options in the DI. “Our philosophy on lighting and compositing was similar to our approach to the designs - ground everything in reality to get something photographically correct, then add elements on top to reach the stylised look Zack was after,” said Guillaume.
While the exterior relied on traditional HDRI lighting, the interior was much more complex, made up of numerous localized light sources. The lighting team used PRman point-based illumination to generate full global illumination of the interior set, giving correct illumination for the thousands of light sources. Using this realistic base, extra lights and reflections were added on a per shot basis to emphasize certain elements and stylise the look. Atmospherics were also used extensively to diffuse and propagate light.
|
Anime Snow
The exterior and the interior represented two different scenarios for atmospherics. The courtyard was in a very foggy, overcast lighting environment. To help sculpt the fog and modulate its intensity with the sun, an in-house atmospheric shader was used to compute the volume of light in a given atmospheric density. “We definitely forced it beyond what you would see in real life to give us some interesting volumetric light densities in different areas of the courtyard. The falling snow had to be slow, gentle and anime like, almost surreal. We used particle simulations to choreograph it to the framing and action. 2D smoke elements added an extra layer of grittiness in that beautifully timed snowfall,” Guillaume said.
“My main concern when we started the interior lighting design was keeping a photographically correct exposure without the shots going virtually pitch black. To keep control, the fairly heavy atmospherics helped diffuse the light and raise the overall black level of the environment. As in the exterior, we used our volumetric shader to compute the diffusion of the main light sources. Atmospherics helped model the light intensities and sculpt the final image. Extra dust simulations and fine particles, with 2D dust and smoke elements confined diffusion to certain parts of the frame.”
Speed Control
They chose 100fps as a good average speed for the sequence and output the shots at both high speed and 24fps. Some shots came in at 50 or 120fps, but their retime toolkit, using Maya, Nuke and in-house tools, has been designed to work at any rate. “The idea is that you can specify the frame rate you want to work at shot by shot, and the output speed through a linear retime or a retime curve. The main challenge working at high speed was the artists themselves. Animators need to get used to different spacing in their keyframes, and FX TDs need to revise their settings so the simulations behave properly at those higher frame rates,” Guillaume said.
“Nuke was our primary compositing package. Our in-house passes management system helped deal with all those layers coming from lighting. We could set up template shots and upgrade the input files easily to another shot. Using our lighting toolkit Tickle, for example, which is connected to our asset management system, if a lookdev artist upgrades shaders or light rigs, the update is propagated quickly through all the shots. A shot specific layer is always made but we tried to standardize what came out of 3D as much as possible so we could focus on the images instead of managing layers.”
Waging War
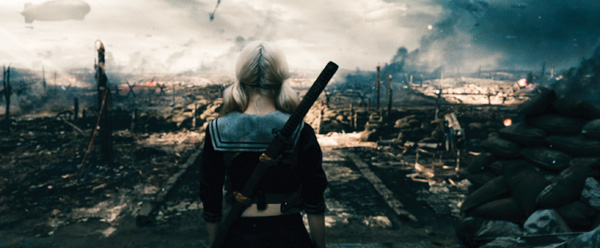
The VFX team at Pixomondo spent 12 months on ‘Sucker Punch’, including the director’s cut, starting in October and November 2009 during early preproduction. Their work involved creating a complete 360° environment depicting World War I experienced from the trenches under an explosive air attack, and encompassed 220 shots.
“We designed WWI planes, the zeppelins, environments such as the German headquarters and gunners nest and all smaller assets,” said Thilo Ewers, Art Director and Environment Supervisor at Pixomondo. “It all had to have a steampunk look. The preproduction was an ongoing process. Intensive look development took nearly three months before we refined the existing concepts with specific designs for our sequence such as logos or decals. Previs was ongoing as well. We spent an initial two months on previs and postvis, but did more whenever new shots were created or added.”
The WWI environment was a huge task in every respect. The team first constructed a map of the whole setting, as it had been laid out in previs. “We divided the whole sequence into sub-sequences and subsets and began to define locations, ranges, angles, sun directions and distance,” Thilo explained. “We ended up with a pretty accurate top map of the whole environment, with the cathedral at its centre. This map was the basis of our master scene in 3D and later in 2D as well. As we had received a lot of LIDAR scans of the sets, we could align all of these in 3D to our map. We imported our match move camera as well, and aligned everything perfectly.
Extreme Camera Moves
“Then we could start building major assets such as the cathedral, the gunners’ nest and the German headquarters with its industrial complex. Most of the camera moves had been laid out in the initial previs and remained the same in the postvis. As we had extreme camera moves in all sets, we had to build the assets fully in 3D, using 3ds max and ZBrush, and refined them later with paint-overs or matte painting extensions. We also produced renders of all assets at different angles to use in matte paintings and composites as bases and cards for matte extensions. After this process we had a master scene with proxies of all important features in our world - the cathedral, the trenches, ruins and battlefield, the gunners’ nest, the German headquarters with the crash site of the hero zeppelin.
“We evaluated which scenes would need full 3D renders, and which could rely on a card based representation in Nuke. Mostly everything at a distance is a card. We developed a method of painting textures for debris, stones and other small assets in the scenes such as the battlefield sequence. Most of the explosions, sky fires, smoke, dust and tracers were done later, in Nuke’s 3D space. There were exceptions for hero shots such as the Zeppelin crash and some hero full CG FX. For the matte generation we used deep compositing techniques, and used relighting techniques for the interactive lighting. Our lighting was handled in 3ds max with V-Ray.”
Concept Art
Pixomondo received initial concept artwork from the production Art Department, which they interpreted and extended to other assets not included in the original concepts. This gave them the opportunity to design many assets themselves such as airplanes, decals, flags, the entire cathedral set and surroundings, guns, impact craters, barbed wire, Spanish horses, ruins and old tanks.
“The battlefield, zeppelins and German headquarters were special exceptions,” said Thilo. “We designed them practically all from scratch. We looked at steampunk art and old industrial complexes and refineries. We bought books on WW1, battlefields, airplanes and militaria. Over time we gathered a huge library of imagery for every single set and asset. For texturing we used our texture library, plus production photography and textures we photographed ourselves.”
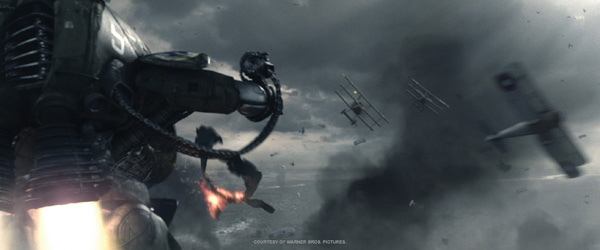
Among the few elements out of character with the WW1 theme in Pixomondo’s environment was a futuristic Mecha clad in an armoured endoskeleton. The message to the team from the director for looks centred on manga and comics. “It needed to take off like a rocket, move quickly but still look heavy, in a cool style,” explained Thilo. “We got started as soon as we received a maquette and a few concepts and drawings from the art department. It had to be fully modelled and rigged with a lot of automated constraints for the legs and arms, the ammunition belt and gun. We did the all the work on it in-house.”
|
|
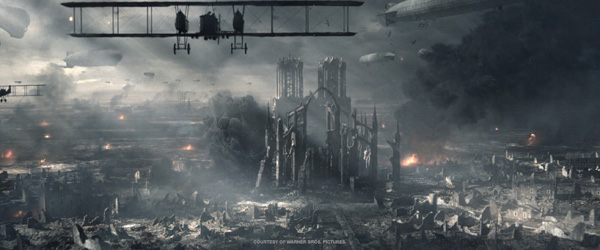
Notre Dame
Further extreme camera moves dictated extreme architectural detail in the structure of the bombed out cathedral building. Thilo said, “As we knew from the beginning that we would have intense 3D moves in and around the cathedral, we decided to build it in full detail, with statues, ornaments, debris and the surrounding bombed village.
“The initial production design resembled Notre Dame in Paris, so we gathered reference imagery of this and several other cathedrals as inspiration for detail, structures, texture, weather influences and decay. It demanded some brut force. Everything was modelled, and we used UV maps and procedurals for the texture. We scattered additional geometry like debris and stones in 3D and in addition to that we painted over the render and re-projected the detail we had added.”
Pixomondo’s scenes contain what must be some of the most expansive and ominous composited skies made for a feature film. “The sky was one of our major preoccupations. We have a lot of experience with skies and searched in our library and found a lot of nice references to build concepts with. We ended up with a master sky for the whole battlefield sequence that we used as a base for a number of shots. If we needed more detail or more dramatic compositions, we changed and adjusted the sky on a shot by shot basis. We used Photoshop for painting, Vue to create some additional cloud and Nuke for the projection of the 360° environment.”
Animated Cards
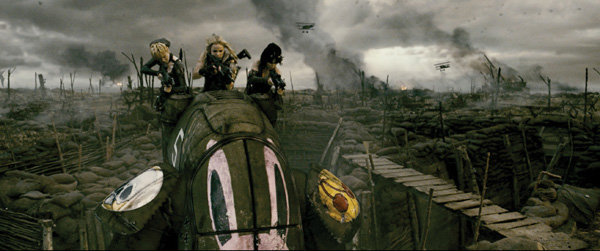
Amid the explosions, fires and heavy artillery, this entire sequence’s landscape is crammed with dust, smoke and large and small particles and sparks flying across distant mountains and, closer to camera, earthworks in the trenches. Debris and atmospherics fill the air. The team aimed to use as many real elements as possible. The production had shot a lot of these for them, and Pixomondo maintains a good library of motion elements in-house.
Nevertheless, they needed to produce a quantity of 3D effects including smokestacks, fires, tracers, spark, smoke tails. In animation heavy shots, the animators put in some of the key elements on cards as they were animating, which gave their own team plus all other departments a very clear impression of what needed to be done. They used those card layouts as a base for the timing, position, look and feel.
3D Nuke Camera
“As our compositing software was Nuke we decided in the beginning to build a 3D camera in Nuke for all shots,” said Thilo. “So after the plates were match moved and the full CG shots were laid out, we exported every camera from 3D into Nuke. In addition, we kept a proxy version of our master environment in Nuke, which the compositors could always load in to check distances and place objects in 3D. For instance, for the battlefield scene we merged all cameras into one Nuke scene. We defined various hero shots and put in lots of smoke stacks, fires, bomb impacts and explosions. We would build up a scene in Nuke with everything in place that we could re-use and re-time as needed for repurposing and continuity.
“A number of tools were built, like matte creation out of 3D info, automatic light interaction, camera import/export tools and others. We built a scene for placing all of our background blimps in Nuke. This tool scattered card renders of the blimps in the background and we could animate their motion, their rotation and position and their lighting. Also, the shells tumbling down into the camera were real shots in some cases. But we also built a tool for emitting and simulating the bullet shells flying from the gun after firing,” he said.
Opening Shots
Prime Focus delivered more than 180 VFX shots comprising the film’s complex opening shots and another intense dream sequence for 'Sucker Punch'. VFX Supervisor Bryan Hirota and a team of 50 worked on the project over the course of 13 months. Their tasks frequently called for careful integration of live action with CG footage and transitioning composited shots between different environments, both CG and live action.
The world they needed to create to realise Baby Doll’s fantasies comprised elements and environments including an alien planet, a futuristic bullet train and metropolis and some dangerous robots, for which the production Art Department supplied excellent concepts. Nevertheless, the team’s creative input was often required, particularly during the opening sequences, one of which was a long crane shot following a car driving up a hill in the rain toward a large house.
“DJ wanted to shoot this scene with the actors seated in the car on a green screen stage, with the camera on a techno crane moving around them and then pulling back to simulate the car driving away,” said Bryan. “This required a full CG environment. We had some concept work for this environment and the house but had to take it further and develop the terrain, road, grass and trees. Much of it was done in Maya Paint Effects, which we could turn into geometry for the grass area. We replaced the exterior of the car as well, keeping only the interior from the live action component.”
Rain Drops
Prime Focus’ digital effects team took over the CG rain and the title logo that forms and disperses over the scene. DFX Supervisor Chad Wiebe explained, “We started with intense research into rain and how it travels along surfaces, picking up and leaving behind droplets along the way, and shot our own footage while travelling in cars through rain to use as additional reference. Once we determined the look we to go for, the technical aspect began. We looked at tools we'd used in the past and customized them to suit the task, mainly to create meshing tools that mesh particles into drops or streams of water.”
Controlling the drops to form and release the logo was the main challenge due to the curved car window surface. Using an image of the logo as a target we were able to get drops of water travelling towards a pre-defined area, where we would spawn additional particles to form and fill in the gaps of the logo. Once the logo was readable, we would release the droplets in a controlled, directed fashion allowing aesthetic control of the rain on the window as the car drove away and the logo disappeared,” said Chad.
Meshing Tools
“After the motion was signed off, the next challenge was how to shape the droplets like drops on glass. Most meshing tools result in spherical shapes. Using different culling and re-meshing techniques, they could create realistically-shaped droplets that appear to travel along the glass naturally. From there it was a matter of properly refracting the environment and characters, which we match moved and placed inside the digital car, to ensure precise refraction through the drops.”
As the camera moves around behind this shot, they replaced Baby Doll and her stepfather with CG models. For any CG doubles, DJ was conscientious about supplying the artists with photography and scans of the actors and their costumes. Because the five girl stars of the film were so frequently replaced, the task of building their models was divided between the facilities and they all shared them as required.
Creative Composite
After this title shot, Prime Focus helped construct a shot inside the house that appears to be quite straightforward but is actually composed of a number of shots and CG builds that hadn’t been intended as a coherent scene. Bryan said, “It starts off on a fully CG proscenium. We created this environment based on the plate photography captured when the opening was imagined differently. When this new idea emerged, we had to create a background and a different, CG camera move.
“We created CG curtains with the Warner Bros. and Legendary Pictures logos, which reveal Baby Doll sitting on her bed, created by projecting imagery of her on the bed from another shot, to allow us to continue with this new camera move. The backstage elements are CG throughout. Once we get close enough to her, we could transition into the original camera move but we then had to composite in the backside of her room, which was green screen in that shot.”
Much more complex transitional work was required in the team’s major sequence when the girls battle the robots, shot over the course of a week, simultaneously on two green screen stages. The 36 individual shoots were stitched together, integrated with CG girls to produce one continuous fight sequence.
Critical Integration
To start, the previs was based on Zac’s ideas but DJ and stunt choreographer Damon Caro together worked out the girls’ precise moves, deciding which parts could be continuous live action and where the breaks should occur, requiring CG girls to be intercut. In the live action portions, the girls fought stunt actors in green suits, replaced later with CG robots. “Then we put the girls inside the CG train car and laid the whole sequence out in both a timeline and an action line, so that they logically travelled forward through two cars to arrive at the bomb car. The goal was to create one long shot, using the CG pieces to bridge from one live action shot to the next. Some CG sections are actually quite long. For example, as Baby Doll spins and cuts through the robots’ knees, she is a CG character for perhaps 80 per cent of the performance,” said Bryan.
These integrations were fundamental to the team’s work in this movie. Their success depends on high quality models but also the fact that, to accommodate Zac’s preference for speed ramps and slow-downs, nearly all footage was shot hi-speed, 150 or 300fps. The raw footage stitched together with the CG in-betweens was 18 minutes long before editorial started on the speed ramps. Syntheyes was used for the intensive tracking.
Precision Editing
“We also got involved with the edit for this fight. We would submit shots, then editorial would do a re-speed and give it back to us with requests for animation changes and so on. The final sequence was 4,000 frames or 2 ½ minutes, about 9 per cent of the material originally submitted,” Bryan explained.
A set had been built for some of the interior train shots, so they used this lighting for their CG interior, but nothing had been built for the train exterior, which was set into an entirely CG environment and in some ways was easier to deal with because the lighting there was completely under their control. Their world needed to be built as a 360° spherical environment to cover all camera moves. But when the girls were inside, for example, and the environment was only visible through the slats of the train car, it didn’t need to be fully rendered.
“Digital Fusion was the primary compositing software we used on this production. The shots were composed of a huge variety, from multiple green screen elements to completely virtual environments and a host of FX,” said Bryan. The sheer volume of different layers and data that go into a composite for shots like these, let alone any editorial re-times/re-speeds, is a substantial challenge to manage that required a lot of discipline from our team and all the teams.
Planet Generation
The alien planet terrains started with the concepts but DJ and Bryan talked about influences from planets they had seen in other films, creating distinctive rock formations and atmospherics blowing past, for example, and extending the fantasy with multiple planets in the sky. The planet was procedurally generated using Terragen, made to handle large scale environments and atmospherics.
“The biggest advantage for us in using a dedicated environmental application like Terragen was that we were able to rapidly change the design and terrain, giving us much more flexibility in terms of shot design over building the models solely in 3ds Max and Maya. Also, as customised software, it has a lot of built-in atmospheric and volumetric functionality to help put in clouds, mist and fog. Some of our artists were more familiar with Vue than Terragen but we were also able to bring Matt Fairclough, the author of Terragen, on board as part of our team,” he said.
“On the planet, the action starts on the helipad in a rocky area, moving through a canyon to an open plain with the rock formations before arriving at a futuristic metropolis. The Art Department didn't actually have a very strong concept for this city. We took the opportunity to concept several designs at Prime Focus with the intention of incorporating some of the silhouette of Lennox House into the profile of the city to subconsciously link them together. We also adopted the idea that if the inhabitants were the same people who constructed the levitating bullet train track, their city should have a heavy industrial component.
City Planning
“Furthermore, we always knew it had to blow up in the end, so we wanted to make sure to build enough interesting details on the camera side of the city to provide plenty of neat things to watch getting destroyed. We needed to make sure the design read clearly as a city for the distant shots as well, and gave it strong features that could be identified from great distances.”
When the aliens’ bombs explode and destroy the city, DJ sought a different look – something unlike like any conventional or even a nuclear explosion. So while they employed CG pyrotechnics, an electrical component was added as well, as a charged, blue electrical dome forming over the exterior of the pyrotechnic effect. Fume FX was used for the look with 3ds max, while Thinking Particles helped with the destruction and shattered glass.
Keyhole
An intriguing shot taking the camera through a keyhole began with a simple, live action approach to a door, which Prime Focus rebuilt in CG along with a keyhole for the camera to fly through. They also had macro photography of Baby Doll’s eye, which they tracked in behind their CG door. A shot of the stepfather was mapped onto the curvature of her eyeball as a reflection. Their own camera push-in was also tracked to the live action camera push-in on this shot. As they continued to approach her eye, they mapped off the curvature of the eye to flatten the image and then reduced the eyeball down to size as well, transitioning the father from a reflection to a live action character.
Each of these teams remarked on Zack’s very confident directing style and the opportunities for creativity that working with him and DJ opened up for them. He never left them guessing about shot design or pacing, but knew exactly what he wanted and relied on their expertise to help him achieve that.
|
Constructing to Destruct
The fact that the MPC team were going to destroy the set at the end of their sequence required a particular technique for set construction. All the objects making up a wall or a column had to be individually modelled instead of relying on texture maps with displacement. “This meant we also had to model the underlying layers that would be revealed when something on top or in front of it gets destroyed. Our packaging system was used to manage all of these elements, which streamlined the process further down the pipeline.
“Our FX team then used Kali, our new destruction toolkit, to work out properties of the different materials present in the temple. Being a finite element solver, Kali works differently to rigid body solutions by setting up a more physically accurate type of simulation. By defining material properties, the solver estimates how much resistance and flex each material has, allowing it to simulate bendable material such as wood or metal as well as rigid substances like concrete or stone. This also defines how each object will shatter, which gave us some really nice crack propagation and very natural broken shapes.
“With most rigid body simulations, you can either rely on Voronoi patterns to split your objects in pieces or hand model the fractured objects to achieve a more specific shape. With Kali, the material properties drive how objects break. Also, we based the system an object’s volume, meaning that our rendering geometry was independent of what was simulated as long as the volume was consistent. This has been extremely helpful, for example, for swapping low resolution columns for high-res ones, or to vary some planks at render time without having to redo the simulation.”
MPC has an in-house rigid body tool called Papi that the team has used successfully for many years. While it is great for simulating materials such as stone or concrete, in the case of ‘Sucker Punch’, they knew they had to destroy wood - that is, a bendable surface - close up and in slow motion.
“The idea behind Kali was to be able to go one step further in how realistically a complex material could be simulated,” said Guillaume. “Kali is not replacing Papi but works as an addition to our overall destruction toolkit. In some very large destruction shots, we’ve combined both tools. Papi allows us to block the timing of the main destruction pieces very quickly. Since these are in-house tools, we made sure they could communicate. We can run Kali on top of a Papi simulation to add details and more realistic material properties.”
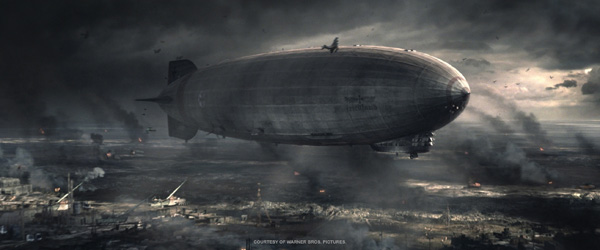
Zeppelins: Fire Development
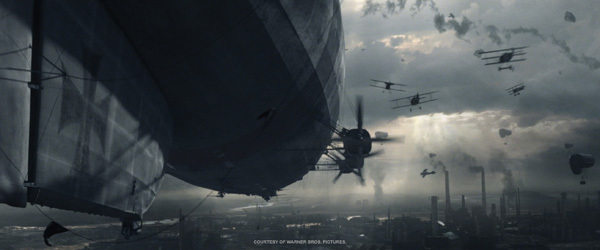
To give the zeppelins, both massive and buoyant, a realistic feeling of weight and speed as they move across the sky, the animation department looked at any reference to airships they could find online, in movies and in the real world. The best reference for the crash was the historic Hindenburg disaster. For the background blimps, they developed a procedural animation system with idle motions, turns and wobbles. They also discovered that the holding cables of these blimps were a key to their ‘floaty’ feeling.
“Creating the exterior skin for the background zeppelins was pretty much old school UV maps for texture and some displacements for the motion on the hull,” Thilo said. “The hero zeppelin, however, was much more complicated. Shortly after we received the sequence, we immediately started on the mini sequence in which this zeppelin bursts into flame, falls to the ground and breaks up. We figured that during postvis it would be easier to keep those shots together in one sequence until the initial animation was complete. After the postvis was done we separated the shots out and our FX team in Berlin started their work.”
Under the supervision of Head of Technology Mohsan Mosahvi, the Berlin team developed a special system for the breakup of the skeleton and cloth of the zeppelin, the massive fire and its ignition, for wind in the hull, the pressure of the gas inside, the cables and flags. “They had to build several tools and techniques to do this, and further develop our fire system. They used 3ds max, Thinking Particles, Fume, Krakatoa and Afterburn for the zeppelin fire and explosions, all of which was full CG.”
|