 |
  |
|
Because this story is derived from a graphic novel, the production determined very early in development to respect the comic book style for onscreen graphics, cropping of frames and a variety of effects and looks applied to the footage in virtually every sequence, and almost every shot. “A couple of years ago, Double Negative helped with a test shoot to try out some of these ideas and decide which would actually work together as a way to take text and graphics from a flat page to a photographic reality on screen,” said Andrew Whitehurst, CG Supervisor.
Page to Screen
“This artistic focus was our principle goal throughout production and post,” he explained. “The whole movie has over 1,200 effects shots in it, and Double Negative completed about 1,000 of them. I was working on it for 18 months, from just before the shoot started. The project included technically challenging work but the most difficult aspect overall was creating the look, making the comic book reality into attractive photographic images. It took a lot of testing and checking out what we could do to make the image sharper or brighter, without making it too graphic. It wasn’t the straightforward challenge of making an effect or object look photoreal. There wasn’t a single, correct answer.”
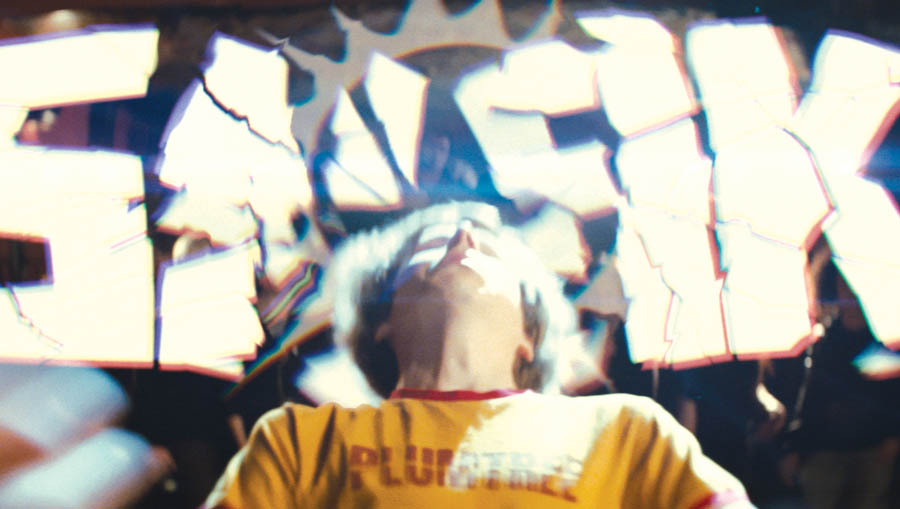
The director knew he didn’t want, for example, big block letters floating around in space. He wanted them to exist in the scene with the actors while still feeling like graphics to the audience. Scott Pilgrim’s creator Bryan Lee O’Malley uses graphics and typefaces borrowed from video games, and Double Negative did the same for the film. They experimented with making the letters slightly translucent, shining light from the scene onto the letters, and incorporating lens effects like chromatic aberration around the edges, to make them feel more photographic.
Absurd Reality
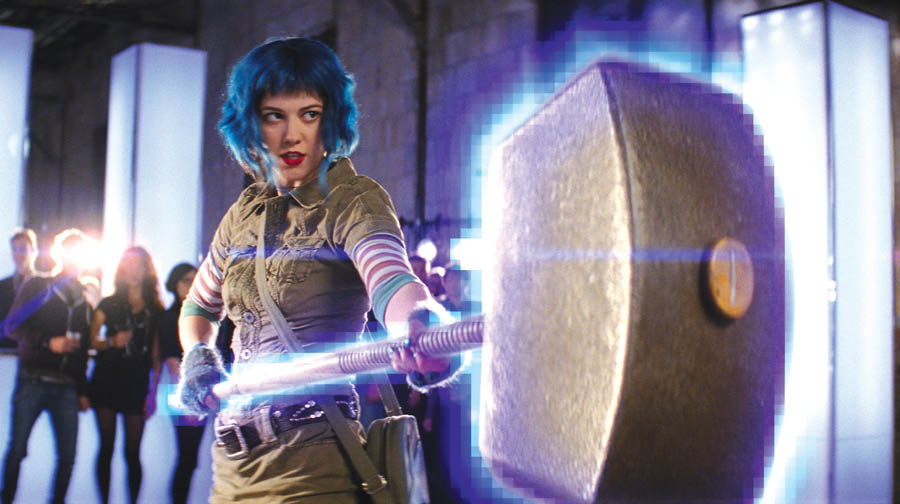
Adding all of these methods together helped them work the graphics into the plate so that the audience accepts them as a part of the story. Beyond text, an example is showing that a character has been destroyed by making him explode into coins, a typical event in video games. “We took it a step further, making the coins Canadian currency, falling to the floor, behaving and looking like real real money. It was turning an absurd idea into photoreality,” said Andrew.
“Other comic book concepts, like the graphics, had to feel just as real but not like solid objects hanging in the environment. Instead of making a word crisp-edged and precise in space, as we would a title, we would do a camera track for the plate and then choose where in the plate the wanted the graphic to appear in 3D space, behind or in front of characters depending on the effect it produced. The graphic would then be tracked and behave as if were there on the set.”
Handling Graphics
The graphics themselves were perfectly flat as if on a card. Combining 2D and 3D techniques, they would place a plane into the right position that had the graphic on it, drawn as a piece of artwork. This could be softened, getting the light from the plate to interact with it as if it were illuminated by the environment. In short, they used the same compositing tricks you’d use to blend regular CG into a plate – such as chromatic aberrations, vignettes and lens artefacts that you’d expect from something that had been photographed.
Finally, they always made sure to obey the depth of focus of the particular shot. If there was a pulled focus from the background to the foreground, the associated de-focus would also apply to the text, helping to create that photographic reality from the flat graphic on a page.
All on screen graphics were designed by Oscar Wright, the conceptual designer, which Double Negative received as Photoshop elements and re-worked to use in Shake, Maya or Houdini to create the effects we needed. The split screens were designed by the client and supplied to the team, who then used Shake to apply them to the shots. Andrew said, “The editors of the film did rough mock-ups of the effect so we could see what the timings were and we used that information to make the 2K versions using the scanned plate photography.
Playing Games
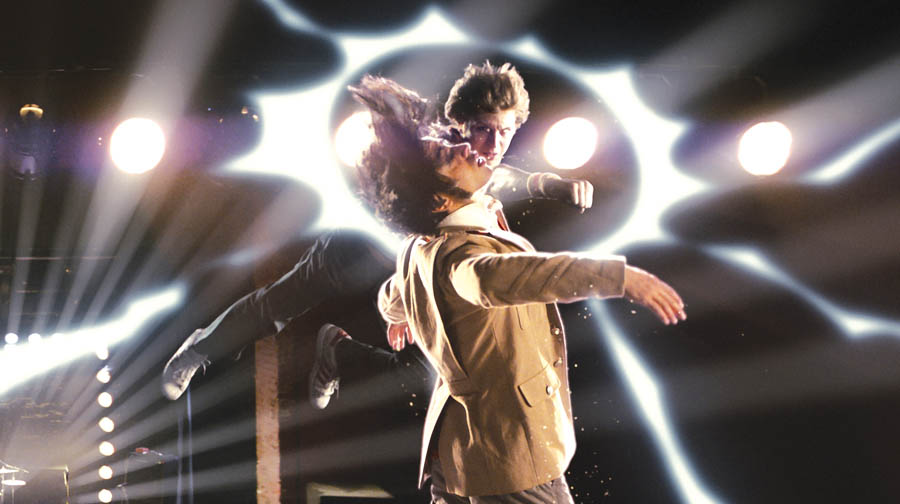
“The audience watching the film will rapidly recognise that the looks are closely linked to video games, like the impact graphics for the punches, combined with influences from Anime films, such the streaked backgrounds added to the photography in the action sequences. Also, anyone who plays a lot of video games, like many of the people making the film, begins to unconsciously accept this visual reality pretty readily.
“The Anime TV series ‘Naruto’ was a key reference for the fight scenes. Old-school and modern video games use different techniques to communicate information to players, and we used similar techniques from both old and new to show who was winning a fight, or who was injured.”
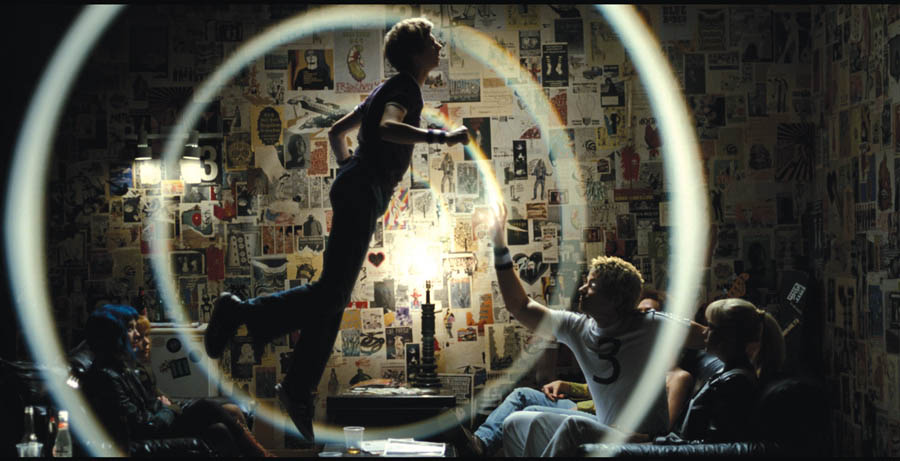
Sometimes they used a graphic element that was full 3D CG. When Knives Chau says she’s in love, the word ’love’ escapes as a pink, gaseous cloud from her mouth, which Scott brushes away with his hand. They tracked his hand, made a fluid simulation for the pink letters and the body track of the hand would interact with the fluid simulation and push it around. “That’s an example of a full CG object and interaction, but if we had something like an introductory card or ‘kapow’ sound element, it would be layered in as a 2D effect, albeit tracked using 3D camera data.
Range of Formats
“For tracking Boujou was used mainly, but we were using PF track and 3D equaliser at the same time because some shots and kinds of effects simply worked out better using one or another. A major tracking issue was the fact that this show was shot on a variety of different media as well. To start, it was Super 35, which most people are used to working with but, as well, some plates were shot with an unusual anamorphic 35mm format, wider than normal, some very resolution on Vista Vision, plus the Phantom HD for super slow motion. So we had to experiment, shot-by-shot to see which tracking software worked best,” said Andrew.
Furthermore, although the nominal aspect ration of the movie is 1.85 to 1, in many action sequences it pushes in to full widescreen at 2.35 to 1, so they needed to animate the crop lines in to make the change. There were even a couple of instances when, to add extra impact to a punch, although the frame is 2.35 to 1, as the character punches out through the screen, his fist actually breaks the frame, visible above and below the black bars top and bottom.
The formats were chosen specifically because of their looks and what they could bring to the sequence. “If you shoot a scene anamorphically, for example, you get a shallow depth of field, pretty lens flares and other exaggerated lens effects you wouldn’t see with spherical lenses. Having shot a scene that way, we might crop it back to the 1.85 to 1 frame again but we’d still have the effects.
“The only exception regarding choice was using the Phantom HD for the extreme slow motion. The speed ramps and re-timing were handled entirely in the edit. The editors and director would work these out in the Avid to suit their story and then gave us the animation curve describing the retiming so we could do them at full 2K quality for our composite.”
Lighting Effects
Most of the plate photography had been carefully lit by the DP Bill Pope, who had a very specific look in mind. The dramatic, stylish lighting is largely his own on set. The main lighting effects Double Negative carried out were a lot of lens flares, often using real lens flares from old anamorphic lenses, because they are quite attractive, compositing them in on top of the photography to add extra atmosphere.
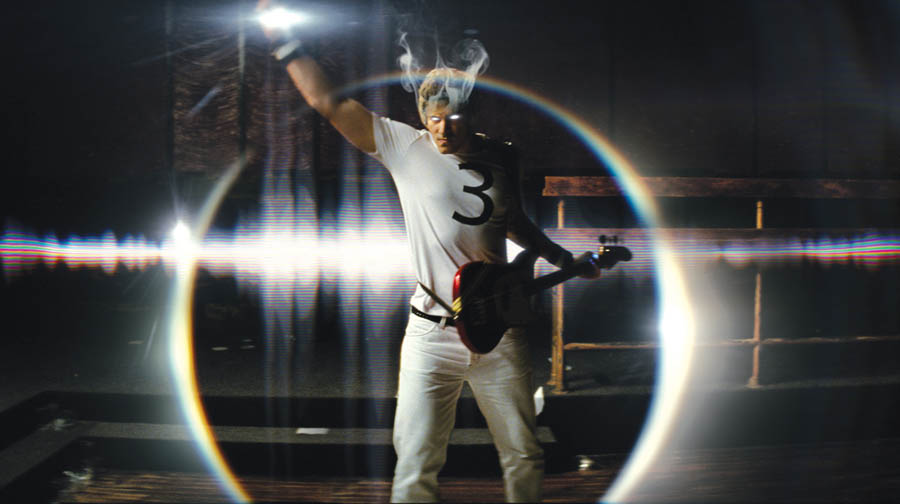
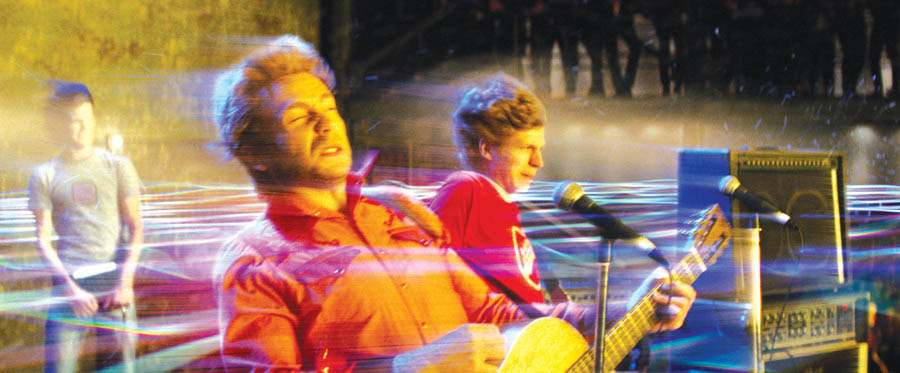
“Another lighting type of effect was created to give each of the pop bands in the story their own style of visualised music, a distinctive on-screen manifestation of their sound,” Andrew expalined. “Scott Pilgrim’s band Sex Bob-omb, for example, has a dancing, rhythmic lightning bolt effect coming out of their instruments. We used these effects to add extra bits of illumination to the plate, reflected in shiny surfaces. So we were never changing the lighting in the plate, because it was always done well and deliberately. We were only adding to it and supporting it sympathetically.”
|
   |
|
Storyboards to Previs
The film was very heavily storyboarded, and so everyone involved had a good idea of how the final images would look. Many boards were taken straight from the comic book, particularly for composition, and the production continued detailed storyboarding right up until the shoot. However, Double Negative prevised two of the especially effects-heavy sequences to help plan how they were shot on set.
One of these is the film-set scene at Casa Loma, when one of Scott’s many rivals, Lucas Lee, skates down the rails of a flight of steps. This was shot entirely in a blue screen studio where the space was very limited. The team needed to determine which shots they could shoot and then control by extending the camera move in CG, and which would be best achieved as a regular 2D composite into the CG environment. By working out the sequence in advance, making sure of the speed and the distance he needed to travel, for instance, they could plan exactly what needed to be shot on blue screen to make the effects work in post.
Snow Dragons
“We also did extensively previs for the fight between the Sound Yeti and the Snow Dragons because it was the only sequence where the visual effect was the sequence itself, rather the effects supporting a photographed performance,” said Andrew. “In order to understand what kinds of camera moves and shot lengths we would need, we worked up the sequence extensively before the shoot. The production gave us a digital model of the set they were going to build, which was a great help because we knew where the cameras could be placed and that it would be possible to shoot what we had prevised.
“After the shoot wrapped and the plates were turned over, we also post-vised the sequence. In the months between previs and post-vis, we had re-worked the models and started the look-development cycle for the creatures, so the models we used in the post-vis were much closer to what you see in the finished film. We animated the post-vis over the plate photography and turned that over to the editors. They experimented with cutting the sequence using the post-vis renders and were able to give us animation and framing notes that we could then implement.
“This process enabled us to do multiple iterations of the animation without having to run everything through full simulation, lighting and compositing, which sped up the turnaround on each change. By the time we began to run simulations and render shots, the animation was at a pretty advanced stage and only minor tweaks were required on each shot. That made the FX TD and lighting TD's task easier as they only had to deal with small changes in animation.”
Fighting Chances
Double Negative handled the six main fight sequences and a couple of smaller ones. “What makes ‘Scott Pilgrim’ different to some other major effects films is that each sequence, fights as well as any others, was quite small in terms of number of shots. It was like working on dozens of commercials at once. The biggest would have been the final fight between Scott and Gideon Graves, when Scott is killed on his first attempt and then comes back and wins the second time, while the most complicated shots were in the Yeti and Snow Dragons fight, mainly because of the number of frames we had to fill with performing CG creatures. These required lots of dynamics, compositing and lighting work, and were also shot on Vista Vision, which meant we were working at very high resolution.
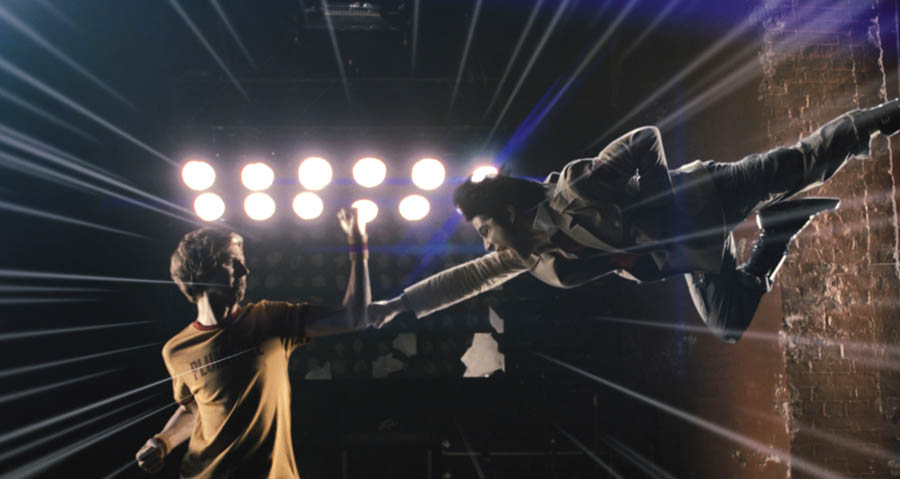
The fights sometimes resulted in a very complex composite, like the one between Scott and Matthew Patel on the opening spread. A plate was photographed on set with the background and surrounding characters. Both Michael Cera and Satya Bhabha were photographed individually on a blue screen stage. “Michael was hit with light from a flash-bulb for the impact frames,” Andrew explained. “Satya was supported on a rig that allowed him to be manoeuvred through the air to punch a soft pad that also triggered a flash gun and then he was subsequently flown out of frame on the rig after miming being punched in return.
“All these plates were tracked and aligned by a compositor so that the punches appeared to connect and that all the flash-gun frames were in sync. Once the choreography was fixed, the amount of movement in Satya's plate was enhanced so he spun more and then lens flares, speed lines, aspect ratio changes and on-screen graphics were added. The shot was taken directly from the comics, so capturing the right style and framing was essential.
Flexible Pipeline
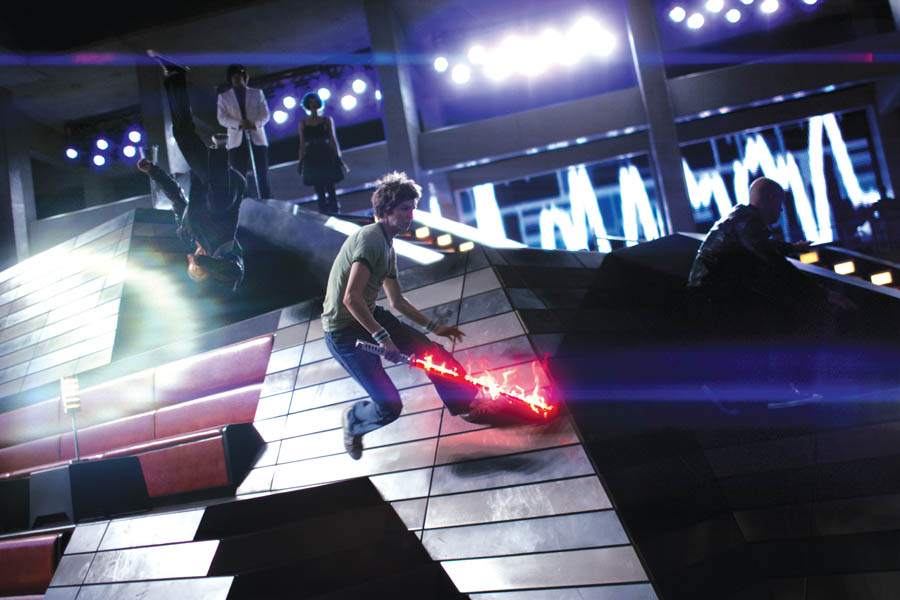
“In spite of complexity, a typical sequence only involved about 30 to 40 shots, which means you can’t operate as teams normally do on CG action movies - that is, pipelining tasks perfectly – because no single sequence justified an extensive set up. For the 3D side, we had a large crew of CG generalists with a commercials background – like me. The crews for each sequence were quite small with everyone working together on modelling, lighting and putting them together. Because the flaming sword sequence in the Gideon Graves fight involved enough shots, it was the only one we pipelined to any extent.”
Andrew found that this arrangement made the project more creative, “Everyone got involved with a complete sequence instead of one small aspect of it, raising the level of commitment. It helped with the overriding concern about the look of the movie and we could see how our work was fitting into the bigger picture. It also made some decisions easier because compositors and 3D artists could sit and work out how to finish a shot together, back and forth. In a stricter pipeline, all 3D work is supposed to be competed before moving along to compositing, not expected to come back again.”
Timing was an important element to match the comedy side of the story but also, the film was cut quite rapidly and abruptly. “The shots were not usually on screen for long, so you had to get the effects right within the frames that the editor chose. We always took care to watch FX shots in the order they’d been used in the cut to make up the final sequence, not in isolation. Things that looked good on their own sometimes didn’t work in the context of the shots they were cut together with.”
|
 |
|
Toolbox
Shake was the compositor on this project. The team’s pipeline tends to lock onto a particular release of a particular application at the start of a project, and that way we know it’s all going to work together for the duration. At the time, Maya 2009 and Shake were the current set-up. “Our fluid solver is Double Negative’s proprietary software Squirt, a plug-in for Maya. We also have our own data format for storing voxel data, particle data or geometry data. Squirt writes out files to this file format and then we use our voxel renderer DNB for smoke, dust and fire,” Andrew explained.
Houdini was especially useful for the Snow Dragons because these creatures were made of particle systems. They used geometry caches which the animator had made with solid, regular geometry, to create the particle simulations. For the Sound Yeti, the particles had to be emitted in the direction of the fur so it was essential to be able to groom the direction in which the particles travelled. They used Houdini to write out normal maps to control this emission effect.
Also, because they worked on so many small sequences and didn’t have enough time for the traditional R & D, they used Houdini as a link between different pieces of software. So, if they wanted to use sound files to control the way a surface behaves in the renderer, Houdini could process the geometry of a shot with the sound for the sequence to output texture maps that could be used in the regular lighting pipeline. The proceduralism of Houdini allowed them to create new software as they worked, without going out to write lots of plug-ins.
|
 |
Integrating sound
“Using Houdini was one of a couple of different ways we had to integrate sound,” said Andrew. “An example of this arose when we wanted the fur on the Sound Yeti to dance in time with the music. Because the fur was made from particles being continually emitted from a surface, we needed a way to get the sound amplitude to scale the emission speed of the particles. By importing the animated Sound Yeti geometry and the appropriate sound file into Houdini, we were able to write out texture-maps that could be used to scale the particle emission.
“Our other technique was to use a custom piece of code we wrote, dubbed the ‘Waveform Generator’, that takes an audio file, creates a set of frequency samples and amplitude data per frame and writes that out to a text file. We could then write snippets of code to pull that data into Maya or Shake to use as animation curves to drive effects generated in those packages. This was useful because we could be sure that all software was using exactly the same values on every frame rather than trusting each application to behave the same way when processing audio natively. In this shot of Todd Ingram you can see a waveform in the back-ground looking a bit like an LED sound visualizer that you'd get on a 1990s hi-fi. This effect was generated in Shake using the data from the Waveform Generator. It enabled us to render graphics at 2K and have them seamlessly sync with the audio.”
|
   |
Trial by Fire
Fire was depicted in different ways, some more naturalistic than others, and always using Squirt. Early in the film during a fight between Scott and Matthew Patel, the first rival he encounters, when four demon chicks shoot fire balls at him, the fire behaves fairly normally. But a more difficult type of fire, more stylised on screen for longer, was required for the flaming sword sequence at the end.
“Effects Lead Mick Harper worked for months trying out different looks for it – it had to be fiery but otherwordly, and aesthetically pleasing,” Andrew said. “The variety of different scenarios that the simulation had to handle was the challenge. It needed 147 different takes of the simulation before the team settled on the film version, covering various approaches to emitting fluid, such as guiding the flame with particles, so that in high action shots you can still watch what the flames are doing, while shots where Scott stands holding the sword attention.”
|
Words: Adriene Hurst
Images: Courtesy of Universal Pictures / Double Negative |
Featured in Digital Media World. Subscribe to the print edition of the magazine and receive the full story with all the images delivered to you.Only$79 per year.
PDF version only $29 per yearsubscribe |
|

Bringing Scott Pilgrim’s story from comic book to screen demanded effects from complex blue screen composites to integrating on-screen graphics and 3D CG. CG Supervisor Andrew Whitehurst at Double Negative talks about the intense look development and new approaches his team used in ‘Scott Pilgrim vs. the World’.
|
|
|
Because this story is derived from a graphic novel, the production determined very early in development to respect the comic book style for onscreen graphics, cropping of frames and a variety of effects and looks applied to the footage in virtually every sequence, and almost every shot. “A couple of years ago, Double Negative helped with a test shoot to try out some of these ideas and decide which would actually work together as a way to take text and graphics from a flat page to a photographic reality on screen,” said Andrew Whitehurst, CG Supervisor.
Page to Screen
“This artistic focus was our principle goal throughout production and post,” he explained. “The whole movie has over 1,200 effects shots in it, and Double Negative completed about 1,000 of them. I was working on it for 18 months, from just before the shoot started. The project included technically challenging work but the most difficult aspect overall was creating the look, making the comic book reality into attractive photographic images. It took a lot of testing and checking out what we could do to make the image sharper or brighter, without making it too graphic. It wasn’t the straightforward challenge of making an effect or object look photoreal. There wasn’t a single, correct answer.”
The director knew he didn’t want, for example, big block letters floating around in space. He wanted them to exist in the scene with the actors while still feeling like graphics to the audience. Scott Pilgrim’s creator Bryan Lee O’Malley uses graphics and typefaces borrowed from video games, and Double Negative did the same for the film. They experimented with making the letters slightly translucent, shining light from the scene onto the letters, and incorporating lens effects like chromatic aberration around the edges, to make them feel more photographic.
Absurd Reality
Adding all of these methods together helped them work the graphics into the plate so that the audience accepts them as a part of the story. Beyond text, an example is showing that a character has been destroyed by making him explode into coins, a typical event in video games. “We took it a step further, making the coins Canadian currency, falling to the floor, behaving and looking like real real money. It was turning an absurd idea into photoreality,” said Andrew.
“Other comic book concepts, like the graphics, had to feel just as real but not like solid objects hanging in the environment. Instead of making a word crisp-edged and precise in space, as we would a title, we would do a camera track for the plate and then choose where in the plate the wanted the graphic to appear in 3D space, behind or in front of characters depending on the effect it produced. The graphic would then be tracked and behave as if were there on the set.”
Handling Graphics
The graphics themselves were perfectly flat as if on a card. Combining 2D and 3D techniques, they would place a plane into the right position that had the graphic on it, drawn as a piece of artwork. This could be softened, getting the light from the plate to interact with it as if it were illuminated by the environment. In short, they used the same compositing tricks you’d use to blend regular CG into a plate – such as chromatic aberrations, vignettes and lens artefacts that you’d expect from something that had been photographed.
Finally, they always made sure to obey the depth of focus of the particular shot. If there was a pulled focus from the background to the foreground, the associated de-focus would also apply to the text, helping to create that photographic reality from the flat graphic on a page.
All on screen graphics were designed by Oscar Wright, the conceptual designer, which Double Negative received as Photoshop elements and re-worked to use in Shake, Maya or Houdini to create the effects we needed. The split screens were designed by the client and supplied to the team, who then used Shake to apply them to the shots. Andrew said, “The editors of the film did rough mock-ups of the effect so we could see what the timings were and we used that information to make the 2K versions using the scanned plate photography.
Playing Games
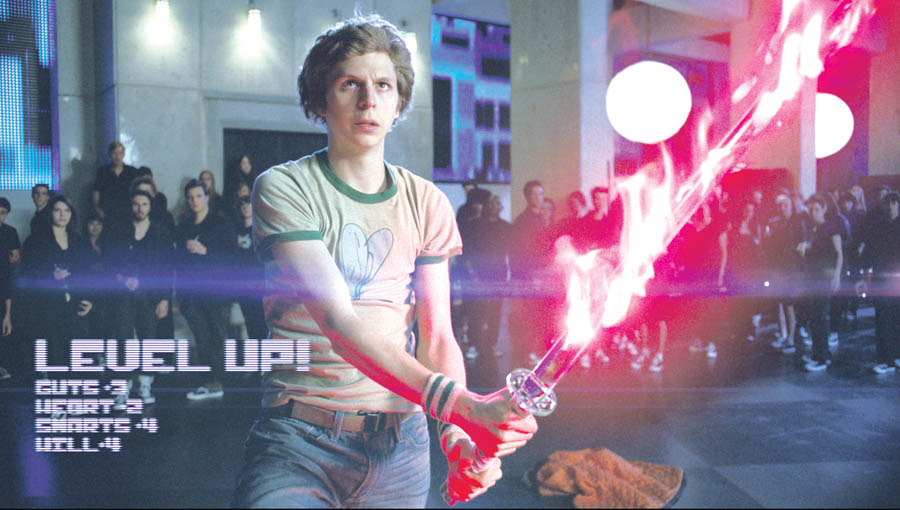
“The audience watching the film will rapidly recognise that the looks are closely linked to video games, like the impact graphics for the punches, combined with influences from Anime films, such the streaked backgrounds added to the photography in the action sequences. Also, anyone who plays a lot of video games, like many of the people making the film, begins to unconsciously accept this visual reality pretty readily.
“The Anime TV series ‘Naruto’ was a key reference for the fight scenes. Old-school and modern video games use different techniques to communicate information to players, and we used similar techniques from both old and new to show who was winning a fight, or who was injured.”
Sometimes they used a graphic element that was full 3D CG. When Knives Chau says she’s in love, the word ’love’ escapes as a pink, gaseous cloud from her mouth, which Scott brushes away with his hand. They tracked his hand, made a fluid simulation for the pink letters and the body track of the hand would interact with the fluid simulation and push it around. “That’s an example of a full CG object and interaction, but if we had something like an introductory card or ‘kapow’ sound element, it would be layered in as a 2D effect, albeit tracked using 3D camera data.
Range of Formats
“For tracking Boujou was used mainly, but we were using PF track and 3D equaliser at the same time because some shots and kinds of effects simply worked out better using one or another. A major tracking issue was the fact that this show was shot on a variety of different media as well. To start, it was Super 35, which most people are used to working with but, as well, some plates were shot with an unusual anamorphic 35mm format, wider than normal, some very resolution on Vista Vision, plus the Phantom HD for super slow motion. So we had to experiment, shot-by-shot to see which tracking software worked best,” said Andrew.
Furthermore, although the nominal aspect ration of the movie is 1.85 to 1, in many action sequences it pushes in to full widescreen at 2.35 to 1, so they needed to animate the crop lines in to make the change. There were even a couple of instances when, to add extra impact to a punch, although the frame is 2.35 to 1, as the character punches out through the screen, his fist actually breaks the frame, visible above and below the black bars top and bottom.
The formats were chosen specifically because of their looks and what they could bring to the sequence. “If you shoot a scene anamorphically, for example, you get a shallow depth of field, pretty lens flares and other exaggerated lens effects you wouldn’t see with spherical lenses. Having shot a scene that way, we might crop it back to the 1.85 to 1 frame again but we’d still have the effects.
“The only exception regarding choice was using the Phantom HD for the extreme slow motion. The speed ramps and re-timing were handled entirely in the edit. The editors and director would work these out in the Avid to suit their story and then gave us the animation curve describing the retiming so we could do them at full 2K quality for our composite.”
Lighting Effects
Most of the plate photography had been carefully lit by the DP Bill Pope, who had a very specific look in mind. The dramatic, stylish lighting is largely his own on set. The main lighting effects Double Negative carried out were a lot of lens flares, often using real lens flares from old anamorphic lenses, because they are quite attractive, compositing them in on top of the photography to add extra atmosphere.
“Another lighting type of effect was created to give each of the pop bands in the story their own style of visualised music, a distinctive on-screen manifestation of their sound,” Andrew expalined. “Scott Pilgrim’s band Sex Bob-omb, for example, has a dancing, rhythmic lightning bolt effect coming out of their instruments. We used these effects to add extra bits of illumination to the plate, reflected in shiny surfaces. So we were never changing the lighting in the plate, because it was always done well and deliberately. We were only adding to it and supporting it sympathetically.”
|
|
|
Storyboards to Previs
The film was very heavily storyboarded, and so everyone involved had a good idea of how the final images would look. Many boards were taken straight from the comic book, particularly for composition, and the production continued detailed storyboarding right up until the shoot. However, Double Negative prevised two of the especially effects-heavy sequences to help plan how they were shot on set.
One of these is the film-set scene at Casa Loma, when one of Scott’s many rivals, Lucas Lee, skates down the rails of a flight of steps. This was shot entirely in a blue screen studio where the space was very limited. The team needed to determine which shots they could shoot and then control by extending the camera move in CG, and which would be best achieved as a regular 2D composite into the CG environment. By working out the sequence in advance, making sure of the speed and the distance he needed to travel, for instance, they could plan exactly what needed to be shot on blue screen to make the effects work in post.
Snow Dragons
“We also did extensively previs for the fight between the Sound Yeti and the Snow Dragons because it was the only sequence where the visual effect was the sequence itself, rather the effects supporting a photographed performance,” said Andrew. “In order to understand what kinds of camera moves and shot lengths we would need, we worked up the sequence extensively before the shoot. The production gave us a digital model of the set they were going to build, which was a great help because we knew where the cameras could be placed and that it would be possible to shoot what we had prevised.
“After the shoot wrapped and the plates were turned over, we also post-vised the sequence. In the months between previs and post-vis, we had re-worked the models and started the look-development cycle for the creatures, so the models we used in the post-vis were much closer to what you see in the finished film. We animated the post-vis over the plate photography and turned that over to the editors. They experimented with cutting the sequence using the post-vis renders and were able to give us animation and framing notes that we could then implement.
“This process enabled us to do multiple iterations of the animation without having to run everything through full simulation, lighting and compositing, which sped up the turnaround on each change. By the time we began to run simulations and render shots, the animation was at a pretty advanced stage and only minor tweaks were required on each shot. That made the FX TD and lighting TD's task easier as they only had to deal with small changes in animation.”
Fighting Chances
Double Negative handled the six main fight sequences and a couple of smaller ones. “What makes ‘Scott Pilgrim’ different to some other major effects films is that each sequence, fights as well as any others, was quite small in terms of number of shots. It was like working on dozens of commercials at once. The biggest would have been the final fight between Scott and Gideon Graves, when Scott is killed on his first attempt and then comes back and wins the second time, while the most complicated shots were in the Yeti and Snow Dragons fight, mainly because of the number of frames we had to fill with performing CG creatures. These required lots of dynamics, compositing and lighting work, and were also shot on Vista Vision, which meant we were working at very high resolution.
The fights sometimes resulted in a very complex composite, like the one between Scott and Matthew Patel on the opening spread. A plate was photographed on set with the background and surrounding characters. Both Michael Cera and Satya Bhabha were photographed individually on a blue screen stage. “Michael was hit with light from a flash-bulb for the impact frames,” Andrew explained. “Satya was supported on a rig that allowed him to be manoeuvred through the air to punch a soft pad that also triggered a flash gun and then he was subsequently flown out of frame on the rig after miming being punched in return.
“All these plates were tracked and aligned by a compositor so that the punches appeared to connect and that all the flash-gun frames were in sync. Once the choreography was fixed, the amount of movement in Satya's plate was enhanced so he spun more and then lens flares, speed lines, aspect ratio changes and on-screen graphics were added. The shot was taken directly from the comics, so capturing the right style and framing was essential.
Flexible Pipeline
“In spite of complexity, a typical sequence only involved about 30 to 40 shots, which means you can’t operate as teams normally do on CG action movies - that is, pipelining tasks perfectly – because no single sequence justified an extensive set up. For the 3D side, we had a large crew of CG generalists with a commercials background – like me. The crews for each sequence were quite small with everyone working together on modelling, lighting and putting them together. Because the flaming sword sequence in the Gideon Graves fight involved enough shots, it was the only one we pipelined to any extent.”
Andrew found that this arrangement made the project more creative, “Everyone got involved with a complete sequence instead of one small aspect of it, raising the level of commitment. It helped with the overriding concern about the look of the movie and we could see how our work was fitting into the bigger picture. It also made some decisions easier because compositors and 3D artists could sit and work out how to finish a shot together, back and forth. In a stricter pipeline, all 3D work is supposed to be competed before moving along to compositing, not expected to come back again.”
Timing was an important element to match the comedy side of the story but also, the film was cut quite rapidly and abruptly. “The shots were not usually on screen for long, so you had to get the effects right within the frames that the editor chose. We always took care to watch FX shots in the order they’d been used in the cut to make up the final sequence, not in isolation. Things that looked good on their own sometimes didn’t work in the context of the shots they were cut together with.”
|
|
|
Toolbox
Shake was the compositor on this project. The team’s pipeline tends to lock onto a particular release of a particular application at the start of a project, and that way we know it’s all going to work together for the duration. At the time, Maya 2009 and Shake were the current set-up. “Our fluid solver is Double Negative’s proprietary software Squirt, a plug-in for Maya. We also have our own data format for storing voxel data, particle data or geometry data. Squirt writes out files to this file format and then we use our voxel renderer DNB for smoke, dust and fire,” Andrew explained.
Houdini was especially useful for the Snow Dragons because these creatures were made of particle systems. They used geometry caches which the animator had made with solid, regular geometry, to create the particle simulations. For the Sound Yeti, the particles had to be emitted in the direction of the fur so it was essential to be able to groom the direction in which the particles travelled. They used Houdini to write out normal maps to control this emission effect.
Also, because they worked on so many small sequences and didn’t have enough time for the traditional R & D, they used Houdini as a link between different pieces of software. So, if they wanted to use sound files to control the way a surface behaves in the renderer, Houdini could process the geometry of a shot with the sound for the sequence to output texture maps that could be used in the regular lighting pipeline. The proceduralism of Houdini allowed them to create new software as they worked, without going out to write lots of plug-ins.
|
|
Integrating sound
“Using Houdini was one of a couple of different ways we had to integrate sound,” said Andrew. “An example of this arose when we wanted the fur on the Sound Yeti to dance in time with the music. Because the fur was made from particles being continually emitted from a surface, we needed a way to get the sound amplitude to scale the emission speed of the particles. By importing the animated Sound Yeti geometry and the appropriate sound file into Houdini, we were able to write out texture-maps that could be used to scale the particle emission.
“Our other technique was to use a custom piece of code we wrote, dubbed the ‘Waveform Generator’, that takes an audio file, creates a set of frequency samples and amplitude data per frame and writes that out to a text file. We could then write snippets of code to pull that data into Maya or Shake to use as animation curves to drive effects generated in those packages. This was useful because we could be sure that all software was using exactly the same values on every frame rather than trusting each application to behave the same way when processing audio natively. In this shot of Todd Ingram you can see a waveform in the back-ground looking a bit like an LED sound visualizer that you'd get on a 1990s hi-fi. This effect was generated in Shake using the data from the Waveform Generator. It enabled us to render graphics at 2K and have them seamlessly sync with the audio.”
|
|
Trial by Fire
Fire was depicted in different ways, some more naturalistic than others, and always using Squirt. Early in the film during a fight between Scott and Matthew Patel, the first rival he encounters, when four demon chicks shoot fire balls at him, the fire behaves fairly normally. But a more difficult type of fire, more stylised on screen for longer, was required for the flaming sword sequence at the end.
“Effects Lead Mick Harper worked for months trying out different looks for it – it had to be fiery but otherwordly, and aesthetically pleasing,” Andrew said. “The variety of different scenarios that the simulation had to handle was the challenge. It needed 147 different takes of the simulation before the team settled on the film version, covering various approaches to emitting fluid, such as guiding the flame with particles, so that in high action shots you can still watch what the flames are doing, while shots where Scott stands holding the sword attention.”
|
Words: Adriene Hurst
Images: Courtesy of Universal Pictures / Double Negative |
Featured in Digital Media World. Subscribe to the print edition of the magazine and receive the full story with all the images delivered to you.Only$79 per year.
PDF version only $29 per yearsubscribe |
| |
|


