
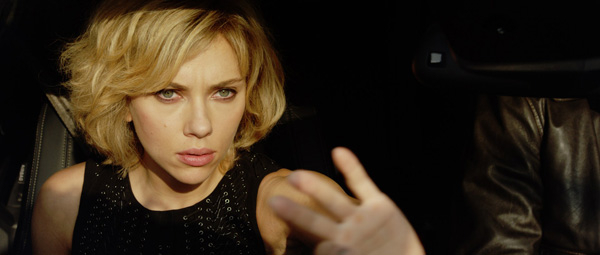
Rodeo FX staged a harrowing car chase through Paris with director Luc
Besson’s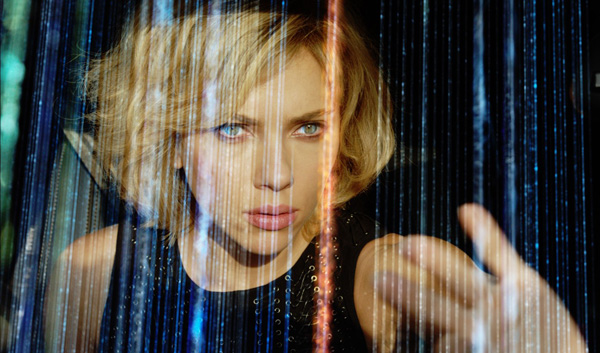 fearless heroine ‘Lucy’ at the wheel, visualising her gifts of
x-ray vision and ability to see mobile device signals.
Rodeo FX Takes Lucy on a Collision Course |
|
VFX studioRodeo FXin Montreal, Canada completed more than 160 visual effects shots for director Luc Besson’s most recent film, ‘Lucy’. This was the first time the company has worked with this director, who is recognised as a specialist in high action movies including ‘The Fifth Element’ and ‘La Femme Nikita’. Consequently,VFX supervisor François Dumoulinat Rodeo FX explained that realism was a primary goal, with a strong focus on lighting. “From a narrative perspective, our goal was to boost the tension,” he said. Rodeo FX’s team contributed to the fast-paced car chase through the streets of Paris, designed the shimmering coloured light rays emitted by the city’s thousands of mobile devices surrounding Lucy, and also conceived and created the look of Lucy’s supernatural x-ray vision. The team’s environmental work includes large matte paintings and CG set extensions for the city of Taipei. They also modelled and animated various CG weapons and, throughout the project, completed extensive invisible compositing. |
 |
 |
|
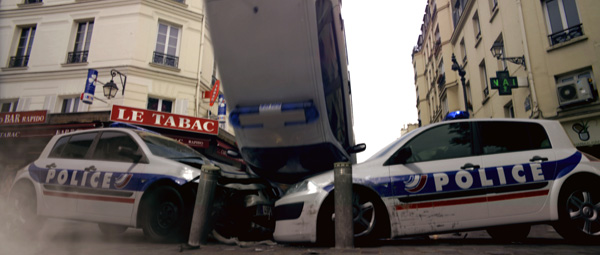
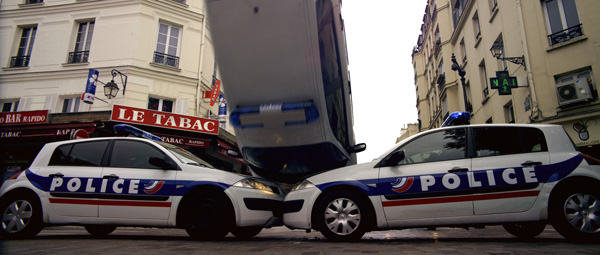
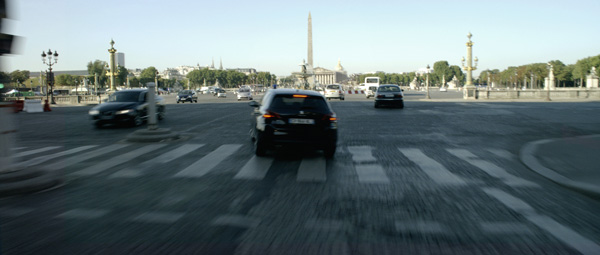
Staging the ChaseIn the car chase sequence, the extraordinary main character Lucy has never driven a car before, but she fearlessly gets behind the wheel and races through the streets of Paris, creating havoc along the way. For this sequence, Rodeo FX’s collaboration with the production team started quite early, and François was working on set during the shoot. First of all, production provided them with very detailed storyboards and maps of all the locations with clear indications of where the real and virtual car crashes would occur. Furthermore, after storyboarding the shots, Luc Besson had the great idea of using miniature cars to stage the major crashes on his desk, while capturing the action on video. Using all of this information, and also extracting data from Google maps, the team created previs that was accurate down to the centimeter. Lead previs artist Alexandre Ménardcreated hundreds of shots, which included all technical specifications required for the shoot - distance, speed, focal length and so on. They sent each individual take at full length to EuropaCorp, Luc Besson’s film studio. His editor then cut the previs himself, which meant most of the sequence was already virtually locked weeks before cameras started to roll. |
 |
 |
|
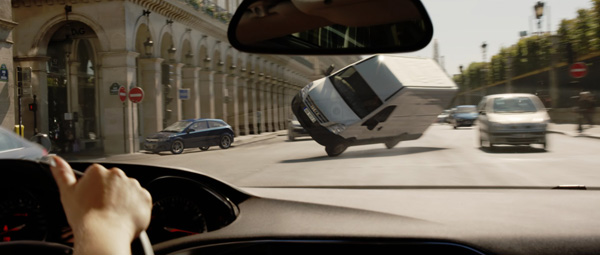
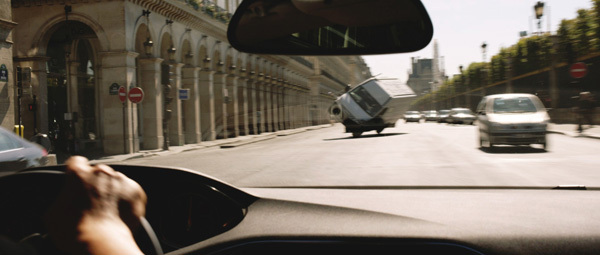
“Production VFX supervisor Nicholas Brooks, who supervised the shoot with stunt coordinator Michel Julienne, gave us initial notes about where they wanted the CG cars and the timing of the different crashes, but in fact gave us enormous creative freedom. We went on to add a lot more CG cars than initially planned, a lot closer to camera, enhancing a total of 70 car shots.” Streets of ParisThe artists modelled, animated, textured and integrated the cars in the streets of Paris using various shot elements.4dMax, a 3D spatial data specialist company, produced a Lidar scan of all streets and locations involved in the chase, which was essential to position and integrate the CG cars in their environment. “4dMax provided incredibly precise and exhaustive data for the car chase sequence,” said François. “They literally covered every inch of pavement from Place de la Concorde to the Louvre. The level of detail in their scans was amazing. Not only did they provide global Lidar scans of the streets, they also gave us hi-res scans of the different sections of each street. “This allowed very precise details on all the props in a specific area. For instance, every single element - lamp posts, mail boxes, fences, traffic lights and so on - had lots of detail in the scan, which helped tremendously when time came to re-project our HDRIs onto the Lidar geometry. In most cases, our HDRI matched the Lidar scan pefectly without tweaking to make them fit together. |
 |
 |
|
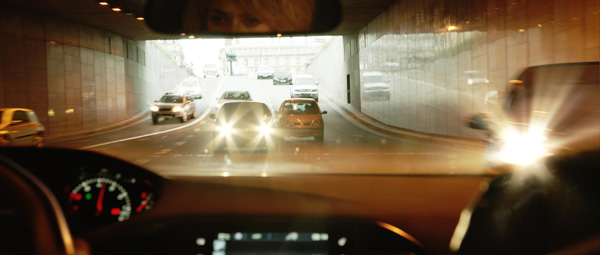
So, from the simulation rig they used to get the suspension of the cars right, to the rock solid matchmoving of extremely challenging shots, to the re-projections of HDRI and textures onto the geometry of the Lidar to generate lighting and reflections - all of their production steps benefited from this very accurate data. Just as important, the .obj and Maya files 4dMax provided were clearly identified, divided properly and well oriented in space, making them easy to use – virtually plug-and-play. The data was already transformed and cleaned up, which saved time on extrapolation. Catching the LightRodeo’sVFX DP Robert Bockcaptured a huge collection of photos that were extremely useful for compositing the 3D cars. The reference pictures and HDRIs also helped make the integration imperceptible, containing essential lighting information and the reflections on the cars. Like 4dMax, he covered every single section of the streets where the chase was taking place, allowing the artists to project their textures on the entire environment. “While real cars were flying all around us, Robert was running across the set, gathering HDRI 360° stills for almost every single take and from every position where we would have to integrate CG cars,” François said. “Later on, since the show was shot entirely digitally, we were able to correlate time of the day from camera metadata and make sure we used the appropriate HDRIs for our lighting. This also proved to be critical, given the fact that lighting conditions changed a lot from one shot to the other, from early morning bright sun to overcast afternoon.” Under the supervision ofCG supervisor Mikael Damant-Sirois, Rodeo’s team of lighters pulled the relevant HDRI spheres and projected onto the Lidar geometry. Since both the cars and the camera were moving at high-speed through the set, lots of different HDRIs would be used in any given shot to recreate the lighting and the reflections accurately. On a few extreme occasions, such as moving in and out of a tunnel, the HDRI didn’t prove to be precise enough and light sources had to be manually placed inside the CG space. |
 |
 |
|
Arnold position passes allowed artists to pick specific parts of each individual object in the scene and attach 2D elements to it, change a reflection, add dirt or modify the car paint very easily and effectively. “We also organized a shoot at our in-house studio where Robert Bock shot live action debris and smoke, plus a few extras, including myself and most of the compositing artists!” François said. Damage Control“As well as the HDRIs, Robert ran a photo-survey session of the cars the production was using, which became a starting point for our modelling, and I continued gathering reference pictures of all kinds of props that we eventually reconstructed in CG. I even took a long, lonely drive out to a show-room in the middle of nowhere, where they sell the same type of bollard seen in a couple of our shots.” The process for augmenting the cars with CGI damage involved modelling and rigging mid-resolution damaged cars at the animation stage, in order to get approval on the amount and placement of the damage. From there, they could finalise the hi-res car models and proceed with their damage simulation. The same procedure was used for about 10 hero cars and roughly 20 additional background crashed cars. François explained, “For each collision and crash, we developed a deformation rig that would deform the meshes depending on impact point, speed and angle. Once we got the impact right, we would start from this basic deformation and refine it by modelling specific interior parts that would be revealed, breaking custom parts and adding secondary animations. On top of that, we ran FX simulations in Houdini for smaller debris, dust and smoke. All these elements were pre-comped by the lighters before handing them over to the compositors.” Pace and TimingReferences for this sequence came from many sources. For the choreography and general look, Luc Besson referred them to a scene from ‘The Blues Brothers’ in which a fleet of police cars pile up in a chaotic but realistic way. With this inspiration plus the video of the miniature cars on his desk, they started gathering their own reference material as well. “For the crushable models, we compiled our own set of reference material, and studied hours of crash test footage, analyzing how the individual components would break, how much debris was spreading out, and other incidents. We then received great videos of the stunt drivers’ rehearsals that we used as reference for generic animations, rigging studies and suspensions behaviours,” François said. |
 |
 |
|
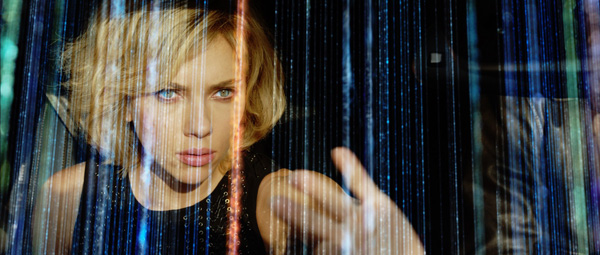
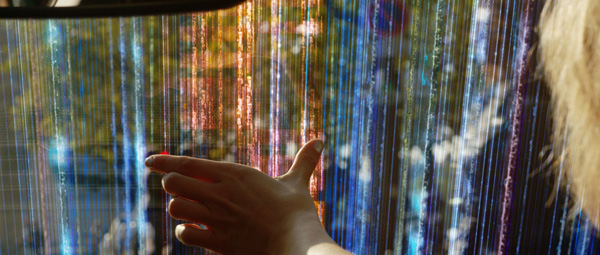
“That said, previs notwithstanding, finalizing the animation was pretty challenging. Fortunately, the director and editor locked the sequence quite early in during post-production and we were able to tackle the car chase early on. We were confident of the continuity of the hero cars but since Luc decided to add quite a few background cars, we had to devise a system for the secondary cars’ continuity without opening a different 3D scene for every single shot. “We ended up splitting the sequence into three different ‘moments’ and created one 3D scene for each, in which we would animate the background cars. This made it much easier to ensure continuity from one shot to the next.” Streaming SignalsLuc Besson’s Lucy can do more than drive fast. Rodeo FX’s motion graphics team was responsible for the rays she sees streaming from mobile devices and her supernatural x-ray vision, which both involved considerable conceptual and design work. Defining a look to illustrate the colourful shimmering signals emitted by the mobile devices was an interesting challenge because the effect needed to be visible in extreme wide shots as well as in close-ups. François said, “We created some concept art in pre-production, which pretty well locked the look at this stage. We were not given any specific reference, but a rather a precise description of the data flows. It had to look both digital and organic – that is, not just an additive piece of artwork, but a true element integrated into an environment. |
 |
|
Because Lucy reaches out to touch and interact with the rays using gestures choreographed by Luc and Nick during rehearsals without any on-set reference, the team blocked the animations based on her movements. HypervisionAs for the x-ray vision Lucy experiences while she is at the hospital, this also needed to be organic and fluid, and in the end was quite complex. Added during post-production, the shot had to carry the idea that Lucy had the ability to see through walls. Production shot extra actors on green screen, Rodeo extrapolated background elements, and a number of motion graphics were designed and assembled in order to create this supernatural vision. “Developing this effect during post meant that we had to be much more creative and resourceful than usual. We needed to create an original concept and look, and either rely on elements that were already available, or generate them simply and rapidly. Nick Brooks really helped us a lot on this by shooting additional sprite elements at Luc’s studios,” said François. ”We used a foreground plate as our main element and derived a series of elements from it. The basic idea was a combination of X-rays and thermal imagery to indicate that Lucy starts to be able to see ‘invisible’ objects. But because Lucy is not a cyborg, the whole look had to be organic and slightly abstract. |
 |
 |
|
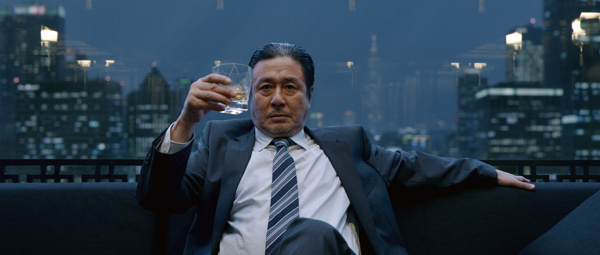
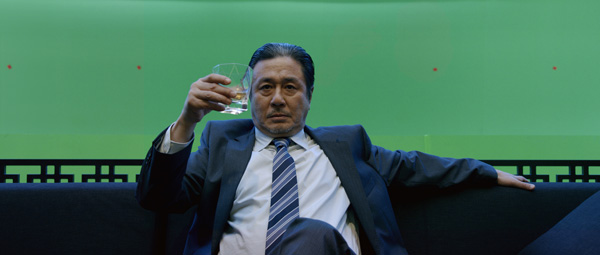
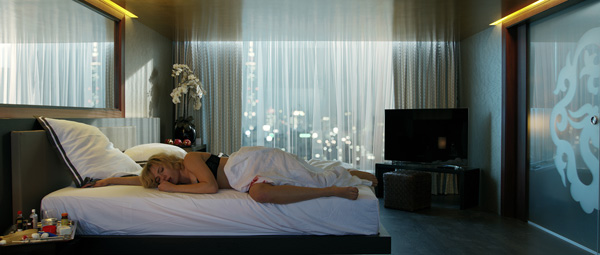
“We sent a rough choreography of these elements to Luc and Nick, and once timing and movements were locked, we 3D rotoscoped the sprites to be able to switch their render from solid to ‘x-ray’. We rendered out passes of the set extension and CG characters using different shaders and then ourcompositor Xavier Fourmondput everything together in Flame. The fluid and organic look was mostly an artistic touch Xavier created in the Flame using animation loops generated in Houdini and Trapcode Particular. City of TaipeiRecognised for the quality of their CG environments, Rodeo FX helped enhance and customise the complex urban landscape of Taipei, seen through the huge bay windows in a scene early in the film when Lucy first meets the leader of the story’s gang of thugs in his luxurious suite. This sequence was shot on a set without windows in front of green screen. 4dMax provided a high-res Lidar scan of this set also, used to position the CG window accurately in space and to create accurate reflections of the room in the composite using a very simple shader. |
 |
|
To ensure this cityscape would work for all camera moves with enough parallax and continuity, they actually modelled a 3D version of the matte painting, which produced realistic parallax on the foreground and midground buildings. The very distant skyline and sky were projected on a sphere, which allowed them to complete all shots requiring this environment using just one projection set-up within Nuke, with two different lighting scenarios. www.rodeofx.com |
|
Words: Adriene Hurst |


