
Jumping from Ubisoft’s video game, the characters and creatures in 'Prince of Persia' inhabit a mythical world of adventure and romance. Indepth interviews with artists from four major VFX houses reveal the diverse new tools and techniques used to skilfully bring the fantasy to life.From Digital Media World Magazine
 |
||
  |
||
|
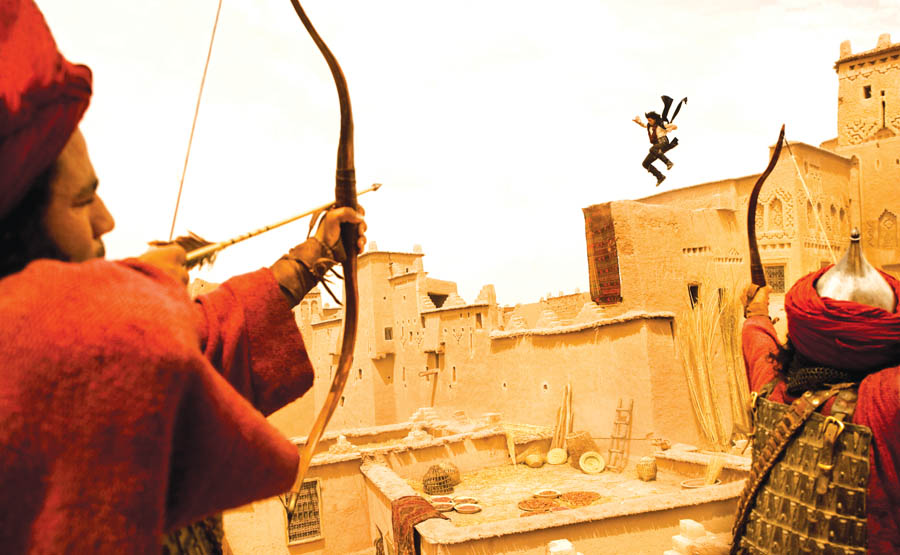
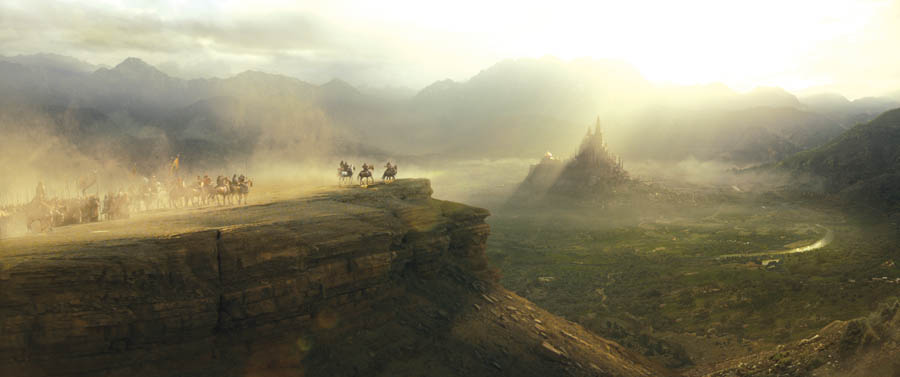
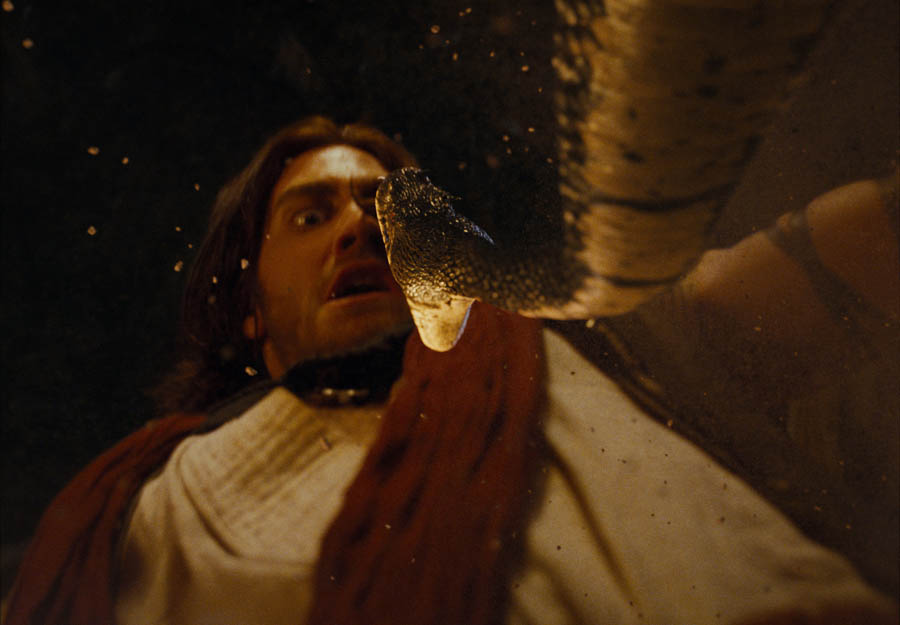
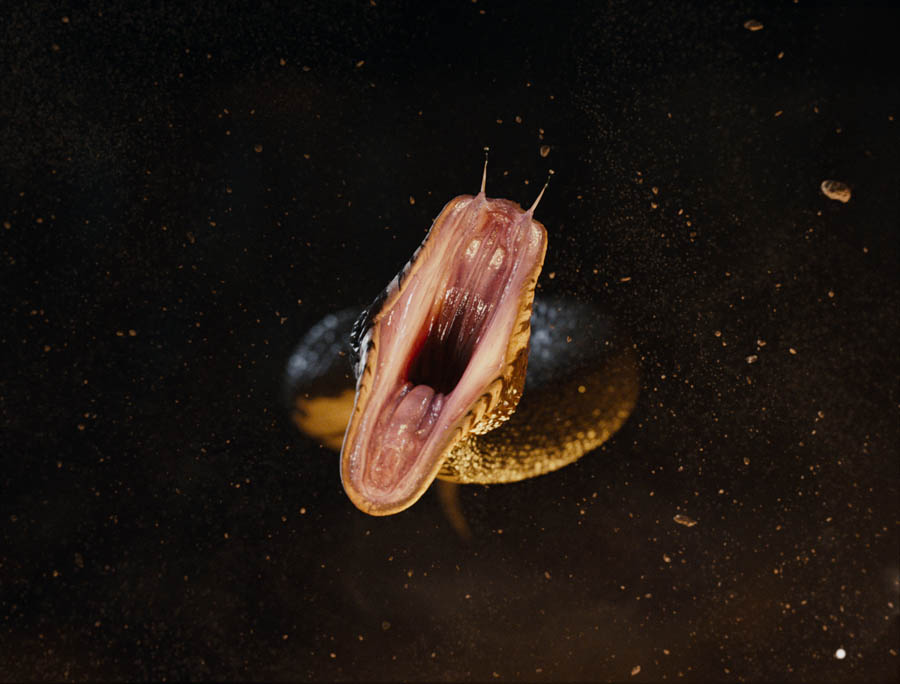
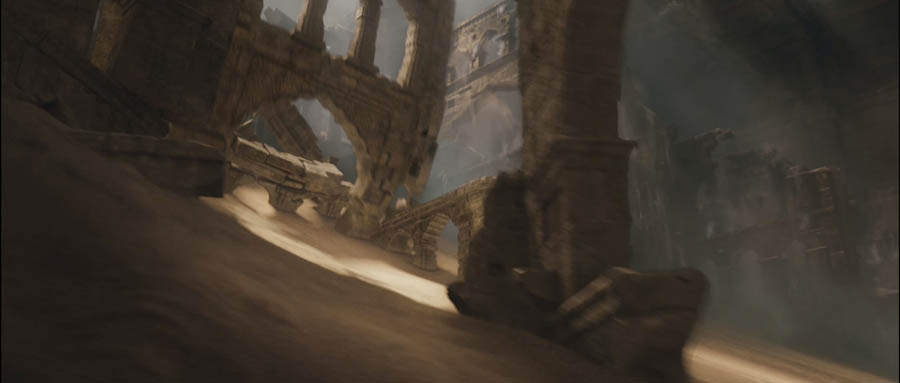
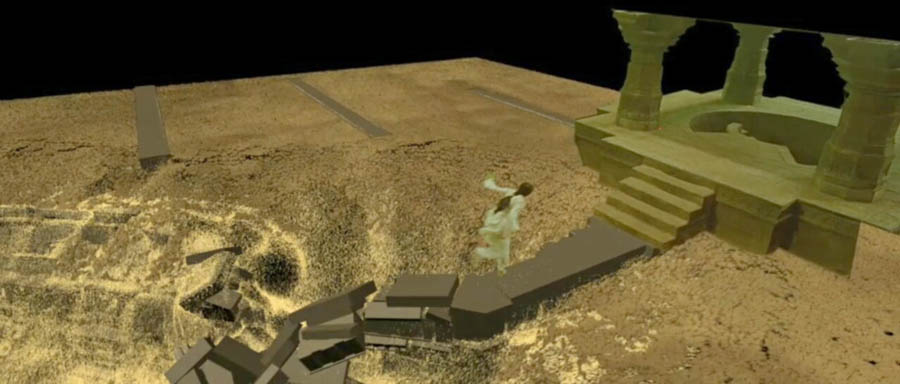
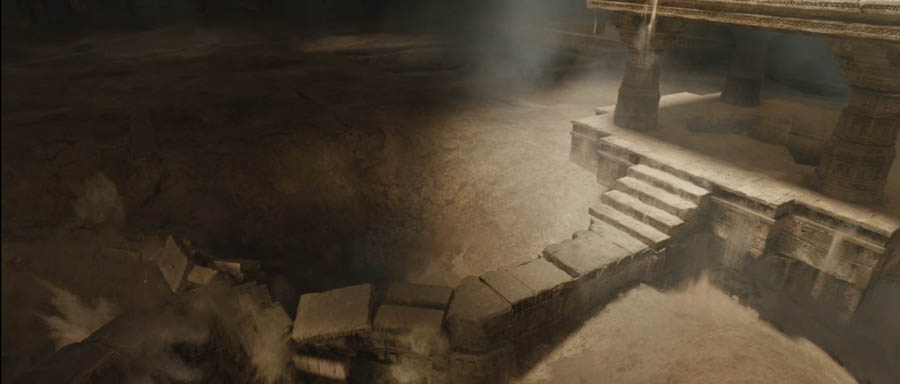
Framestore’s Visual Effects Supervisor Ben Morris and team put creativity, R&D and a heavy dose of hard work into the project. Although in the final edit 124 shots remain, the artists worked on over 200 shots. On Set in Morocco He also ensured they would have enough tracking data back in London, updated camera and VFX floor sheets, and collected references, textures and HDRI for CG, set augmentation and unexpected shots. Framestore contributed a fair amount to the concepts and story for the shots they were assigned. Ben notes that this is a growing trend in VFX. The critical sand room sequence the team handled at the end of the film takes place in an entirely CG setting, and is driven by what the FX artists have done with the environment, the look and even the final action. Concept Drawings Universal Particles The particles could be generated from either Houdini or Maya. They wanted to be software agnostic to suit the skills of potential team members joining the project. The pipeline also had to be data-centric. As long as simulations of particles could be generated and stored in a universal or common cache format, then the RenderMan DSO pipeline could take data from any of these applications, and tools were developed in both that complimented each other. They ended up with a team of Houdini and Maya artists who could all write out the same p-cache file format that Alex developed for the job. Ben explained, “To the renderer, those simulations all looked identical. We could concatenate them, manage them all off-line out of the packages and write them to disk. We could write a description file for the render which would serve as a shopping list specifying, for example, ‘These four caches should go there, those from Maya over here . . .’ and so on. They would be put together through the render pipeline.” Light Occlusion “Also, because of how fine the hairs were, unless our calculations were very precise – and consequently very slow - a lot of noisy artifacts appeared in the final image. By grouping hairs into sets based on location and thickness, and by representing these sets in a special way, we could calculate the light interaction between large numbers of hairs quickly and without introducing any artefacts. “When shading the sand, we found a similar problem - large numbers of small elements that all contribute to the lighting of their adjacent elements and surrounding geometry. By adjusting the primary occVox algorithms to group sand particles instead of hair, we could use the existing code to generate quick, accurate lighting interaction between literally billions of points.” Animated Collapse Once the animations were approved at a rough level, their effects artists would paint the low res sand planes from which they would simulate high-res collapse and destruction of the architecture, substituting in more accurate representations of the bricks and shattering bricks, simulating the action with their in-house dynamic solver F-bounce, using the animation ground plane as a collision surface for those chunks of architecture. Simultaneously, they would be simulating flow down the sand planes that were affected by intersections and collision with these objects. They would calculate surge profiles and undulation on the sand plane that Dastan slid down. |
||
 |
||
   |
||
| Layered Simulations “It was a multilayered cake. We locked one simulation for rigid bodies, did the next simulation on top of that for splashes of sand where bricks hit the flow, back spray coming off the rear of structures through the arches. Then another rigid body layer might shatter larger bricks into smaller ones, based on simulation contact and impact. We layered them all up, hoping we’d never have to go back and start again. But of course once we started constructing the physical simulations, change was inevitable," said Ben. “Therefore, we stored the simulations in a modular fashion. If we did have to go back and re-simulate anything, it could be done in isolation. “It’s not enough to make a dramatic sequence like this physically accurate and correct. It had to look the way the team, the director or Tom actually wanted it to look. We had to be able to massage and direct it.” Nevertheless, the artists watched demolitions of old and new buildings as reference, even footage of the crumbling towers on 9/11. Blown-up power station cooling towers and blocks of flats were useful too. Six-Day Shoot Short on time, Framestore built minimal practical props for the six-day shoot planned for the sequence. They needed a door for Tamina and Jake to run through into the sand room, and a plinth, or mechanical slide on a rail, that Jake slid down in some early shots. The most problematic was an inclined sand slope for Jake and the stunt doubles to use in the main part of the sequence. At first, they tried using a heavy, awkward slope which they struggled to keep covered with rough intractable sand that interfered with the actors’ actions. But they gave up after wasting two days and decided to let Jake slide down a smooth board and add CG sand in post. Later, towards the end of the sequence, Jake hangs perilously from a tower holding all of the sand. Framestore built the top surface of this for him to scramble up before his final back kick. These were the only practicals elements in the sequence – everything else was CG but they had made sure that the concept artwork they had submitted to the DP and cinematographers was enough o tell them how the final space would look. A lot of story and sequence editing followed, of course, distilling it all into a tight, 2-minute action sequence. Reconstruction The lighting scheme came from a mix of onset reference and concept art. Whenever they shot practical elements of the actors, they took HDRI reference, although once the collapse had begun they changed the lighting so often that they did some relighting on the 2D elements as well. In the latter part of the sequence, Lighting Supervisor Rob Allman and Kevin Jenkins art-directed much of the look of lighting, referencing old masters paintings, moody Rembrandts and so forth. Tom Wood was open to these ideas, moving his vision to striking visuals, dark backgrounds falling off to near blacks, strong light from above and rich saturations in the reds and other old master-style lighting techniques. Style Bible “The concepts also drove the scale and magnitude of the simulations as well, and he created some of the visuals well in advance of starting the shots. It was a long but exciting project, in which we couldn’t have predicted that this sequence would turn out as it did. Charming Snakes They decided they should be mostly black, broken up with banding and a lighter belly. The put in large Hollywood fangs for danger and produced an amalgam of real snakes to create the vicious sidewinder they needed, going slightly beyond reality especially regarding their tunnelling ability – how well could a snake really tunnel with horns and rough scales? Scaling Up “Theoretically, you should be able to put them on a path and get them moving. But considering these snakes’ activities in the film, even a kinematic solve becomes hard. For one shot you’ll want the head to drive the action but for another you’ll want it reversed, or to anchor all movement from one point. These demands made the rig complex. It took a long time to design and build what the animators needed and at one point they cheated and used two snakes in one shot, concealing the join, which gave them more flexibility to carry out their manoeuvres. Super Snake Rig The shot covering the snake’s demise crept up on the team sooner than they expected and they never had a chance to set up witness cameras for enough tracking reference. So, they had to make do with a stand-in – a bicycle inner tube stuffed with raw salmon and tuna, fake blood and stringy additions. They placed basic white tracking markers on the outside of the tube and got the Hassansin's actor to perform the scene, before and as he sliced the snake open. They simply did as much tracking as they could despite the squashy subject. Dagger Rewind |
||
  |
||
  |
||
|
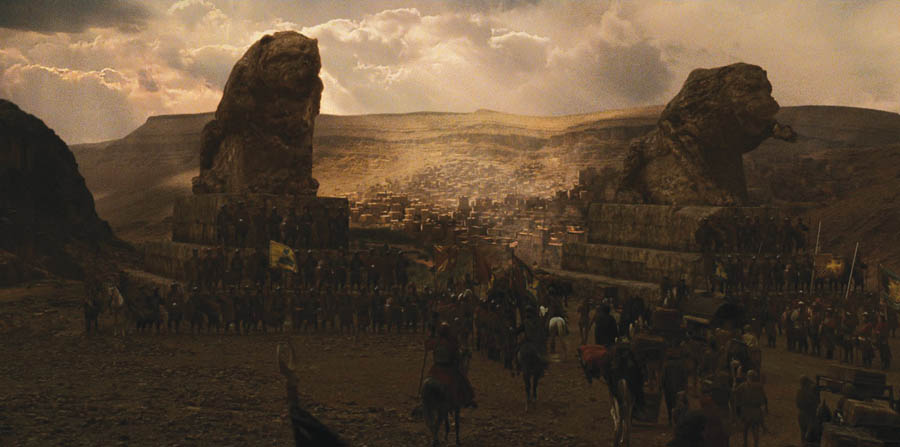
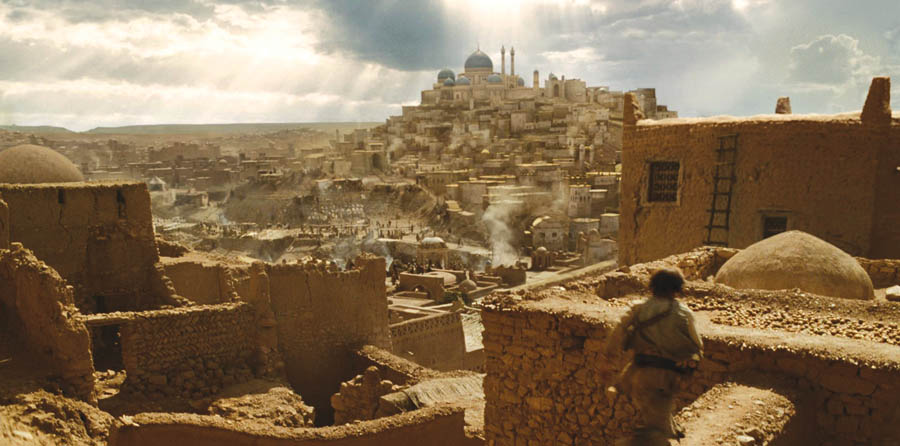
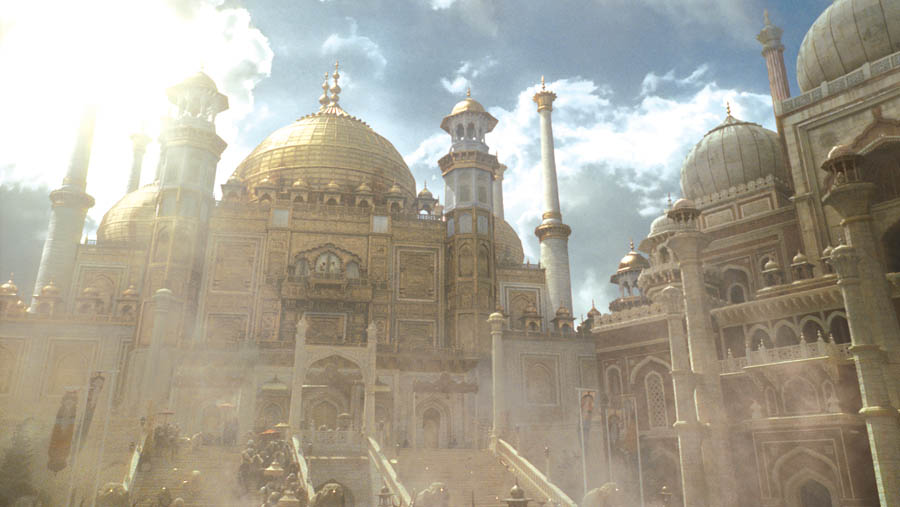
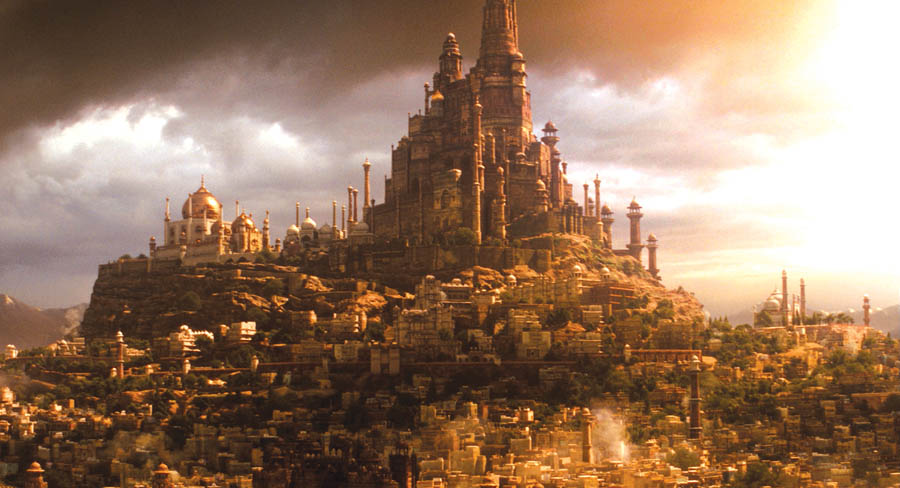
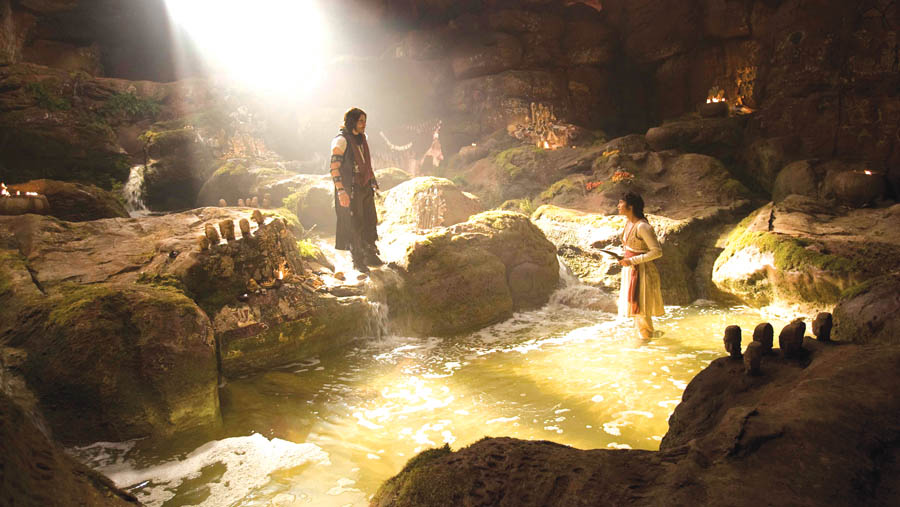
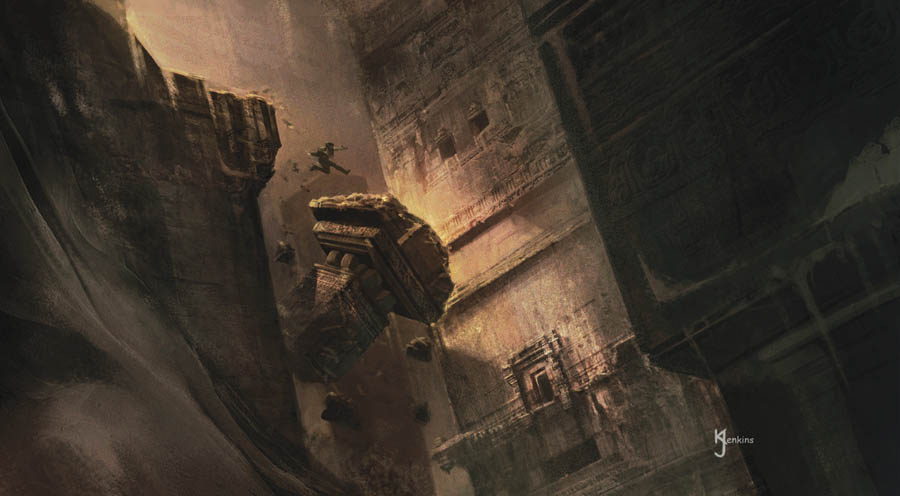
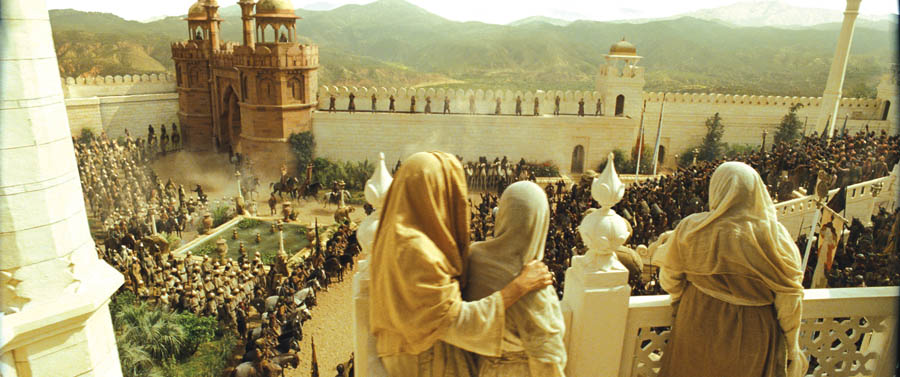
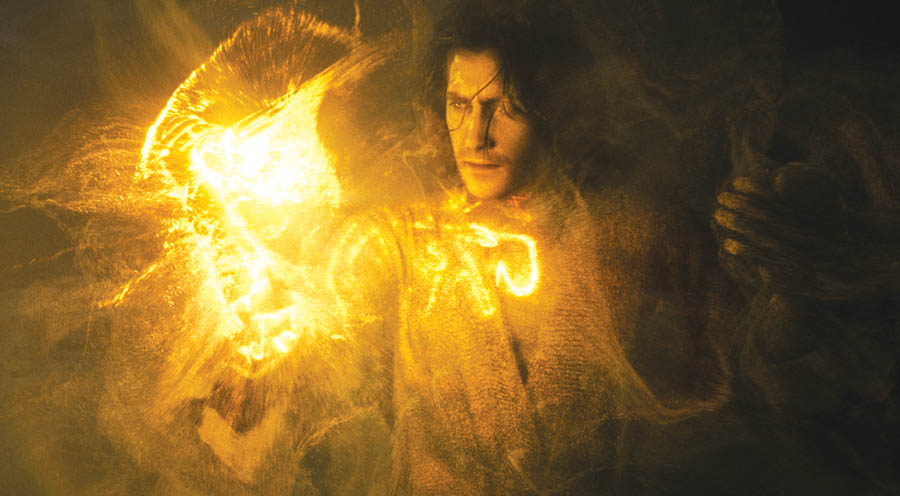
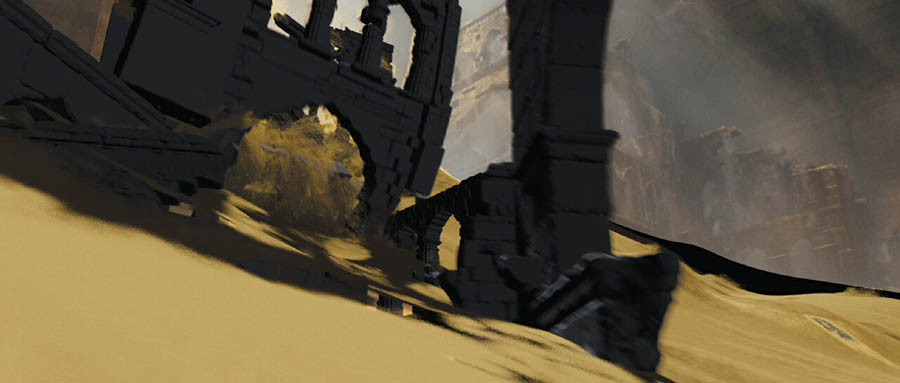
Double Negative’s Sequence Lead Viktor Rietveld worked specifically on this ‘dagger rewind’ effect, which, with a few limitations, allows an effects team to redesign live action shots in post production. For this project, it represented a challenge and an opportunity because they needed to create two independent versions of the same character - one moving forward called a ‘ghost’ character and one moving backwards, the ‘rewind’ character - shown within a single shot. The technique was first developed as Event Capture for ‘Quantum of Solace’, when it was used to complete a sequence in which the actors jump into free fall from an airplane. Applying it to ‘Prince of Persia’ required a few interesting refinements. For example, the actors’ hairs didn’t come through the process accurately, demanding the help of the matchmoving team to work on strands of hair and flapping clothes, lining up images from all cameras used in a sequence. The result was a workable 3D character that could be projected into live action footage. Texture Perfect This had to be corrected manually with paint work, and the textures had to be split into dozens of layers. The compositors had to carefully combine these layers, starting with eight beauty, or incandescent, layers. Then a vector would be projected into the virtual camera. Viktor wrote a simple Shake script that produced Alpha channels, pre-multiplied with the beauty pass, and then combined them together to produce a smooth appearance. Initially, they would have 16 to 18 layers, which is not that many, but then they would add small patches here and there as required. Ultimately, their combined efforts allowed them to turn their virtual camera right around live action characters with realistic textures. Once all data was in place, it worked well and gave lots of flexibility inside the camera and could be used on both the ‘rewind’ and the ‘ghost’ characters. Flexibility was important to the director Mike Newell regarding this effect, thinking he might want to wait to decide on camera moves until some time after the live action shoot. “Of course, it’s an expensive technique and not practical to use all the time, but it was worth it in this instance, especially since we were producing the two characters in each shot," said Viktor. "One was moving forward in time normally, while the other moved backward, but used the same camera motion. Motion control cameras would have been the only alternative here, but these have limited flexibility on set.” The angle between each camera is where the 3D camera has freedom to move. The more cameras used, the more flexibility it will have. For some shots the array of cameras was wide and extensive, nine cameras with 20° between. For the scene when Dastan activates the dagger for the first time, the camera has to go right around him 120°, from close up to quite far, shooting three characters all running around. But they had captured enough data to do it, despite the length of the shot, some 300 to 400 frames. This became especially important when just one month before delivery, a change was required in the 3D camera, which would have been impossible with a straight live action sequence. Photo Trails “It was a difficult effect to grasp, even while we were working with it,” Viktor admitted. “On occasion it was a little mind boggling, moving backwards and forwards at once. We used a combination of Maya and Houdini in our pipeline, that is, it was based on Maya, which includes most of the plug-ins we have developed, plus Double Negative’s inhouse volumetric rendere, DNB. We need Houdini for many of our effects. Houdini is a fantastic data wrangler. We also developed a proprietary file format for working between Maya and Houdini, which we used especially for particle handling. It can handle and control the millions of particles we needed for the ghost effect.” Ghost Effect Combing Vectors Light Fantastic “We could colourblend other effects into the look, such as emitting light from the dagger or from Dastan’s tattoos. We created some very effective lighting from various sources for the particles that, before version 13 of RenderMan, may not have been possible. This has made a huge difference to our team’s lighting techniques.” Lighting for the rewind characters was a special case. To regulate the lighting from the different cameras was handled with a primary grade given to the footage at scanning time, so the compositors would all have the same colours to work with. “However, once this grade was baked in, the render was fast and straightforward,” Viktor explained. “Those reconstructed characters did not need relighting, whereas the ghost characters certainly did and were completely re-lit. Dastan’s face was partly live action, partly CG, which needed to be matched to the lighting on set. But sometimes, for more control, we would light the set completely flat and relight everything later.” Most sets for the rewind shots and sequences were almost completely replaced with CG – including backgrounds, extra characters and the ghosts themselves. Sandglass Creating the underground rock cavern wasn't so problematic, but the crystal presented a bigger challenge - what does a 300 foot crystal filled with light and emitting sand look like? After finding some unconvincing photo references, the team eventually based much of their work on crystals they bought from a local alternative medicine shop. With these they captured footage while shining lasers through them and lighting them with different light sources, emulating results such as refraction and flaws that made them feel like crystal. The greatest challenge of the sequence was achieving the scale. The team visited a quarry, capturing a large collection of photos to reconstruct the rock surface in 3D, and projected textures onto the geometry, creating a realistic rock surface built to a real scale. Further assistance came from the quanities of falling material, after researching and studying how rocks would fall from the roof and break up, dragging dust and debris with them. Getting the speed of falling material right helped to convey the scale, as did adding atmosphere. The floating dust particles, barely visible as dust, gave the cavern a realistic feeling of space and distance. Mythical Alamut Over India From the start, the team knew that there would be complex shots with sweeping camera moves through of Alamut in various lighting conditions. Previs was undertaken but the full extent and number of the shots required was not firmly decided on until the shoots were completed and the editing had been locked. This meant that the cityscape needed a good degree of flexibility and, therefore, it made sense to construct Alamut fully in 3D, although certain shots were supplemented with matte painting where 3D refinement would have created unnecessary work. In the end a variety of city shots were done including accurately placing Alamut into a helicopter plate shot in Morocco, extending the Moroccan Eastgate set with Alamut behind and, of course, some fully CG city shots. Town Planning To create the bulk of the city, the artists built a selection of 30 houses, from plain buildings to minarets along with a large selection of props and market stalls. Around 50 different props were created and cloth simulations done for laundry on the roofs. Each house had texture variations and a number of other hero or unique buildings were created as focus points. They could control the variation and types of housing in an area in real-time with an OpenGL preview. Close-up shots of the city involved additional layout work and dressing by hand. Grand Scale The pipeline has tools to allow artists to lay out the collection of 30 buildings cached on disk to form a virtual layout, without having any geometry existing in the scene. This can be viewed in Maya using the custom OpenGL preview node and be released into Shot Packages which are passed to along to artists such as crowd or lighting TDs. Level of Detail |
||
 |
||
| “Rendering the city for the complex 3D shots were heavy but a lot work was done early on and throughout to optimise,” said Stephane. “This included work on the pipeline and the way the city is loaded into PRMan from the packaging, along with a number of more straight forward things such as PTC baking global illumination and separating shadow maps for static/animated objects to reduce the number of per frame shadows required. We rendered the trees as a separate pass and the city normally two passes to allow comp control and to keep within a reasonable memory threshold.”
CG Armies MPC used its library of motion capture clips, and a dedicated two-day shoot at Centroid at Pinewood Studios, supervised by Crowd Simulation Lead Adam Davies and Stephane, captured some specific motions, from armies charging into battle, guards patrolling the city, panicked citizens, up to Dastan’s elite men rappelling up a wall. “We received excellent photographic and plate reference for the soldiers from the shoots, and we built the agents directly from this. For this show we only had one quality of agent built to a high level - the crowd often tends to come closer to the camera than expected! We used the same motion capture clips throughout, and using the ALICE cloth meant we didn't need to use Syflex for the crowd closer to camera. City Building To create augmentations, the Cinesite team did some 2D compositing but most of their work was CG. For the two cities they created, Nazaf, King Sharaman’s home, and Avrat, his father’s burial place, they chose to use 3D after experience with other films. “You might plan a city as a matte painting, and then discover you need to move the camera, requiring a matte painting projected onto geometry for 2 1/2 D moves, and finally realise that these methods are not cost effective. It’s also frustrating for a director to be told when and where to lock off the camera, or be limited to a nodal pan,” said Sue. “Most directors expect to have full freedom.” The cities were built from a combination of art department concepts and detailed survey of the sets at the time of shooting, photographing everything down to the last mosaic tile. Sue did further research at museums in London, especially a special exhibition at the Tate Britain Gallery called ‘The Lure of the East’ showing works by British artists depicting the cultures and landscapes of the Near and Middle East, which she attended with Tom Wood. Local Lighting While the set was limited to a façade representing only a tenth of the complete city, it gave the team enough information to build the remainder in a modular fashion, with a variety of different doors, arches and minarets to mix and match in buildings of a similar design and feel but all individually made. Sue reckons about 50 per cent of the shots were done in Morocco and when they returned to Pinewood Studios they could create effective backgrounds for Dastan’s parcours jumps performed on wires on a blue screen set. The team’s real challenge was matching the lighting. They had taken shots on location as a guide, but of course the DP could never have replicated the lighting on the set. The artists touched up every set, adding more contrast and dark shadowy areas. Their 2D Supervisor Matt Kasmir dedicated himself to matching the light in the two locations. They had taken silver and grey balls and HDRI cameras out for lighting reference, using a 4-camera 360° array to capture the light in a single shot, while their camera wrangling team recorded camera heights, tilts and angles, and lens grids for distortion. DP John Seale also used zooming cameras, not typical for a VFX film, which change focal length and lens distortion, and makes tracking 3D objects into live action more complicated and time consuming. This data was encoded into the shots. Sue has learned that getting the surface of the skin right is critical for big cats, due to the strong layer of muscle under a think layer of sebaceous fat with fur on top of that. “When the cat jumps onto a rock, the muscle snaps into place but there is some secondary movement in the fat layer to account for, then over this the fur wrinkles in a special way. These details add to the realism. Unlike an alien, an ‘unknown’, people know instinctively how a lion will look and move.” Living Crowds Other software in the pipeline was Shake and Nuke for 2D compositing, and Maya for the 3D. City dust and smoke was generated with Houdini and Maya fluids, and matte paintings for sky replacements were made in Photoshop. Animated Weapons The team needed to work out locations of all elements in 3D space, while looking at a 2D image of the footage. They relied on LIDAR scans of the set and, by combining these with motion tracking they could figure exactly where the actors were and how far the whips should stretch, or how much the shape should change, to make the necessary moves and hits against props to enhance the actors’ work. The 3D Supervisor Artemis Oikonomopoulou was a great help, adding glinting lights to the flashing blades. |
||
      |
||
| Younger Skin The team had to do some face replacements onto live action doubles, usually standing in for the actors to save time. “Face replacements are becoming more common in films. We took photo reference of Jake’s face, for example, and tracked it onto the face of his double,” said Sue. “But we also did ‘youthening’ work on the faces of the King and his brother in some scenes occurring about 20 years earlier in the story, in which Mike Newell was reluctant to replace the main actors with younger ones. We shot the scene with and without the actors, and took hi-res images of younger people who closely resembled them under the same lighting conditions. “In post, we tracked in the younger looking skin onto the faces of the actors to replace skin under the eyes, thinned the noses, added eyelashes and hair. We used our in-house plug-in Motion Analyser to track the skin’s surface and locate specific flaws in 3D space. It can keep the new skin accurately in place by analysing the motion of vectors and maintains the location of the object as it moves through the shots. Other faces it is being used on include talking animals such the dogs in 'Marmaduke'.” |
||
|


