|
The VFX shots for ‘Let Me In’ were relatively few in number but were complex and often very long, keeping the two teams busy throughout post production. Method was awarded work on the show in November 2009 just before principal photography began, and had a team member on set in New Mexico throughout production, working alongside production VFX Supervisor Brad Parker.
Double Crash
“The shoot lasted until February 2010,” said Sean Faden, VFX Supervisor at Method Studios, “Although we did a few tests during production to give the director Matt Reeves a sense of how much make-up Abby would need to transform into her vampire persona, we started CG development in April and completed all the shots by mid August. I was on set for most of the key shoot days relating to our shots.”
In addition, Method provided a data wrangler for the production, Messrob Torikian, who helped survey and photograph each set, and record all relevant camera data. Method’s total team comprised about 15 people, completing 19 difficult shots.
To help stage a car crash at a petrol station, the Method team combined and transitioned two plates involving two different cars. The first, A plate had the real actors inside the car with a stunt driver in a pod on top to drive and control the car. He backed the car away from the station, letting it swerve across the street.
Multiple Transitions
The second B plate was shot on blue screen with a car rotating on a rotisserie, a stunt man resembling the main actor and a dummy set up as passenger in a slightly different position to the end of the A plate. These two plates contained several elements the team needed to transition. First, the actor was transitioned to the stunt man, and the passenger to the dummy. The cars were both 1971 Chevy Impalas, had different trim packages with different seats, rear view mirror, side panels and so forth, and had to blend together as well.
Sean said, “I’ve done enough similar transitions to know that making all these changes in a single frame isn't effective. We staggered them, employing several techniques. For example, the back seats were different heights in the two cars so we made the seat in the B plate bounce during the crash, making the new level less noticeable when the car came to rest. The bounce required animating the seat and a paint warp to blend the stunt driver and actor.
Sweet Spot
“Also, the dummy in the B plate was completely static until the car began to rotate, but the passenger in the A plate was bouncing in his seat, which meant animating the dummy as well to find the best possible moment to make the transition. Every element had its own ‘sweet spot’ for the ideal frame where the transition should occur. In our first pass, we had added considerable camera shake but the director wanted to completely carry the audience into the crash, using only enough shake for realism, and make the whole sequence feel like a single shot. We used both Flame and Nuke in the comp.”
They created the backgrounds for the blue screen plate and a road extension in the A plate as the car skids across, including the street environment. Sean went out on the Pacific Coast Highway with a Canon 7D to shoot HDR tiles of the night environment, including a petrol station, hillside, guard rail and trees, and then merged these images onto simple geometry.
|
|
A second portion of the environment was the hillside the car tumbles down, entirely built in CG with V-Ray and Maya. “This was the only shot to use V-Ray. The character work in the other shots was all rendered in Renderman out of Houdini. Our CG Supervisor Juan-Luis Sanchez organised the V-Ray render. The bushes were a mix of CG with 2D bushes on cards, shot on location for us once the car had fallen, upside down, to the bottom of the ravine,” Sean said.
Twist and Shake
A further challenge to this sequence was the overall animation. At the beginning, there was one car skidding across the road, plus another simply rotating in place. They tracked and match moved the motion of the cars in each situation, and when the car took the embankment, they synced the two together as the car began to roll down, based on the rolling of the motion-controlled rotating car. They added a large shake to the animation each time the car made contact with the hill, meaning the background had to move outside the windows since the camera was inside the car.
“This car animation was done in Houdini using CHOPS, or channel operators, which allowed us to manipulate animation curves and composite animation more easily. This way we could give the relatively simple animation of the tumble a procedural shake and twist for each impact.” These effects would update automatically whenever they altered the animation. They also had controls to dial up or down the size of the bounce or twist. Adding to the complexity, the background needed a much bigger ‘bounce’ to make it read from the interior, the same as it would be viewed from outside.
Animated Attacks
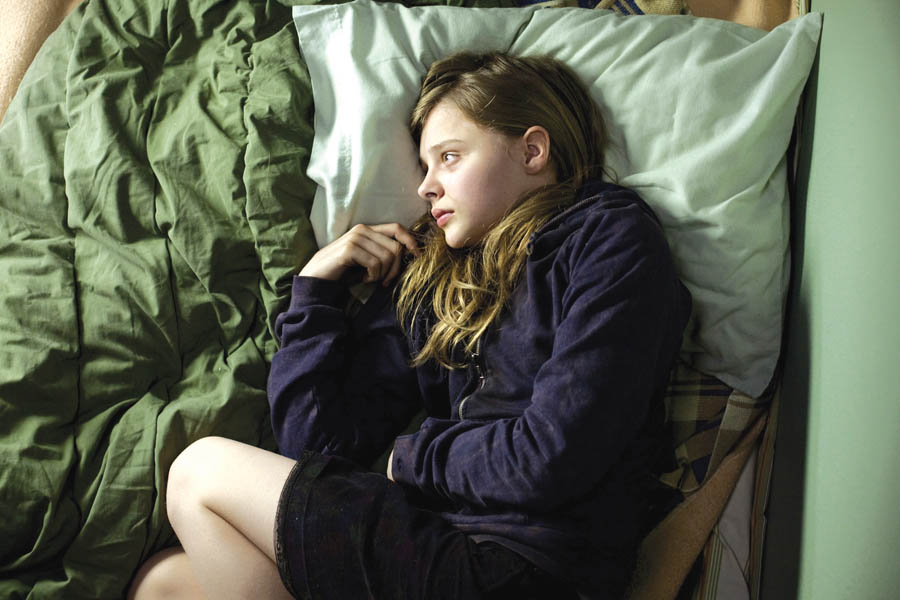
The whole sequence was over 1000 frames, about 700 of which were CG. Most of Method’s shots were similar, intensive one-off shots and sequences. When Abby transforms into a vampire and attacks her victims, Method were responsible for the dramatic and frightening animation creating her performances. The director wanted this incarnation of her character to look as real and convincing as her human self, and the way she moved was critical.
“Conventional wirework or stunt work wouldn’t have worked as well,” Sean said. “Stunt actors would have fought through the sequences, just like professional stunt actors. It would have lacked the raw edges he wanted, violent and moving at a superhuman pace. Whenever one of these animations was called for, we shot the actress, acting through the piece as far as feasible, running and jumping at a tree she was meant to climb up or fence she was to leap over.
Frantic
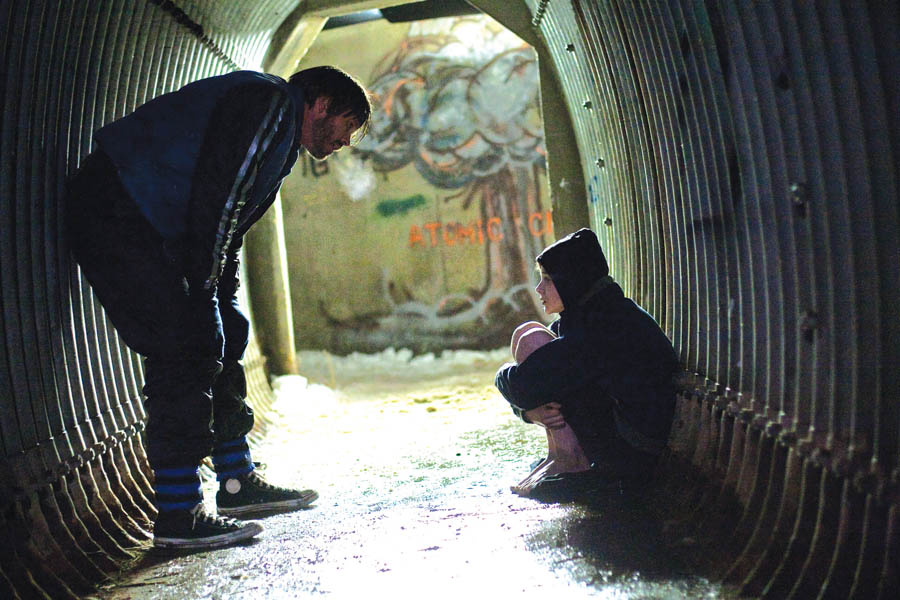
“For the attack scenes, we shot her actually on top of the actor, performing motions similar to those required but not as violent. The footage wasn’t used outright but gave us a basis for how her clothes, hair and Abby herself should move. We could see what the other actor’s footwork would look like, for Abby’s animation to coordinate with. One attack, inside a dark tunnel, was over 300 frames long, unwaveringly focussed on the two actors. Her ultimate animation took many weeks to hone and perfect, but those pieces of live footage on location served as excellent reference.”
The animation Supervisor Matt Hackett in Method’s New York office would send through work on Cinesync, where the teams and the director would work through the animations together frame by frame. “Matt Reeves asked us over and over to make the performance frantic, out of control and violent, wanting to avoid a choreographed appearance. It all had to lookout of control and uncalculated, not planned."
Alter Ego
What made Abby a difficult character to create these effects for was a compassionate side to her personality, hidden in someone who is essentially a monster. She sees in Owen a shy, bullied schoolboy, recognising the loneliness and neglect that haunt his life. Ostensibly, her efforts at friendship serve her own interests – she needs someone to help her find blood - but she remains a sympathetic character.
“The live footage we had was very helpful when it came to the render,” said Sean. “It took much of the subjectivity out of the all CG character, the usual problem in such shots. We had the real looks to work from.” Abby was first scanned by XYZRGB in Santa Monica. They delivered models and some textures although Method mainly replaced the texture work and clothing, developing three outfits for her. The model was animated in Maya using nCloth, importing to Houdini to render through Renderman. Hair and cloth increased the challenge, especially as they handed off between the real and the CG Abby, where the composite also became critical.
|
|
Let Her In
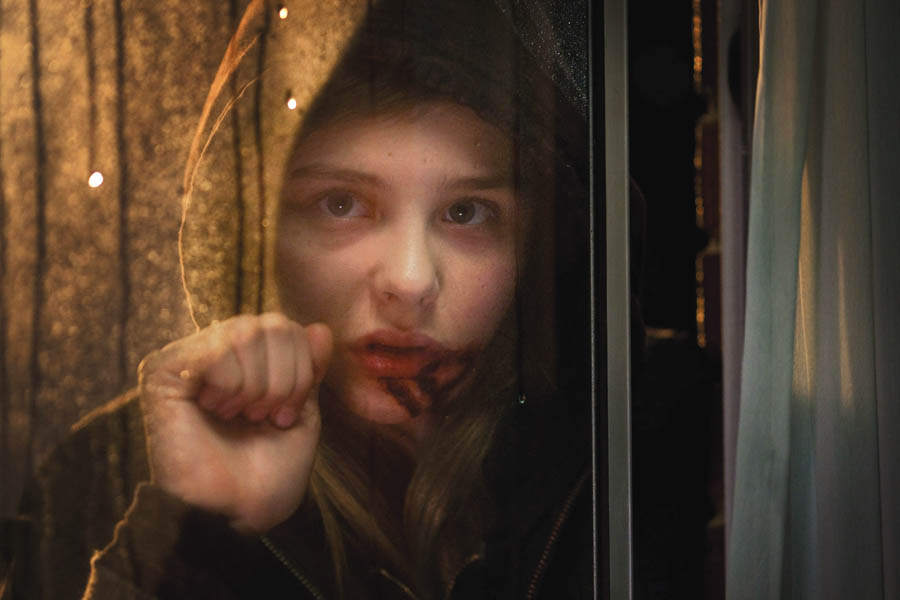
An important scene that defines Abby’s character is when she finds herself entering her new friend’s apartment without an invitation from Owen – ‘letting her in’. She begins to tremble and blood runs from her face. “Normally in such a scene, the character would be shot on set, dressed in blood. But in this case, the timing of the bleeding was so dependent on the emotional beats of the scene that this technique wouldn’t have allowed us enough control.”
She was shot without blood, or just enough for reference, and rendered out the entire sequence with her totally bloody. We then let the director and editors define the beats with in the scene as specific ranges of frames to help us regulate how much blood appeared and when, building up to the fully rendered out look. The team worked on it as one shot but in the movie it plays as four beats, which had been set out as a timeline for us. A further two shots had to be addressed in the sequence, also shot without blood because we hadn’t known how much would be needed until we had worked through the initial effect,” Sean explained.
The realism of the blood was achieved by rendering with an HDR pipeline with Mantra, using HDRs from the set. The effects animation was done with Houdini particles. They could leave those timing decisions for Matt till later thanks to the proceduralism of Houdini, but were mindful of leaving enough time for the compositing, rendering and lighting adjustment.
Magnet Tracker
Just as important was getting the CG blood to ‘stick’ properly. Abby trembles in camera quite violently through the scene. “We used the same Nuke-based system we had devised for ‘Nightmare on Elm Street’, our magnet tracker. [See DMW No 125.] It fine tunes matchmoves, coordinating CG and performances to give compositors further control. They can work faster and more accurately. Our Compositing Supervisor Jeff Allen used it on all three blood shots in that sequence.”
A mass of CG fire was required for a dramatic scene in a hospital in which one of Abby’s victims explodes into flames. In camera, a stunt actor replacing a nurse had a small amount of practical fire, which Method tripled in volume, and the flames dressing the hospital bed were doubled. But by the final shot the room is engulfed in CG fire and black smoke gathers below the ceiling. “During a shoot a production is not permitted to place actors in a closed set, so nothing had been overhead at all. But Matt wanted this fire to feel enclosed with smoke collecting at the top of the room." For this they created Houdini fire and smoke through dynamic operators called DOPS. To blend the effect around the deformations at the edges of the bed, which was moving with the actress’s performance, some practical fire elements were employed also.
Burning Face
Most challenging was her burning face, changing from normal to completely burnt. Her performance was quite violent so they used their magnet tracking once again, although for her arms they had to sometimes resort to CG replacement son a clean plate, but the CG effects blistering and burning her face had to be applied to her actual face. They created several texture maps, including colour and displacement and blended between these in Houdini. Matt was pleased with the overall effect combined in the sequence – flames, burning skin effects and lighting.
The exterior of the hospital was increased form four stories to ten, modelling and extending the building and giving the extended model to the matte painters for perspective and shading. They added falling snow and, of course, CG Abby climbing up looking very small. So that no viewer would miss her, Matt had them add a light switching off to signal her location with in the very wide shot.
Setting the Stage
The team at Dive in Pennsylvania carried out some important environmental work on this film, including building up levels of snow on the wintery New Mexico landscape for the long opening shot, setting the story’s grim tone. “CG snow was created in Maya in a way that steadily and subtly increased the amount of snow over the course of the long shot, and layering multiple renders of the snow on top of each other, saving render time overall,” explained VFX Supervisor Mark Forker.
“Our team started receiving plates in early June 2009, after the shoot had finished. We completed 87 shots in all. Production VFX Supervisor Brad Parker and Matt Reeves had seen ‘The Road’ [See DMW No121] last year and liked the photoreal style of the environmental work there, bringing the environment into the film as a character. It was also a similar type of environment, cold, harsh and spare, often shot at night.
“The opening shot also required a detailed matte painting and a new camera move. It had been shot late in the day or early evening and needed relighting, snow, atmosphere in the distance and cars removed from the original plate. Fortunately, the move was a simple push-in for the camera and could be accomplished with nested frames of the matte painting.”
|
|
Final Shots
The two extended final shots were achieved under awkward circumstances shot on a stationary train parked up against a wall, so they were not working with properly set up set up green screen plates for the windows. Moreover, the background elements had been shot from a moving car with little concern for the path of the train and needed a lot of paint work to make them usable. The car had been travelling uphill while the train remained level.
One sweeping shot showing a conductor approaching Owen needed imagery replaced on both sides of the train, through small slivers of windows. The final shot, longer still, looked directly out through the window, past Owen. Mark said, “Among several challenges was the lighting which had to change over the course of the shot both to show that the sun is rising and to represent the coming changes in Owen’s life. A number of existing lighting elements, and especially water condensing on the window, were not cooperating so we had to lift and invisibly replicate bits and pieces from other parts of the shot to create the right looks of streaming light and dripping water.”
Syncing Elements
Exteriors seen from inside vehicles are often problematic to situate correctly and because the shot held so long on the window, the team’s work had to be invisible and accurate without distracting the audience as the mysterious story finally came together. “The boy’s reflection had to be rotoscoped off the plate and because they were replacing both the background and the lighting, they had to treat the looks differently across the whole reflection. But we did use the original element, with careful compositing, because the reflection was integral to Matt’s vision of the shot,” said Mark.
Tracking helped the artists keep the elements in place through the shot, instead of specific frame-by-frame roto. The artist tracked the interior, lacking anything in the green screen to track, to lock foreground and background together and eventually stabilise it and put a new camera move on both to give it an accurate run from the camera on the train. “We used Imagineer System’s Mocha to track the windows on the foreground plate and Nuke’s tracker to stabilize the BG plate. The shot was composited with Nuke and Primatte. Because the shot was so long, 1600 frames, we could only render sections at a time.”
Transformation
Abby’s actual vampire transformation that Dive created for her was complicated and tempered by the dual nature of her character. “Matt felt that the early concept art had gone too far toward making her a monster and had to be refined to strike the right balance of horror and personality. We could base our work on the in-camera make-up she was wearing, showing veins, blemishes and treatment of her eyes, giving us a starting point from which to perfect the look. For example, the make-up artists couldn’t extend the black around her eyes completely to her eyeballs like animals’ eyes, create the correct veins, blend in the blood, or remove parts of her eyebrows. We achieved these looks with Photoshop elements and Inferno’s paint.”
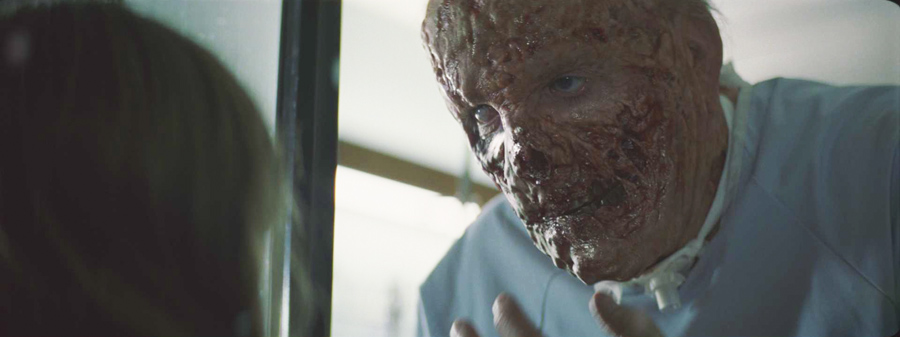
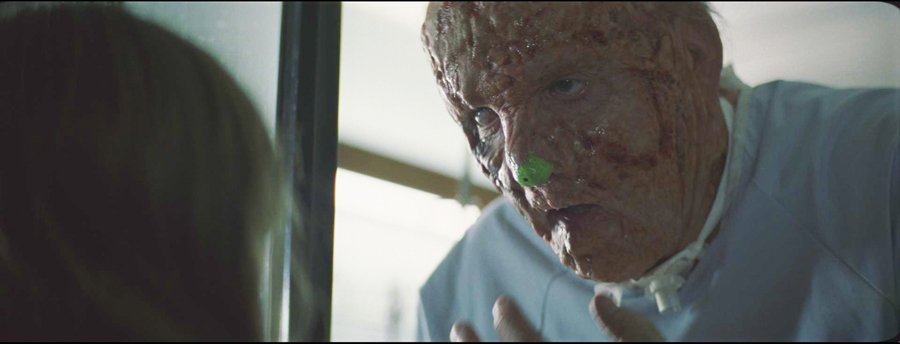
Another important transition Dive was responsible for was developing looks for Abby’s father and caretaker when he suffers horrific acid burns to his face in the car crash that Method created. Because Dive’s shot count had risen to a number that exceeded their capacity, they managed an external team at Invisible Pictures, a company they often collaborate with in this way on projects, as they did on ‘The Road’.
Face Subtraction
Mark said, “Their 3D skills are a good match for our 2D skills. This task demanded intense 3D modelling, rigging and texturing. The actor’s head was given a base makeup, like Abby, and scanned but the difficulty arose when parts of it had to be removed as burned away flesh from the nose, cheek and chin. This subtraction was the focus of Invisible’s work.”
Around the forehead and down one side of his face was some makeup that they had to blend into and clean up with some minor filtering. The Invisible team’s replacement work involved the lower two-thirds, beginning from the nose. The pipeline was complex. They used Lightwave's Microwave plug-in for baking the texture from the scan to the remeshed model, and UVlayout for creating and editing UV coordinates.
They sculpted the details on top of the scan data with Zbrush, and cut additional geometry into the base mesh with modo before going back to ZBrush for sculpting. Maxon Bodypaint helped with some texture work also. Photoshop was used to create, modify and finalize texture maps controlling elements such as skin colour, subsurface scattering colour and weighting, specular shine and weight, and custom reflection images.
Syntheyes tracked the camera motion of the live plates, to apply to the 3D CG scenes in Maya. Maya 2011 was used to create a realistic skin shader, and to match the lighting present in the live plates. They also used Maya to create a simple mouth/jaw animation rig for subtle mouth movements. This work was then rendered with Mental Ray for Maya. Nuke 6.0 was used for all compositing.
Most were side shots, revealing the missing portions of the face and needing the background to be replaced at Dive after plates came back from Invisible. Fortunately fairly general pieces were missing that they could replace in 2D.
But some shots were also handled as green screen, which meant placing the character into the hospital environment where we see Abby visiting him at the window. Completing the sequence, involving 12 shots, required swapping back and forth between green screen shots and the others taken on set. “We were given the background as both stills and moving plates but as usual, the ‘ideal’ background shot was often not quite there, especially the ones in which the camera was trained down at Abby, who was outside the window with CG snow falling behind her. The reflection also had to be retained on the window from the green screen plate and combined with water vapour.”
Retiming
A further shot required Abby falls from her perch high up a tree as she leaps down on a victim. “She was held on wires for the jump,” explained Mark, “but beyond needing wire removal, her fall slowed down too much at the end to look effective. We removed her from the shot and retimed her fall, but in doing so her relationship to background elements had to change also, because the plate speed had to remain the same.
“This meant replacing and fixing hundreds of bits of the tree, snow, a dog on the ground and other objects wherever Abby was missing from her original position, some of them animated. To make it even less straightforward, the fall was not retimed to a uniform speed – she had to slow down at the end to match the live action again. Once we’ve completed such a complicated composited shot, we always check it for details against the original in our full sized review theatre here.”
Smoother Shot
Dive also worked on the very long shot in the tunnel described earlier, as the jogger approaches Abby crouched on the ground. “The camera work was handheld, quite rough and shaky. Matt had wanted perhaps to emulate a shot on tracks but changed his mind and asked us to smooth out the shake, retime and stabilise it,” said Mark.
Their CG artist Jeremy Fernsler explained that to create a smoother, more controlled shot, they first attempted a 3D solve of the camera, filtering and smoothing the keyframes as well as hand tweaking where necessary. “This was further stabilized with a 2D track. Unfortunately this created some skewing artefacts that weren’t very pleasing, so we employed the Furnace Steadiness plug-in in Nuke. But between the solve and the time it took to turn around an iteration, it was difficult to troubleshoot the shot due to its duration.
“Finally we took the shot into Shake, unsqueezed the anamorphic plate and ran the Smoothcam plug-in at quarter resolution proxy. This calculation time lasted a minute or two so that tweaks weren’t a problem. We then stepped through and optimized the filtering choices to provide the best options for the move and image quality and rendered out. Thankfully we still had tools that have worked well in the past, even if they have been discontinued.”
|