
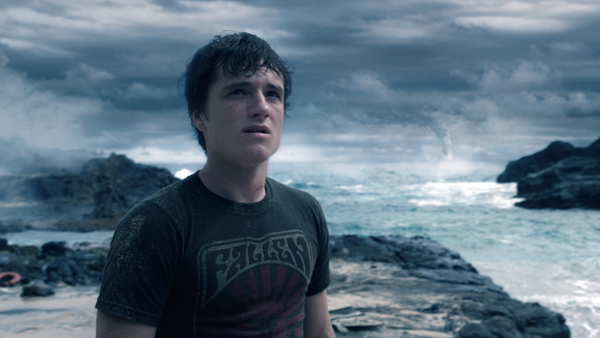
'Journey 2' takes a trip through a hurricane to an island no one has ever seen but surely wants
to visit. Production VFX supervisor Boyd Shermis, the DFX supervisor at RSP and VFX supervisor
at Method Studios discuss the birds and the bees and the lost City of Atlantis.
| As production VFX supervisor, Boyd Shermis' involvement with this movie began in July 2010. At that early stage, the production consisted of little more than the director Brad Peyton , the beginnings of an Art Dept and a production designer, but still lacked a DP. An initial version of the script had been written, though it would need to change and new characters adapted.
"'Journey 2' is above all intended to be a fun ride for kids," said Boyd. "We had a handful of conceptual illustrations and a few ideas for the core action sequences, such as the hurricane, the bee and lizard chase and the underwater sequence of the collapsing island - but no storyboards." Nevertheless, director Brad Peyton and the studio asked Boyd to create some very dynamic chase sequences the complement the story as it stood so far, in order to start giving the film that 'roller caster' feeling they wanted. |
|
 |
|
| Dollars and Sense About six weeks into this preparation phase, the third Floor started in earnest on previs, because at this point Boyd also needed to supply a VFX budget based entirely on the unfinished script and his own knowledge and experience. "Basically, until I could give the studio a meaningful dollar value to work on, they weren't going to offer any funds for previs or anything else we needed to get started, which was frustrating because only with previs can you determine what the film is all about, how it will work and, consequently, how much the effects will really cost. So, the budgeting phase was a major hurdle." Previs allowed sequencing and planning the set pieces to fit within the budget, the story and to satisfy everyone's vision. Production designer Bill Boes became a close associate as did the director, editor and special effects crew – Boyd's key collaborators. The VFX and production design teams work from the same concepts, like the director, to create the film's looks. Some sets were built entirely, others partly, some only minimally. In terms of environments Boyd's work has to coordinate what is built with what's expected. "For example, we used one very minimal set at the end of the film as the island collapses and the characters are standing at the edge of a cliff. "The entire set consisted of a table measuring about 10ft by 15ft, textured with a rocky surface – and no cliff at all. Fortunately, some photography had been shot at the location to base the VFX team's work on at Scanline in LA, but the full climactic environment then became their responsibility." |
|
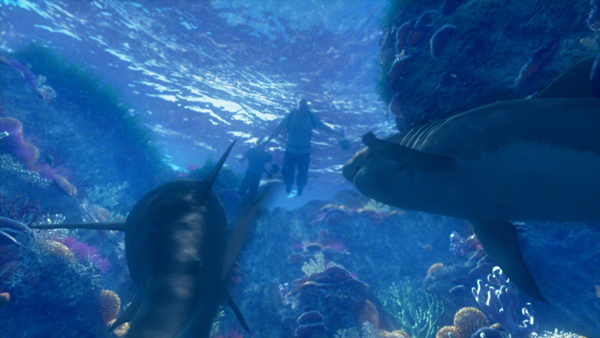
| CG Set Building Similar demands arose for the Nautilus submarine. When characters Josh and Hank struggle underwater to screw open the hatch, or when Hank climbs out on the deck to fight the electric eel, only a small deck piece had been built for what eventually became a very large submarine. Although the Art Dept had developed a complete ship design with a set of technical drawings, once the physical set piece had been constructed and the sequence shot, the artists at Pixomondo in LA, Berlin and China, had to adjust those designs to work with the footage when creating the full environment in CG. "Furthermore, concept designs like this tend to lack sufficient detail, such as small elements on the ship's exterior that give it realism. For coherence we usually go through the fleshing-out process alongside the Art Department." Because Boyd's role included working as 2nd unit director, he focused intently on vendor selection. "I look out for teams with the strengths we needed for this project – creatures, environments, simulations and explosions, vehicles and so on. Actually, I'm doing this all the time whether I'm on a job or not. I keep up with what different vendors can do that is unique, different, better or cheaper compared to what other teams are doing. They are constantly updating their skills as well." Sequence Design Having sequence design in place gives everyone on the production a template with which to work. The production designer knows how much of a set has to be built, and the lighting department can design lights. Boyd was communicating with lots of people including grips, lighting, mechanical effects and more. He also continues to define with the director what the effects teams have to deliver. "Then I can motivate the artists to the bring life and something genuinely special to this vision, relying on their particular skills," he said. |
|
 |
|
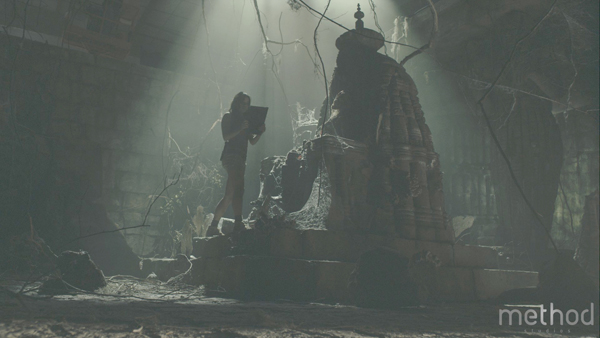
| Seriously Mysterious Creating the film's 'Mysterious Island' world needed a multi-sided approach. Though a good portion of the shoot took place on Hawaii, Brad Peyton actually wanted it to look like no other island any one had ever visited, fantastic and seriously mysterious. A primary challenge for us was this desire he had for something that looked 'unreal' but not fake. They worked through numerous environmental design stages for different parts of the film during production to find just the right balance for an outrageous looking place with rocks from South America, a waterfall from Hawaii, other pieces from China, all blended together with a coherent look. Every aspect needed to look photo-real enough to let the audience believe in it. All vendors had at least some environmental responsibilities, but he had selected a few of the teams specifically for their expertise. One of these was the team from Method Studios still known at the start of production as CIS Vancouver, where the artists had been doing some impressive environmental work. They created the City of Atlantis for 'Journey 2', a key place in the story. A section of this had been built physically outdoors on Oahu but the vast majority was fabricated in CG. Catching Light This system helped especially during the bee chase sequence through the jungle, some portions of which were shot in a small, real forest in Hawaii. Boyd said, "I went up in a miniature helicopter to fly between the trees and up and over and through features to capture the sequence photographically as a foundation. Then I had to capture the lighting environment, and took the HDR-Cam into over 20 places within that forest to ensure that wherever the CG camera had to go later, the lighting would be correct. Furthermore on an earlier scouting trip, I had LIDAR scanned the entire forest. |
|
 |
|
| This is pretty much standard procedure for Boyd, who says he takes a LIDAR scanner and technician to every set location that might conceivable need visual effects of any kind. That way he knows exactly where the camera is at any point during a shoot, capturing the camera, actors and other technicians' positions throughout and allowing him to recreate the set via triangulation.
Cameras Plus After testing the RED MX and a few other options, the production chose the F35. Some of the bee chase footage was shot on the F23. Boyd's aerial work often employed a RED MX, while for the mini helicopter forest shoot and the underwater eel sequence he used a pair of SI-2Ks. The Phantom was used generally used for slow motion. The shoot lasted about 14 weeks – eight weeks in Hawaii, five seeks in North Carolina and a few days shooting pickups and elements in Los Angeles – and was one of the shortest feature films production schedules that Boyd had worked on. Hurricanes and Giant Lizards |
|
 |
|
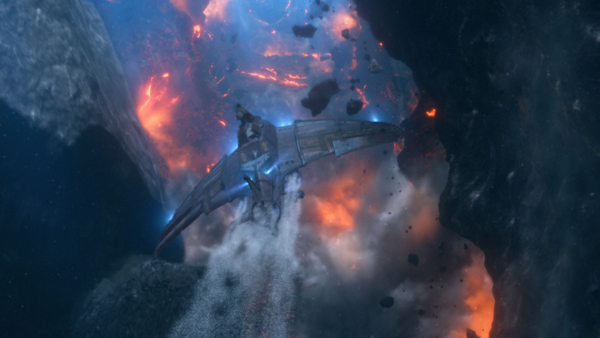
| "As I consider the sequences and effects, I generally have an approach in mind by the time I hand them to the vendors, but I'm always open to suggestions for ways to do things faster or better," Boyd said. "In the world of VFX-driven movies, at 430 shots, 'Journey2' wasn't overwhelming in terms of shot count. But it has three or four major sequences that required intense effort – a helicopter thrown into the middle of a hurricane, plus massive environments and simulations including cloudscapes.
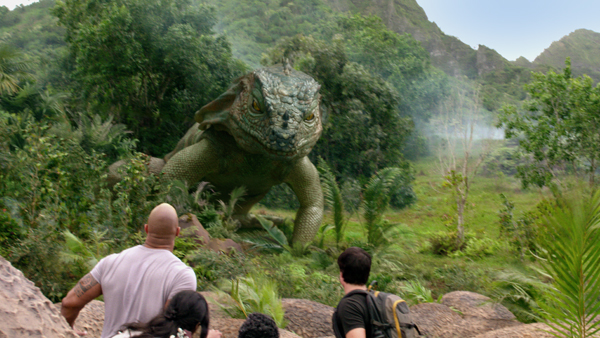
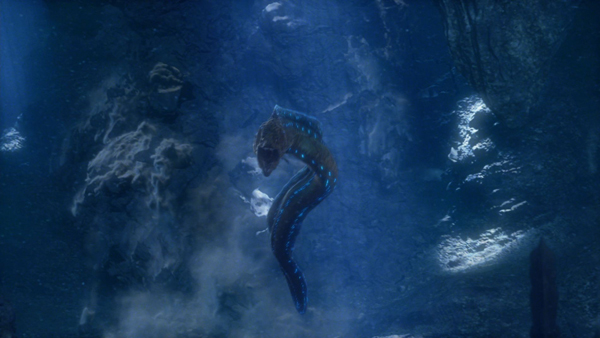
The lizard chase, early in the film, had some quite specific challenges. It had to be exciting but not threatening. I think MPC Vancouver's animation was an ideal balance. The lizard couldn't be treated as a giant dinosaur. It may have been 40ft long, but it had to remain lizard-like and integrate into a real jungle environment." Two Worlds Each section involved a huge environment of its own. Underwater, the landscape is constantly shifting, moving and threatening the characters, obscuring the way ahead. Boyd said, "To avoid utter chaos through the sequence, the Pixomondo team approached it in terms of a video game, where you can see where you are going but the view is always changing and you have to react to each turn of events. Violent eruptions and falling rocks interfere with the ship's navigation. The ship has to feel huge but maneuverable through constant change and over a vast area of real estate that required a massive build out." Because everything was in motion, virtually everything required a simulation, from the moving rocks to the silt, the venting volcanoes to the bubbles in the water streaming off the ship in trails. They needed hundreds of layered simulations. |
|
 |
|
| Ocean Spray When Scanline tackled the water simulations for the hurricane, they put special effort into enhancing their proprietary software - at Boyd's request. "When ocean water hits a rock and becomes white water foam, it jumps into the air, hits the wind and atomises into very, very fine particles and eventually dissipates. I'd been working with Scanline on water since 'Poseidon', years ago and always felt the absence of this atomisation. So I asked Stephen Trojansky at Scanline to push for that, because so many of our shots contain such violent splashes – and they did it. They created a new version to generate spray with those looks." One of Boyd's favourite sequences was small but significant, achieved by Trixter at the start of the island adventure involving some tiny but completely lifelike elephants, the size of an average dog. "When I first met Trixter, they had been working on cartoon animals in commercials, but hadn't ventured into any major photoreal creature projects. So I took the step of asking them to work at photoreal quality but to keep their distinctive character quality in their elephants, balancing between an elephant and a puppy-dog personality, slightly cute, almost smiling but not losing a true elephant's nature. It was just what we wanted in the end, but not easy to achieve." Previs Edit "The editor might add a character moment or insert a wide view, or come back and request extra shots I haven't provided. Also, as 2nd unit director, I was working with him during photography, and even more during post as vendors turned in material, providing much better quality footage to work with. We would discuss such points as the energy of the island collapse, for example, or speed of the ship and shot length, all affecting the cut." |
|
| Preparing to Chase AtRising Sun Pictures, based in Adelaide, South Australia, Mark Wendell was brought on as DFX Supervisor in December 2010 when only a handful of the facility's artists were involved and many aspects of the film were still undefined. As their main bee chase sequence had yet to be shot, the RSP team joined Boyd and the camera crew in Hawaii at the location where much of the live action forest footage was shot. The shots were captured in several ways, all in stereo 3D - with RED cameras, on tripods or hand held, as well as with the SI2Ks from the mini helicopter, flying through the forest. The footage began to trickle back to the team in Adelaide in about February 2011, which was also when 2D supervisor Tim Crosbie and Mark travelled to North Carolina to supervise the live action green screen portion of the sequence. When building the CG forest, a major constraint was matching their forest to the existing footage, where the edit at times cut back and forth between the two. "It's quite different from an all-CG environment in a film like 'Avatar', which affords a lot of artistic freedom. While we had a level of freedom to enhance the forest, everything built had to be closely based on the real Hawaiian environment," explained Mark. To that end, Boyd provided his abundant photographic reference, all plates, full HDRI stitched domes for lighting reference, and the LIDAR scanned data of the forest. It was incredibly heavy data, but turned out to be invaluable in a variety of ways. Forest Build The challenge of the stereo, of course, was that it couldn't be applied as an afterthought, especially in an action film where the studio wants the effect to be a highlight for young audiences. They had to be mindful of viewers' ability to resolve and perceive stereo images comfortably. As all compositing was done with Nuke, Ocula was used for processing the stereo plates. "This was a not-very-glamorous but very necessary part of working on this show. A huge amount of work and a substantial overhaul of our pipeline were needed to expand it and build a specific pipeline for stereo reconciliation – fixing stereo, vertical and colour disparities between the two eyes. |
|
 |
|
| Skills Expansion The project became a learning opportunity for the RSP team. They had done stereo conversion work on 'The Green Lantern' and worked on others that were post-converted such as the final 'Harry Potter' film, but this was their first extensive work on a full stereo production. Mark now feels it's preferable for a VFX team to be responsible for the stereo in their shots from the start, to make sure it's done well. RSP also had to significantly expand their layout and camera team, not having worked on a project with the same scope or scale of environmental work as required for the forest and creatures in 'Journey 2'. A typical forest scene might have several hundred assets, initially hand placed by the layout team. Once the effects team had filled out the scene with extra foliage there would be thousands of individual pieces – leaves, trees, flowers, rocks, logs and so on. This meant developing some new tools, systems and processes in-house to manage the data. Conceptual Undertaking A full set of tracking markers would be in place on the green screen for the actors' shoot, while the bee-buck also had points allowing us to matchmove its motion as it rocked around fairly freely on a pivoting gimbal. So we had enough information to get good stereo matchmoves and camera tracks, as we had for the forest backgrounds. The challenge then was to 'float' the actors with their camera, with the camera of the background. "This gave us our general approach - and our conceptual leap," said Mark. "We would set up a matchmove camera for the actors on green screen and that became one unit in a Maya scene file – a couple of cards with the actors on a plate, riding on top of a virtual bee with their tracked camera attached to them. Then we re-photographed that whole unit with the background's tracked camera. As long as we maintained a certain margin of proximity between the two cameras, we got away with a fair bit of disparity. In short, it turned out to be a workable system." |
|
 |
|
| CG Shift The original plan for the bee chase was to photograph the forest and use as much of the photography as possible for the backgrounds, expecting 70 to 80 per cent to be live action. Only a few shots were recognized as unfeasible to achieve in camera. The production was also counting a on a level of enhancement to the forest as well, to bring the somewhat dark, uniformly green Hawaiian forest closer to the director's vision of it by adding flowers, colour and variation to represent a huge, jungle-like forest surrounding the action. As it turned out, as they continued to explore camera angles and evaluate the photography, they transitioned to more and more all digital backgrounds. Mark believes that a major factor was some tests RSP's team had done earlier, closer the time when Boyd had shot the aerial forest footage. Boyd had originally thought of CG as a fall-back for where the live action was inadequate but the tests came back looking so good that, once they were in editorial, the production were confident about taking up the option to change some shots from the previs, moving the camera, extending the moves or altering speed. "Sometimes we would use a background plate but then fly extra digital trees past in the foreground to add excitement and increase the feeling of movement," Mark said. "A further issue in the footage was that a small road, set with tracking markers, ran through a section of the forest. Also, on some helicopter shots the remote control operators were in view. So we had to devise a system for the stereo paint out and make sure it worked into the depth of each shot. With practice, the team got pretty efficient at these tasks." RSP already had an in-house asset management system based on Maya for individual assets such as pieces of geometry, creatures, a shader or material. But up until then they hadn't developed any group assets, which they needed to create for 'Journey 2'. "We devised a layout asset which the new layout team used to hand place all the key trees and rocks in a shot, for example. This would be handed off to the animation department to help them plan the bees' flights around key objects in their scenes. At this level, layout and animation could be approved using grey-scale stereo renders out of Maya composed of naked trees as placeholders for the actors or CG to fly around," said Mark. Physically Based Render One reason for the success of the forest was Mantra's physically based rendering mode, PBR. Mark explained, "We could use a fairly simple shading model for the foliage with a little translucence. A look development team painted numerous different textures for objects with bumps, displacements and specular maps. But the shading model in Mantra could remain simple as well as the lighting model, usually with just one key light, a dome and perhaps some hand-tuned dappling. But because of the way the PBR worked, we achieved the soft ambient light from the sky dome, bounce lighting from other objects plus the translucency from back-lit leaves. |
|
| "All of this, combined with the textures and complexity of the layout, gave a very successful result, even without a complex shading model for foliage. This layout system is now proving useful for an 'urban jungle' we are working on now for another project."
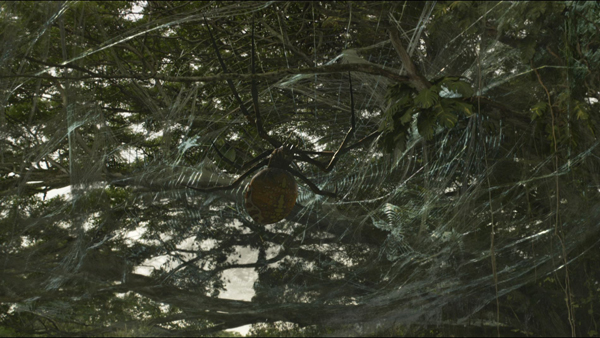
When it came to the creatures for their sequence, production had a very clear idea of what they wanted for some, especially the giant birds which were modelled on the European Bee Eater. Rising Sun could use the birds' natural, lively colouring but had to enlarge its body from 6in to 40ft tall. They adjusted the markings and head shape to make the model look a little meaner, more wedge-shaped and hungrier, but the production mainly wanted to rely on its size to communicate any menacing qualities. Just Plain Scary "The spider, however, was intended to be just plain scary," said Mark. "We actually had to create two spiders for the film, both based on a similar model with a few distinguishing tweaks. The hero spider was involved in our main chase sequence, while an additional spider played a role in a shot as the camera pulled up to reveal him lurking in the canopy. The interesting part of the spider sequence was the web design. "We were originally working off concepts from the client portraying a web that would completely shroud the foliage in a cheesecloth-like network. Everyone agreed that this would look appropriately creepy and it gave us a chance to build a network of tunnels and tubes in a sheet of hanging, dirty web. We spent a large portion of the production on it, testing ways to procedurally build the web in Houdini and making it dirty by hanging leaves and debris in it. We then draped it over, around and between the trees, over the ground and bushes." It was effective, but had to be immediately identified by young children within a fast-paced action sequence. Also, to work with the edit, in which it is first glimpsed from a distance, this look just wasn't proving recognisable enough. |
|
 |
|
| So in the end, they had to revert to a very traditional, circular orb-weaver spiral pattern, hung between several trees. "I actually think it is probably creepier this way because it is so easily recognisable at a distance as a classic spider's web. However, as this came as a fairly late design change it did mean that one of our Houdini artists had to work quite a few extra hours! Nevertheless, the shots turned out really well," Mark said.
While the team's pipeline was based on Maya for character animation and layout and as an interface to the 3Dlight renderer, any simulations except cloth such as particles, dynamics, web movement and interactions were all done in Houdini, including wind through the trees and exploding feathers in the collision shot. "For actor-CG interactions, we created a rough rotomation of the live action to which the Houdini simulation could be synchronized – whether with foliage, the web or any other objects. Double Excitement These doubles were a challenge mainly because of the huge amount of extremely useful data from Boyd from several sources, including cyberscans but especially the normal maps from ICT, the Institute of Creative Technologies at the University of Southern California. "Once the ICT data was incorporated into our skin shader we could produce extremely accurate skin and digital doubles. "Previously we had carried out skin shading in a more or less ad hoc manner, but this was the first time we had access to such high quality data. It took a period of R&D to incorporate using it into our process and get the results Boyd wanted. The data comprised specular and normal maps. Our character supervisor Ben Paschke and his team studied the papers from ICT intensely, plus the underlying mathematics of the data, developing it into a shading model that would work with the normal maps. The nice thing about the data is that once you get the shading correct, you get the expected skin shading components like sub surface scattering, multi-layered oily specular pore looks with soft reflective fall-off at the edges – all these qualities come naturally, due to the way this data is captured." Dappling Effects "We would start with a physical approach to lighting, re-creating what the sun and shadow were actually doing, given the forest that they are moving through but inevitably, this wouldn't be exciting enough. We'd enhance that with extra dappling maps that the characters would fly through, just to keep the shot lively and flashing enough. Once the CG characters were handed over to compositing, and the live action characters positioned over them, the compositors would give final tweaks to match the dappled effect across the actor from the CG underneath." |
|
 |
|
| Feather and Fur Systems RSP invented a feather system from scratch for this film. Ben Paschke and the character team devised procedural ways to instance features across a character and provide this information to the lighters as an RIB archive. This way the lighters wouldn't have to carry the heavy feather geometry in the Maya scene files. The feathers would come out only at render time. A fairly automatic initial instancing system that put static feathers across the entire bird would follow any deformation of the underlying model. The primary feathers were actually exposed to animation and the lighters in the base geometry. The riggers put these into the rig so that the animators could access them as they posed the skeleton to strike dynamic poses or flutter. For example, the first dramatic backlit shot of the bird attacking from the sky had a lot of character animation applied to the feathers for very specific poses and the slow motion rolling and ruffling. All secondary feathers could be applied with a procedural system. Once those were placed statically a character TD would run a simulation on the m to put wind movement through them as well. All of this was then supplied to the lighters as an RIB archive. "The fur system was not entirely new but we had to extend the automation of it for many shots," said Mark. "We used Joe Alter's Shave and a Haircut in Maya and added all the fur dynamics for interaction with that as well. But lots of work went into automating this so we could push a dozen simulations a day on a given set of shots through the render farm. The fur team handling the grooming were kept quite busy since every shot needed at least static fur on the bees for the longer shots, and interactive moving fur for closer looks. We used rotomated models again for the fur interaction with actors. Selling the Scale "So we played with various techniques to sell the scale of the forest and the characters. We played with stereo cameras to fine tune the interocular distance, the atmosphere and other aspects of stereo to enhance the scale. But the most successful techniques turned out to be animation. It took a lot of back and forth communication with the client to find that sweet spot where the bird moves just fast and aggressively enough to pose a serious threat, a monster on the verge of eating the characters." But if they were allowed to move too quickly they started to feel cute and small again. The total performance of a big slow wing beat, the up and down motion of the body up and pivoting the head while tracking it with the body had to be developed through many cycles before Boyd and the director could find that spot where the scale worked. It was the same for the bees. Obviously such a bee would be a heavy weight to carry on those wings but they developed a blurry wing bea, through numerous iterations with the right amount of motion, swinging and hanging the way real bees fly around, to sell it as something closer to the size of a car than a bee. |
|
 |
|
| Environmental Concerns Although, as VFX Supervisor Boyd Shermis explained, all the teams working on this film were concerned with the environments in their shots, atMethod Studiosin Vancouver, the environments were a priority. Above all, this team was responsible for the all-important, initial reveal of the Mysterious Island landscape as the characters discover it after they crash from the hurricane to the beach in their helicopter. VFX Supervisor Mark Breakspear explained that the director wanted to see an 'extra-wordly' environment, full of influences from every continent, as well as from fantasy. However, the realism and immersive quality had to be consistent across every shot. Mark and the team at Method has created just about every other kind of environment in films for specific reasons – a real place where a production cannot shoot, or a place that used to exist that they had photo reference for, or even an invented place with no references from reality. "In this case," Mark said. "Brad Peyton wanted a place that no one has ever seen before but, nevertheless, looks like somewhere you could go." Like Rising Sun Pictures, Method found that Boyd's reference coverage of every shoot location on Hawaii was incredibly dense and thorough. Hawaii had been captured for them in full stereo 3D shots, LIDAR scans and more. But capturing that meeting point between fantasy and realism wasn't easy. Early in production, Method began creating and testing matte paintings. Overall, those early looks were effective but, as Mark explains here, they required numerous iterations, adding or removing trees, creating more elaborate rock waterfalls, until they finally arriving at the director's vision. Illusion of Depth "The combination of CG elements, matte paintings and stereo 3D creates a challenge," Mark said. "When you look at a 2D matte painting, depth is missing. You only have an illusion of depth as the brain goes to work making sense of the details. But putting that image into a true stereo space sends the brain mixed signals and the illusion fails. Overcoming this requires its own scene building process – and still more iteration." |
|
 |
|
| Every Rock and Flower Right up to the last possible moment in production, they continued refining the looks with additional butterflies and flowers, water running over rocks, glistening quartz textures – each change made a difference. Every single palm tree in the shot moves and sways in the breeze. They chose likely plant species for each spot, and studied the characteristics of very high waterfalls. "All these factors taken together helps the audience see what you want them to see," said Mark. "Our CG pipeline, based on Maya, wasn't unusual, but we were pushing Nuke's 3D space capabilities to their limit, and using Ocula for the stereo component within the composite to clean up frames and plates. Because stereo makes it hard to get good, matching tracks we used various matchmoving and tracking software including Boujou, PFTrack and Silhouette." Mark explained why matchmoving was necessary on virtually every shot they handled. "In a 2D production, you only need to track the plate, which gives you a CG camera with which to build your environment for compositing. But for a stereo project, you need a stereo camera pair, achieved through matchmoving, that can be translated into a Nuke camera pair. All your small compositing tasks like wire removal, can't be done by painting a patch – the patch will simply hover in the air. You have to be able to do the removals in stereo, which can be accomplished in Nuke using projections and building a 3D environment, but you still need the stereo camera. That way, every render produces two images and all compositing jobs from clean up to blue screen comp, tracking and colour correction become possible." Camera Data Every shot came with a complete set of metadata from the set including all camera data. This was obviously very useful but they found that it sometimes was not quite accurate or didn't fully record what was happening to the rig, such as the cameras' gradual shift out of position in terms of interocular distance and other values. |
|
 |
|
| "Consequently our matchmove results on some shots were very different to others, although the data from the monitoring gear was the same. The only thing we would know for certain, shot by shot, was the lens specifications. In some case, for instance, we would matchmove both right and left shots but then discover that the right eye had twisted so much that it seemed to be looking inside the left eye camera. But of course that couldn't have occurred – otherwise, the camera itself would have been visible in the right eye plate," said Mark.
"The computer gives you its best estimate, but problem-solving is still up to you. About 50 to 75 per cent of the shots, about 50 in total, needed some special attention to work out the camera movement and replicate it in CG." Mark is certain that when the opportunity to work on a stereo project comes up again, they won't hesitate to take it up. The team's head of matchmove Peter Hart put a great deal of effort into working these issues out and for Mark, making that effort worthwhile is the main reason to get involved with another project. Stereo Bounce |
|
 |
|
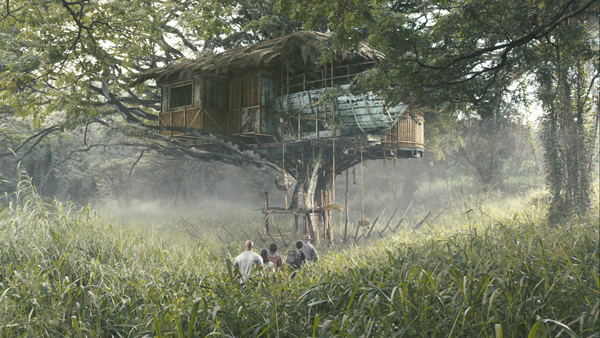
| Young Josh's adventurous grandfather lives in an elaborate tree house on the Mysterious Island, and its construction became another of Method's responsibilities. On location in Hawaii, director Brad Peyton chose a particular tree that he wanted this house to sit in, which Boyd LIDAR scanned. According to Mark this data produced some interesting results and a voluminous number of points.
Tree House For the house itself the team were sent sketches and architectural plans of the inside of the set where the live action was shot. For this kind of architectural element Method uses a Maya – mental ray pipeline, and constructed the exterior based on these plans to ensure continuity from shot to shot. To help them fit the resulting model convincingly into the tree, Mark and the modeller first built a support system for it to make it believable, complete with pulleys and ropes. "It went pretty accurately into the tree in the plates, although we had to remove a few stray branches poking up through the middle," Mark said. "Cutting branches off a tree in 3D space is a task I may not try again in a hurry." Rocky Arch |
|
 |
|
| "In this case," Mark said. "Boyd's LIDAR scans were directly useful in building geometry for the cliffs in Maya. Then we matte painted the various pieces of photography of cliffs and rocky edges to project onto the geometry." This scene comprises long shots, for which there were no live action elements of the actors shot at the correct angles, and so they also needed to create digital doubles of the actors. In this instance the demands on the team regarding the doubles weren't overwhelming because the camera was positioned quite far back from the beach.
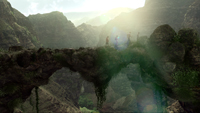
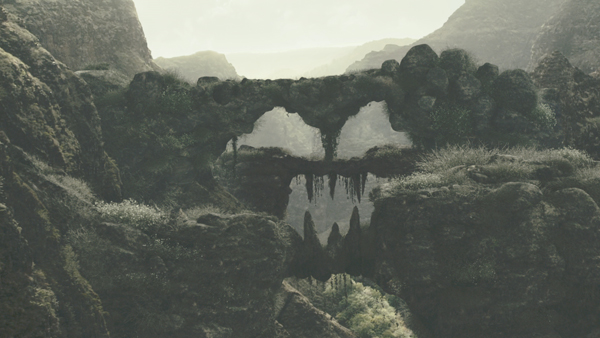
But later on, the very high quality data captured at ICT Light Stage of the actors made Method's exciting sequence at Spooky Bridge possible. This bridge is a precarious rocky arch where the actors couldn't actually go. As the characters pass over it, the camera move and angle momentarily reveal a scary face designed into the rocks, and then the camera gradually passes by and lets the face disappear. But it also passes quite close to the characters. Perfect Doubles Mark explained, "Light Stage is a giant dome with scanning equipment that produces flat-lit character data that can be re-lit for different scenes in 3D. They output a model to animate with motion capture data, and provide the skin of the actor plus associated clothing. The amount of data they provide is huge, but essential to make the characters look real. We are, in fact, under pressure to put it all to good advantage. We communicated via conference calls with Light Stage to make sure we were setting up our render passes and so on correctly." Actually, for this sequence, the first hurdle was the fact that during the shoot, the right eye camera came very loose, which made the stereo data inaccurate. They had to re-build the entire right eye plate from the left eye to be able to put in cliffs, rocks, characters - everything - into the shot. Next, they needed to design the right sort of 'scary face' as a spooky but believable rock formation incorporating stalagmites, stalactites, ivy overgrowth and so forth to suspend disbelief just long enough as the camera passes. |
|
 |
|
| Across this film lighting remained a challenge mainly due to the size of the environment they were building around the small sets. "HDRI is good but may only apply to the portion of the shot immediately around the scan location," said Mark. "In the end, the 'painting with light' idea is quite true. You have to make the light work visually. The result may technically be cheating but it looks more real to the viewer. The software can only estimate using the data we are able to provide but lighting is a very illusive quality, and you generally have to adjust the light in such situations by eye, following exacting rules. Boyd is very good at this – he can spot very quickly where and how the light needs correcting."
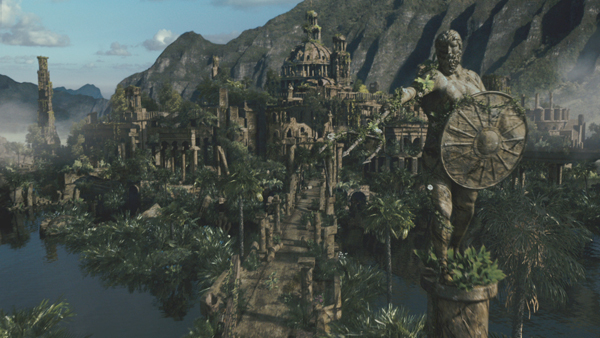
Ruined City of Atlantis The basis of the city's design was a series of concentric circles, moving closer together to form a giant centrepiece. The back story for the inhabitants of Atlantis involved managing and transporting the water supply as an explanation for this design. Mark noted, "These back stories are quite important for making sense of complex, fantasy environments. You ask yourself, how does it work? As a result, we were constructing sewage and water systems as well as houses and buildings. Then of course, we had to break it all to turn it into ruins!" Early enough in the process they also needed to provide Scanline with a basic .obj model of the city to start work on their monumental flood waters. Later, Method was able to provide their model at higher resolutions with textures for Scanline to refine their simulation with. The city as built in space measures 3 to 4kms across, which immediately dwarfs the actors but gives lots of scope for stereo depth. Another big challenge, however, came when putting the stone structures together with the overgrowing plants. Mark said, "We initially had a subroutine that laid plants over everything procedurally, which worked but didn't look very real. Plants of certain types will naturally grow in particular spots in cracks and so on, not randomly anywhere, and drop leaves in certain ways. Therefore, in the end, every plant was placed by hand. When the camera zoomed in, it made quite a difference to the believability of our shots." |
|


