

RSP’s all-CG shots for ‘Gravity’ bring astronaut Ryan Stone tumbling back down to earth in a glowing space capsule.
Gravity - Down to Earth |
|
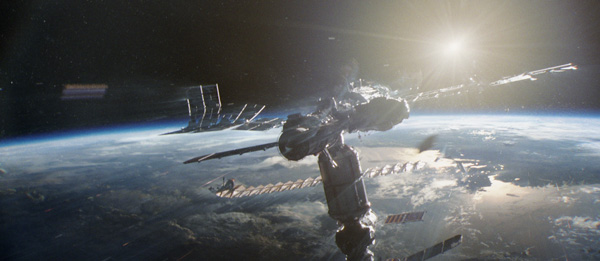
Rising Sun Picturescontributed two and a half minutes of entirely computer generated footage to the final sequence of Gravity as the heroine Ryan Stone tumbles through the atmosphere back down to Earth in the Shenzhou Capsule. All 17 shots were produced in stereo 3D, from June 2011 through to delivery in September 2012. The team’s work encompassed hard surface modelling of the Tiangong space station and re-entry vehicles, digital matte paintings of space and earth environments, and numerous physical effects and destruction. Inspiring DetailCG supervisor Sam Hodge and look development supervisor Ben Paschke was inspired and challenged by the very high quality work Framestore had put into the look of the spacecraft exteriors, which involved a huge amount of detailed geometry. Framestore had also supplied an extensive library of textures, which meant RSP needed to work up their own textures, by creating procedural shaders, to the same quality for closeup areas of the Tiangong that appeared only in their shots. Fortunately, they found that NASA could supply very high resolution photography of their vehicles in orbit, which became critical reference in helping them decide on the direction for look development. The Houdini Mantra renderer’s Physically Based Renderer mode, PBR, was used for all beauty renders to achieve the necessary multiple-bounce diffuse and specular lighting inter-reflections. Ben said, “Outer space is a great environment for this kind of lighting because the bounced light is even more evident due to the high energy coming from the sun, and very low ambient levels. Lighting setups for the Tiangong were in fact very simple, comprising an area light for the sun and art-directed environment lights to get the low bounce off the Earth just right.” |
 |
|
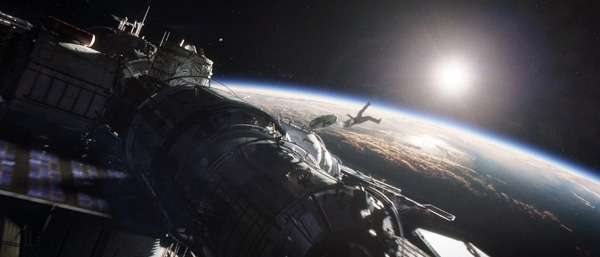
“I find this kind of work very interesting because you can’t truly test the workload limits of your system until you have to deal with a real-world set of large data. This was a great set of data to conform to our Mantra pipeline. Fortunately SideFX could give us personalised support and help us with ideas to manage the sheer amount of data to be rendered.” Destruction TimelineLater on, when it came time to destroy the space station, they had to drive this extremely dense geometry by a low-poly proxy, which acted like a deformation cage. The destruction FX were designed and created to reveal to the audience as much of the physics of the spacecraft events as possible both realistically and in a dramatic, interesting way, even though the artists had no existing reference footage of real-life events. It required a lot of exploration to find the right balance. Meanwhile they had to manage the overhead of the asset geometry by generating sets of collision volumes and isolating emission areas before actually running any FX. Pre-fractured structures could be torn off, based on painted seams, and deform and flap according to the apparent wind-resistance and angle of the moving craft. The painted seams were lines made on the models in Houdini which then determine where the craft was weakened and likely to fracture. Early on they set a 'destruction timeline' showing how the Tiangong would break down over the shots. The seams reflected that timeline, to ensure the right portions tear off at the right moments in the sequence. Conveying a tremendous feeling of speed for the space craft was among the team’s primary challenges. RSP’s VFX supervisor Tony Clark explained, “Actually, the spacecraft would have been moving in a total blur to the viewer’s eye. We had to slow them down quite a bit to around 15,000km/hr to make them readable, but because we lacked a close enough point of reference for the audience it was difficult to express.” Controlling AblationTherefore, ablation was a useful effect for them to be able to control especially on the capsule. Ablation is the removal of material from the surface of an object by vaporization, chipping and similar kinds of erosion. It is often used to describe material used on spacecraft for ascent and atmospheric re-entry. |
 |
|
Plasma effects involved building a deflection-shield, starting with a particle pre-simulation running along the craft that would form its shape. They could apply the same ablation principle, that is, the facing-ratio plus exposure to friction. In this case they also animated shockwaves along this shield to give a feeling of the energy, introduce the break-up and add drama. They also generated quantities of fine particles, like the ablation, that interacted with the spacecraft. Capturing the fine geometric detail as the particles interact was important to selling the effect. Dialogue and IterationOn this project, the looks relied quite heavily on the compositing stage, even more than on most projects. A system of dialogue and iteration developed between the effects team, lighters and compositors. Overall, without using deep composting, the layering was complex and resulted in an exhaustive list of components to manage, each highly dependent on the others. Over time they compounded these into as small a set as possible to manage their resource limitations. Also, as a stereo show requiring subtle gaseous effects they tried to complete as much creative work as possible within the CG pass to prevent artefacts from developing in the composites. Nevertheless, by working on silhouette and rack-exposure the compositors helped keep the pace of shots interesting and dynamic. An effective way to vary the static quality of the stark lighting for their dramatic sequence was playing with lighting composition. The sub frame camera shake during the destruction was generated and previewed using Nuke, with a custom camera shake node that handles noise layering based on user weightings. This could be extrapolated out into true 3D data. “So a rotation would become a Z roll and scaling became Z translation,” said shot supervisor Adam Paschke. “In addition to this we added a control that allowed us to blend between a fully nodal solution - with no translations - and a fully translation solution with no rotations except Z roll. This was then exported with ten sub steps via Alembic into Houdini and rendered using about six sub frame time samples." Ablation Colour LUTCompositing was important to the look of the ablation effect as well. Shot supervisor Dennis Jones explained that they devised a fairly simple but controlled way to apply very fine colour transitions to the ablation FX passes. “After exploring many different colour options for the ablation effects Tim Bowman and I engineered a colour lookup table that we applied to pre-balanced greyscale elements from the effects team. “We initially generated this manually by eye, but then found spectral temperature data represented in Kelvins and remapped this to the photometric domain using RGB mathematical curves. This gave us precise colour values across shots and made it easier to populate updates across multiple shots. It was a challenge to find the balance of a believable colour palette for plasma and flame ablation - forces that audiences aren't intimately familiar with.” The challenge of optical correctness continued when considering the spread of light, which was very visible against the dark void of space, and their approach to blooms and lens effects to achieve enough realism. They sourced 4K RED footage of in-camera optical effects, such as lens flares and internal lens artefacts, and compiled a library of digital capture artefacts and imperfections to enhance believability. Tony Clark called this aspect of the work ‘an exercise in visual fidelity’. Furthermore, once a scene had been assembled with true 3D depth, they were asked to creatively override certain characteristics to create a more dynamic spatial relationship. Adam said, “The adjustments often involved introducing greater dimensionality to the earth’s surface to allow the audience to feel a curvature. To help, we developed visualisation tools that allowed us to measure relationships and introduce the required offsets, and these sometime required a second round of geometric projection based distortions. Dramatic TouchdownAs Ryan Stone thankfully survives re-entry into the atmosphere and begins falling down to earth, RSP’s work focussed on terrestrial environments, at first seen from altitudes higher than most of the audience would have viewed them. All of these views - looks and geometry - are original matte paintings created by RSP’s team. Some interesting research work was carried out very early before pre-production, as RSP was building their pitch for the project. They captured footage by strapping high resolution cameras to Horus balloons, which are typically used for weather data, and sending them 36km above the Australian outback for photo reference and elements for their digital matte paintings. Tony said, “We used custom software to design the camera payload for the balloon, attaching a Go Pro on one side and a very compact, high quality DSLR on the other. We could capture RAW images in bursts, giving us 4K shots that we stitched into panoramas of about 10K. This imagery was not directly incorporated into the matte paintings but provided excellent looks referneces for what would actually be seen.” Ryan’s parachute simulations and animation were a further chance for the team to add drama to this climactic sequence. Tony said, “The parachute choreography had to convey threat. Ryan is never really safe until the last moments of the movie. Cloth simulations and effects alone are not always ideal for creating dramatic tension. The cloth work on the parachute is actually very detailed, especially for the enveloping effects, relying partly on a realistic simulation but combined with a lot of hand animation to keep enough control. www.rsp.com.au Words: Adriene Hurst |


