

Framestore and Method Studios talk about disassembling & assembling RoboCop, exploring the future of television and staging a robotic siege.
Cops and Robots |
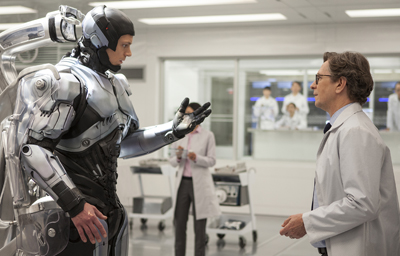
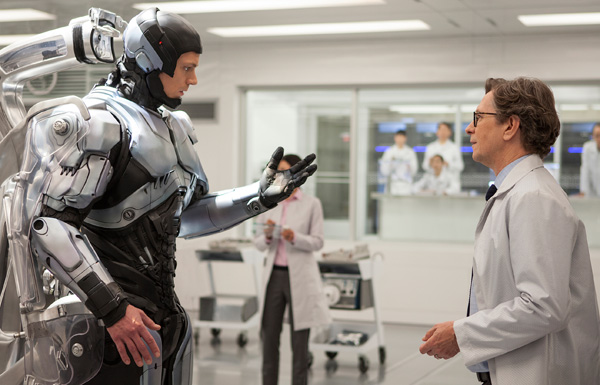
| In the world of ‘RoboCop’, the US multinational corporation OmniCorp designs and builds robots of various types that are used to maintain security by police forces and military organizations in countries around the world – but not in the United States itself. When the company pushes ahead to deploy their robots on American streets, they decide to build one incorporating a human being. It was to be a powerful machine, certainly, but a machine driven and controlled by thinking, feeling person. This aspect of the story was the focus of much of the VFX work in the project. |
 |
|
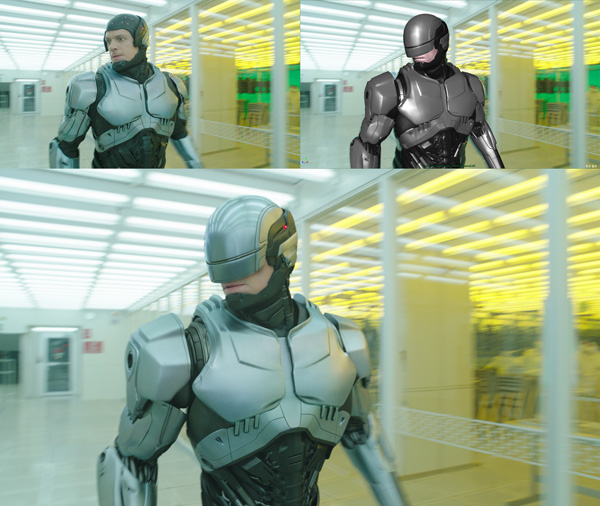
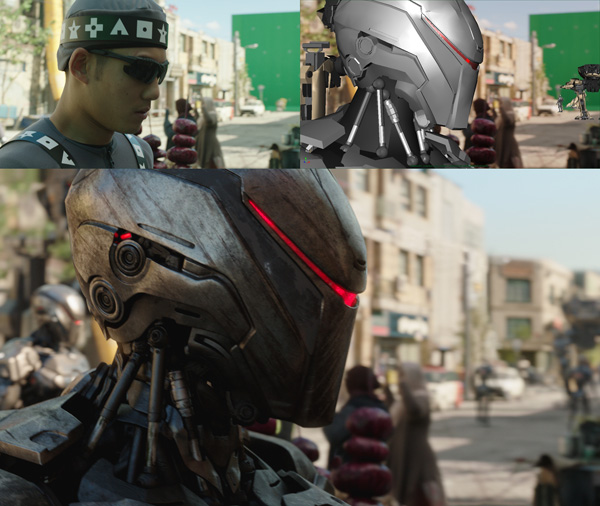
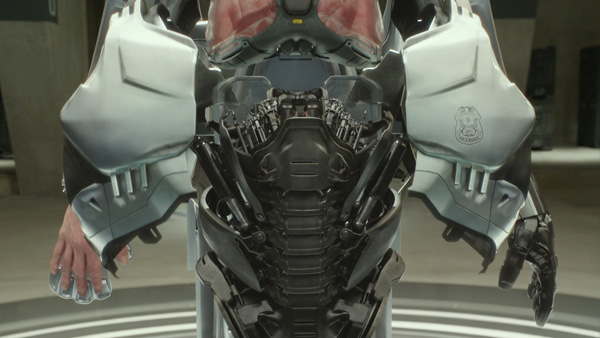
The hero character Alex Murphy is a courageous Detroit police officer critically injured in a car bomb explosion in which he loses most of his body, apart from his head, one hand and vital organs. In the story, OmniCorp seizes on Alex as the basis for their first human-machine hybrid police officer, and rebuild him. For ‘RoboCop’ audiences, the job was done by VFX artists. In this article, Framestore and Method Studios describe their work on RoboCop himself and on the multitude of other effects this story involves. RoboCop Under the SkinFramestore’s teams working on ‘RoboCop’ were located at both the company’s London and Montreal facilities, led by VFX supervisor Rob Duncan. They began work on the project only one week ahead of the shoot, which was a challenge in itself since they completed over 600 shots, including effects, environments and CG character modelling and animation. Perhaps the most important part of their work focussed on Alex Murphy’s RoboCop body, especially the original, silver suit worn in first part of the movie. The tasks primarily involved refining or augmenting the practical suit the actor wore on set, which was expertly made by Legacy Effects. Because the suit needed to look as if it actually was Alex’s body, not a costume added externally, Framestore’s work consisted of slimming him down. They removed parts of the suit, especially around the neck and shoulders, elbow and hip joints and the abdomen, and replaced this material in the plate with either background imagery from a clean plate of the same set, or with new CG machinery, mostly of Framestore’s own design. |
 |
|
VFX supervisor Rob Duncan explained that they had a variety of reference material to help achieve a high quality match between their CG robot body and the practical suit, including stills, scans, photogrammetry and lighting data. “Legacy were mindful of the original classic suit when designing the colour palette of the silver suit, and in turn we had to investigate how to convert their physical airbrushing and lacquering into the digital realm,” Rob said. “They were very helpful and laid out, step-by-step, the exact process they went through when painting the suit, even going so far as to quote the specific shades used to add dirt to the suit. This made it easier to distinguish between a natural shadow and a smear of grime collecting in a corner of the suit. Robotic Moves“We actually didn’t want to go too far with creating negative space, because there was a danger that Robocop would look too spindly and fragile. The actor Joel Kinnanman had spent a lot of time rehearsing how to move in a robotic manner, and overall he was remarkably consistent. There were only a few occasions where we needed to tweak his posture or stance to maintain the mechanical feeling. It was important that he distributed his weight symmetrically, especially when standing still.” The mechanical working parts revealed in the joint spaces were designed in the very early stages. Because they existed mostly in shadow it was critical that they discovered how they would photograph in the actual shots, in case they had to go back to modelling to make them read well. |
 |
|
For the updated, black RoboCop developed later in the story, the physical suit had a slimmer design and so the VFX work was handled differently. The team also modified its shoulders but the abdomen was only warped instead of replaced, tracking the stomach first to locate it in the shot. The resulting geometry was used in compositing to warp the plate and achieve the final design. Catching the LightFor some of the stunt performances, an entirely CG photoreal, identical RoboCop was created and animated. In other scenes a partial suit was used or portions of the practical suit were made of rubber to let the actor perform freely, which meant replacing only these areas with matching metallic, digital elements. To invisibly composite the digital RoboCop into the various environments, the sets were scanned, from which the geometry was extracted to produce a 3D build allowing them to place Alex very accurately in shots. The character and the environments were then re-rendered together to precisely match the lighting in that location. Light and rendering light were important factors for the movie due to the shining metallic surfaces of both the silver and black models. Rob explained that using the Arnold renderer was critical to making their work run smoothly “The Arnold pipeline produces results that are more physically accurate, which meant the lighting wasn’t an issue for us. This was the second project after ‘Gravity’ to use Arnold, and now all subsequent projects have adopted it.” |
 |
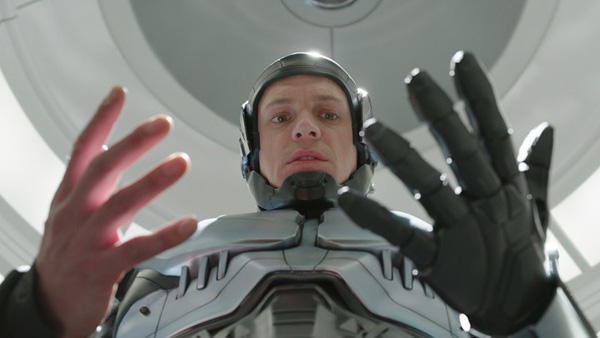
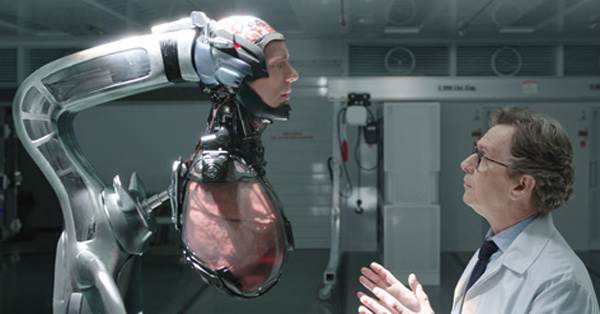
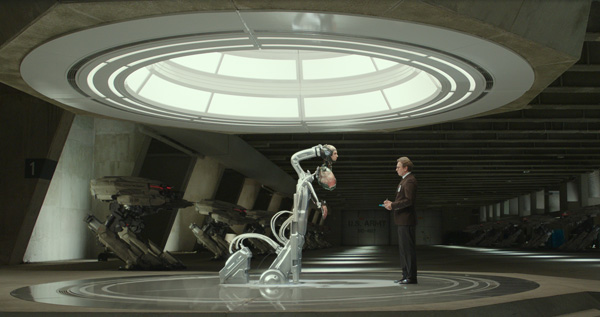
Breaking DownFramestore was not only working on Alex as a complete, functioning, semi-robotic police officer. They also helped create the dramatic scenes in which OmniCorp’s Dr Norton and his specialists disassemble him, while both Alex and the audience look on. This critical moment in the story is our first chance to understand - with Alex – the true nature of what has happened to him and what his future will be like. He is strapped into a docking station in a laboratory, watching in a mirror as doctors and scientists remove his mechanical robot parts to reveal his own head, lungs and various internal organs breathing and pumping – all that remains of his real body. Making the scene dramatic was important, but it had to be based on realism in the level of detail in the CG, in the lighting and compositing. The first shot in the sequence was the most challenging due to its length, the amount of motion and the camera move. The Alex Murphy/RoboCop character was in the plates for this sequence when they received them, although the only live action part of him seen in the film was his face – everything else was fully-CG from the start because it would have been even more difficult to attempt a takeover in the middle of the shot. They painted the body out and, as the shots progressed, replaced it with portions of clean plates. Rob said, “Because this was an intensely emotional scene, it was imperative that the two actors could play off each other. Obviously this made our job more complicated because it meant a huge amount of plate cleanup, but it was the best way to choreograph the action. We didn’t employ any specialist markers on set, because we knew we would have a Lidar scan of the room. Combined with extensive photogrammetry, we had enough to line up to the filmed plates. Medical Reference“To achieve life-like results in the organs – looks as well as animation – we looked at lots of medical operations online, tough on the squeamish members of the team like myself, and even bought pig organs from a local butcher to shoot our own close-up textures. We settled on a clear Perspex for the organ cases filled with a stabilising liquid, which had a major impact on the look development we had done up to that point. |
 |
|
“We also had an actual mirror on the set, so that we could capture Robocop’s reflection faithfully. It more than doubled the complexity in the first half of the shot because we had to have two accurate camera tracks that agreed with each other, and it made the second half difficult because we had to retain the face from a distorted image plane. It was our toughest shot in terms of camera tracking, partly because of the duration but mostly because the mirrored surface exhibited imperfections in the image plane which could not be replicated in the digital world. We got as far as we could and then took care of the rest with extensive plate re-projection.” Alex becomes overwhelmed by what he sees and runs from the laboratories through several other sets, many of which needed major extensions and additions. One is a huge warehouse populated with row after row of lab workers in pink coats. Four rows of extras were shot on set, which Framestore augmented out into the background of the final shot. Rob said, “We toyed with the idea of digital doubles, but ultimately we were able to achieve all of the crowd replication required with 2D green screen elements shot from roughly the correct perspectives that we would need to populate the shots. Rice Paddy SimulationWhen RoboCop reaches the exterior he is surrounded by rice paddies with groups of labourers, again reaching into the distance. The set consisted of a short field with a few real rice plants the actor could run through, which were extended to include thousands of plants and rolling hills in the background. In this case, the actor performed in a partial suit to allow enough movement, which was augmented or replaced in most shots. Rob said, “In the far distance, we used digital matte paintings for the environment, but the rice fields are a simulation. We had to put in hundreds of plants, sometimes closer to the camera than the real ones. From shot to shot on the day, the lighting and the wind would change. It wasn’t possible to match one shot and clone it to the others because the real plants might be moving differently or leaning over more. A number of plants were individually ‘groomed’ to avoid repeating patterns. That, combined with subtle variations in the wind forces applied to them, provided us with a huge number of permutations which made the paddy field feel authentically organic.” They managed to retain all the plants he interacted with in camera, and had to match their look and movement very closely and digitally create the same dynamics in CG plants, moving in the wind, placed right next to the real ones. The hundreds of different strands of grass were simulated, starting with about 20 different plants that are instanced over the environment. Training UpAs RoboCop, Alex trains for his new career on the streets by fighting another of Omnicorp’s robots, the EM-208, inside a virtual reality world. The surroundings start out blank and white but then develops into a full, photoreal CG environment. The challenge, handled by the Montreal team, was to maintain RoboCop’s realistic looks as the background changes. A high density mesh was created and used to control the different blending points and time the transition as needed in the sequence. |
 |
|
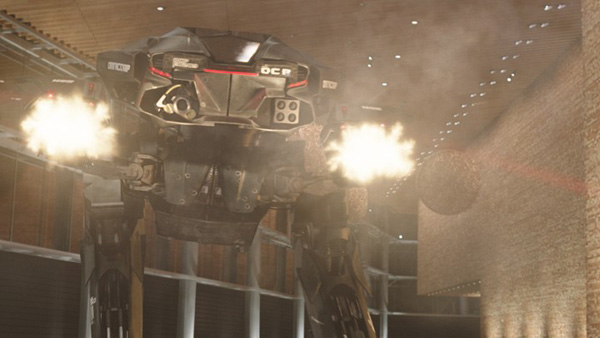
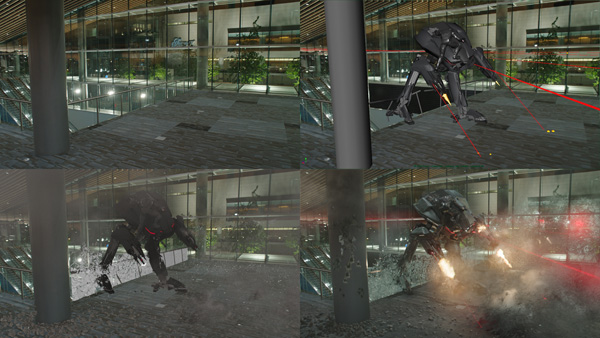
The camera tracks out to reveal the action on giant screens, modelled in Nuke, behind RoboCop and the EM-208, which needed to reflect the light of the screens. “The lighting of the Robocop model is generally driven by the environment it is situated in – therefore at the start of the shot it is meant to feel a bit odd because the space around it is almost completely uniform. As the shot progresses, Robocop feels more real because the environment adopts more realistic texturing,” Rob explained. Rendering was carefully managed to show a metallic environment reflecting light from metallic robots, back and forth. To help achieve the, the artists made a pre-composite of how the screen insert would look, passing this to the lighting team who generated different passes to build up realistic interactions between the two robots and the screens behind. ShowdownThe conflict between RoboCop and OmniCorp, the company that rebuilt him, culminates in a massive, complex battle between RoboCop and a troop of CG OmniCorp ED-209 robots. Although José Padilha, the director, usually preferred to design shots on the fly while on set with the talent and camera crew, he agreed to plan this sequence fairly carefully and use previs to prevent it from falling into confusion. “The previs primarily determined how the live action plates were shot, so that there was a coherent journey through the fight and through the physical location. It was the stepping-off point for the animation of the characters, but we didn’t refer to it much after the first pass. Imagination was required as well because, apart from a handful of shots, no stuntwork was filmed, so we were dealing with plates which were completely devoid of action,” said Rob. The set location standing in for the OmniCorp building was the Vancouver Conference Centre, a modern, functioning building constructed largely of glass. Because the scene is comprised of ricocheting bullets, explosions and shattering glass, large-scale practical effects were not an option here. Consequently, nearly every shot in the sequence required VFX, essentially destroying the entire conference centre digitally. Rob said that while this gave Framestore’s team plenty of control over the whole sequence, it also demanded thorough continuity from shot to shot. They had to consciously follow up on any event staged digitally including gunfire, explosions, debris and other damage. RoboCop arrives at the scene by motorbike. The actor himself appears in some shots, riding a low loader, but on the road a stunt rider was shot wearing a motorbike safety helmet that the artists replaced in the composite with a CG helmet of the sleeker RoboCop style. As he drives up to the OmniCorp building, he drives in straight through a window in a shower of breaking glass, and the battle begins. Modern WeaponsThe FX team developed software to handle the breaking glass effects as RoboCop crashes into the building and he and the robots fight their way through it. The glass explodes into thousands of pieces on impact that break again when they hit the ground. Because of the number of bullets and the intense, fast-moving destruction they cause, Framestore also decided to employ an in-house bullet system to use as a visualisation tool to determine what would happen in any given shot and help them work out the effects of each bullet more efficiently. Because several different teams were involved - animating the bullets, anticipating where each would hit and then creating the reaction - this would have otherwise been very time-consuming. |
 |
|
The bullet system meant the animation, FX and compositing teams worked together on the interacting battle elements – muzzle flashes, tracer fire and bullet effects. They first decided who was firing, when and at what in each frame, and made sure each team had the information required, not only the FX artists. That is, the lighters needed certain information to create interactive lighting for the gunfire, and the compositors to apply muzzle flashes to the guns and place textures into damaged areas. Rob said, “We assumed the ammunition used was the same as in modern weapons - no laser guns, just laser sighting - so our reference was real-world impacts on surfaces such as wood, concrete and glass.” One frame after a bullet was fired, the system would draw a straight line through the set and leave a marker where the bullet hit first, which served to drive the effects for that specific type of bullet. So, although no single group drove the gunfire, in practice, the animation was determined and then picked up by the FX artists. This procedure was then expanded to include similar, separate systems for bullets, the lasers and the muzzle flashes. Gun ControlThe muzzle flashes were added during compositing. The camera work made the looks more complicated because muzzle flashes look quite different from different angles. From straight on, they burst open like a flower but appear longer from the side, which required a technique for telling Nuke the camera angle relative to the gun. They had a library with muzzle flash elements shot at enough different angles to complete a 360° turn around the gun. By working with FX, animation and rigging artists, the compositors developed a tool giving them enough control over the particular muzzle flash used and the way it fired to make it look right and give each gun type a distinctive flash. Automation of the destruction notwithstanding, according to Rob the shots and sequence still needed art direction. “You couldn’t just have a constant fire. Sometimes you wanted to fire a burst and then re-aim and fire again, sometimes you would want a strafing pattern,” he said. If going through that art direction process meant leaving out some of the bullets, it saved them time to ignore the hits and reactions instead of going back to the animation stage. At the end, RoboCop fights his way up to the top of the OmniCorp headquarters in a scene shot on green screen requiring full extension, as well as adding the Detroit cityscape in the background. Material mainly came from a helicopter shoot over Detroit. |
 |
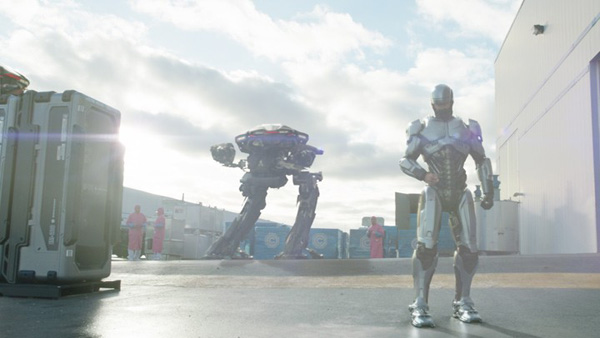
Street Fighting - Teheran‘RoboCop’ begins with a live broadcast from Tehran, which is being used to demonstrate on public television how effectively OmniCorp’s robots maintain law and order but tragically, the scene erupts into violence and chaos. This sequence was shot on a set in Toronto representing a section of the street, built up to two levels. Framestore extended the buildings upward and the whole street further into the distance, adding the explosions, smoke and destruction. The extension work, required in nearly every shot, was achieved with either full CG assets, 2.5D projections or matte paintings, and needed a great deal of authentic detail to make the location resemble a busy, active neighbourhood in a large city like Tehran. They also populated the environment with CG robots, both the tall, mechanical ED-209s brought from the original ‘Robocop’ movie, and the new more human-like EM-208s.The design for the EM-208 robots came to the team from the production Art Department, while Framestore developed their animation. “We originally planned to derive the movement from the on-set stuntmen,” said Rob. “But we found that there were differences between the individual performers, which worked against the idea that all the robots had come from the same factory and were running the same software, and would therefore move in the same way. Keyframed Robots“Consequently, we dispensed with most of the mocap performance and relied solely on keyframe animation, because it was more suited to the limited range of motion we wanted to convey in the robots. We did a separate, single-performer motion capture session which addressed the problem of variation, but we found we needed to augment it with keyframe animation, to remove the ‘humanity’ from the captured performance.” But in fact, Rob considers that having stuntmen stand in for the robots was invaluable, as it gave all the crew and background extras the information they needed to perform their duties believably. “We regarded these as rehearsal takes and then always re-shot without the stuntmen – about 80 per cent of the finished shots employed these ‘empty’ plates, which left the remainder requiring a lot of plate restoration before adding in the CG robots,” he said. To contribute to their robot moves and looks, a generic walk cycle was developed, including walk-to-stop, plus a cycle for scanning, combat and other programmed action. A further indication of their activity was their visors. A red LED showed in the centre for stand-by, a run of red blips when they are scanning and a lit up visor when in combat mode. The LED was a separate, flat texture pass, controlled in terms of behaviour and intensity at the compositing stage. When the EM-208 disappears into the explosion, a volumetric lighting pass was also rendered for added realism. |
 |
Car BombThe car bomb that nearly takes Alex Murphy’s life at the beginning of the ‘RoboCop’ story was also Framestore’s task to create. It takes place in the driveway of his own house. The shot is very long, and consequently very revealing. The team decided to keep the car as a fully CG asset throughout the shot, and took over Alex himself with a digital double at the moment of the explosion because they needed to ensure that he could be seen in the fireball that follows. The double was based on a full-body cyberscan, backed up with photographic textures, giving them a real component to match to. Because the flames emerged from the car in all directions, through the doors and from underneath, and combined with abundant debris and interacted with Alex, it wasn’t possible to create one large simulation to control everything. Instead the FX team created several simulations, using Flush, Framestore’s in-house version of Naiad, to build an assembly of different simulations that worked together. The digital double, the car, the fireball explosion, and the debris were all rendered separately, so their relative visibility could be controlled in compositing. “The modelling, animation, effects and lighting were already established because we were matching to an on-set pyro explosion that was featured in flashback sequences,” explained Rob. “Therefore we knew what the timing and reach of the explosion needed to be. In some ways it would have been easier to have a free hand in terms of the simulation, but on the other hand we always had something real to refer back to, which meant that the end result was extremely realistic.” The shot was pre-vised first to inform the live action shoot. For interactive lighting, the SFX team constructed a lighting rig to stand in first for the hazard warning lights before the car exploded, and then for the light from the explosion. It occupied the space where the car would be, which meant rendering a full CG version to conceal the lighting rig. London to Montreal and Back Again‘RoboCop’ is the first project Framestore has completed on which their Montreal and London studios worked together. As Rob said, having a team based fairly locally to the production for this film was actually a coincidence, not intended at all. In fact, it didn’t really matter where the work was done – he always felt the quality was very high. “Also, our adoption of Shot Review Plus helped us work across two sites with the new team in Montreal,” he said. “It runs on a similar principle to Cinesync. All the participants are looking at the same footage at the same time, with the ability to drive the timeline, but ShotReviewPlus improves on this functionality for us because it is directly linked to our internal databases. We can call up any online material rather than having to prepare a list in advance of the session. This means we can decide what material to access on the fly, during real-time conversations.”www.framestore.com |
 |
|
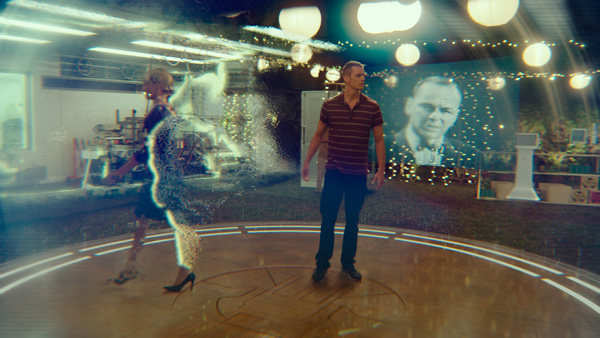
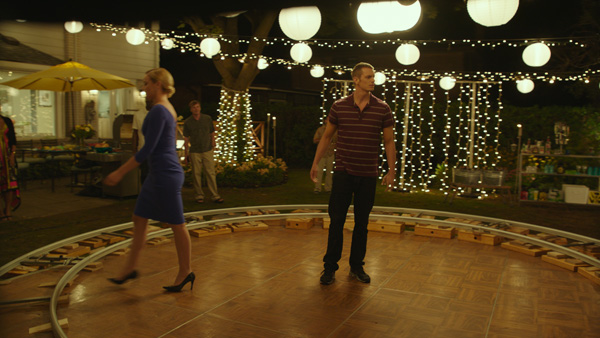
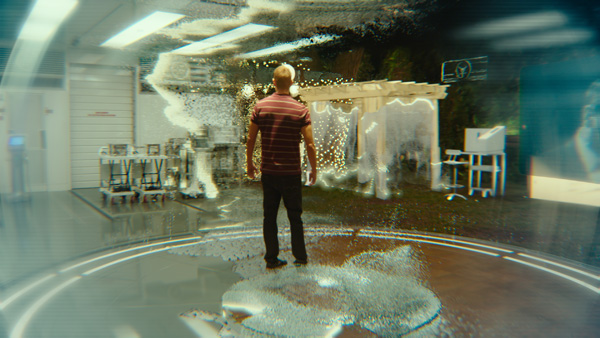
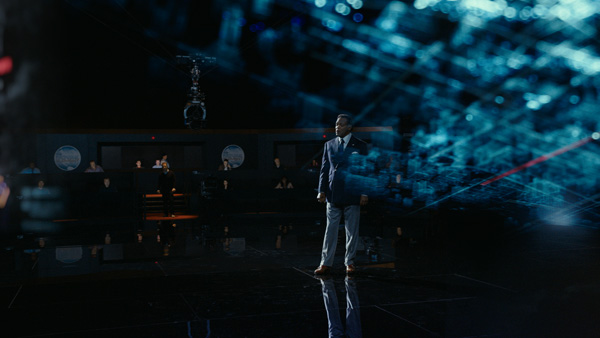
Method StudiosandMethod Designcreative group entered the project after the main shoot was complete, allowing the teams only a couple of months prepare and turn shots around, and no opportunity to work on set. Their scope of work ranged from CG animation, simulations and FX, and set extensions to user interface and display monitor graphics. Harsh RealityOne of Method’s most intriguing and emotional sequence involved a complex scene transition that was important to director José Padilha as the first unveiling of the RoboCop character in the movie – both the audience and to Alex Murphy himself, who from this point in the story must face his new life as a machine. The key audio visual cue OmniCorp’s Dr Norton gives Alex before he awakens from his trauma is a black-and-white video recording of Frank Sinatra singing. Alex’s brain processes this cue as a pleasant dream that takes place at a party at his home, surrounded by friends, dancing with his wife. This warm, softly lit scene makes a sharp contrast with the cold sterile laboratory where he suddenly wakes up. |
  |
|
The two shoots for these scenarios were essentially quite different, filmed in separate locations with no motion control, under different lighting, with slightly different lenses. But they had two critical links that Methods’ VFX team used to their advantage when creating the CG transition between them. Both were shot on a circular dolly revolving around the set, and both had Alex at their centre. Having had no chance to gather set data before the shoot, they first needed to gain control of the transition elements. VFX supervisor Nordin Rahhali said, “We tracked the shots and the cameras of both scenes and created our own 3D camera. Once we had defined our transition zone we allowed Alex to remain briefly in the clothing and lighting of the first sequence by taking him over and reprojecting him into the plate of the new environment as it goes through the CG transition around him. Finally, Alex – now RoboCop - and the audience find themselves in the gleaming OmniCorp laboratory, face to face with Dr Norton.” Singing HologramAn animated particle simulation, created in Maya and Houdini to produce an effect similar to video break-up, was added to the shots as a clue to what is happening and also to refer to Alex’s partly machine-like nature. His brain is processing information in a digital way, pixelising and de-rezing the image. |
  |
|
The audio track and video footage of Frank Sinatra were passed to them from production. “Because the two did not match exactly, the video had to be manipulated to line up with the famous voice,” Nordin said. “The look and treatment of the video shows the singer as a thin holographic veil, which the doctor’s assistant controls as it moves through the transition zone, tying in with the circular movement of the camera to bring Alex from dream to reality.” The assistant’s interaction with that hologram was designed at Method Design, a specialist graphic design team at Method Studios. Not only was ‘RoboCop’ one of the largest user interface and display monitor graphics replacement projects that Method Design had ever undertaken, but it also needed a higher level of interaction with characters than other films. Consequently their scenes required the designers to become more involved than usual with the visual language of the whole film, the action and story. In most cases, the Design group designed and animated the holographic screens and UIs as flat 2D assets and handed them off to VFX to be reprojected or applied as UV mapping to curved surfaces, which could then be composited into shots. The VFX artists also assisted with interactions by bridging the 2D and 3D working environments. They rendered out from the shot a UV grid from Nuke that served as a guide indicating to the graphics designers exactly where an actor’s fingers were lying, for example. |
 |
|
Mike Sausa, senior creative director at Method Design, said, “As we worked on the flat graphics in After Effects or Photoshop, we could adopt the same grid and see precisely where the button presses and other interactions should happen. This technique saved us a lot of time and trial-and-error.” Robot AssemblyMethod handled a number of shots in a sequence showing the doctors and scientists at OmniCorp assembling RoboCop from a collection of human internal organs and robotic parts. The team started with the assets that Framestore had created for their disassembly sequence earlier in the film, but due to the position and proximity of the camera and the length of the shots, these assets needed to be uprezed and re-textured, or their rigs manipulated for viewing at different camera angles. Defining the extra detail they needed required research into lungs inflating and the way a heart pumps. Fortunately, although Method had entered late into the movie’s post production phase, this sequence was shot as a pick up after the main shoot, which gave Nordin a chance to fly to Toronto to join the crew and production VFX supervisor Jamie Price on set. He was able to capture the set data the team would need for this dramatic and technically demanding sequence. |
 |
 |
|
For the subsequent robot suit assembly around the internals, Framestore had also provided their assets, with information on how they had broken them down for their scene. “Having these models and details from Framestore was a huge help,” Nordin said. “But in re-building the robot, Jose wanted the chest plate to slide into place last of all as a dramatic finish, while during the breakdown, this chest plate had formed an anchor for the arms and all other components. “Jose’s request meant re-thinking the build and, with it, the animation. New connection points onto the body were created to accommodate the change. On the rigging side, the entire abdomen, which attaches to the lower lungs, required numerous new pistons and connectors, animated to create motion and look more interesting.” Nordin took advantage of being present at the shoot by working out some previs beforehand and, due to the very short timeframe, working through the animation with the production as soon as plates were available from set, so that revisions could be done straightaway. Again, because Jose usually prefers to work out sequences while on set, the previs was more a source of ideas than a firm guide for the shoot. |
 |
Extending the LabAfter Nordin arrived at the location, the production decided to substantially extend the laboratory set. Method submitted a still shot of a sample extension from which the director chose the detail he wanted. The dimensions were important as they would affect how many more ED-209 robots would be needed to fill out the scene. Again, they used Framestore’s ED-209 assets, re-worked somewhat to suit Method’s pipeline and the new lab environment. Method Studios’ pipeline for this project and most others of its type is based on Maya for modelling and animation with V-Ray as primary renderer, with Houdini for effects, usually rendered with Mantra. Additional modelling is done most often with ZBrush, and texturing is handled in Photoshop and MARI. Mike explained, “Method Design works mainly in Adobe Creative Suite – Photoshop, After Effects and Illustrator - but we are in fact a hybrid group that includes Maya and CINEMA 4D artists. When we go into production, because we’re linked to a VFX group working on a Maya/V-Ray pipeline, we tend to move work into Maya for the extra rendering horsepower. But we also have several talented CINEMA 4D artists who can turn out look development work very quickly that the team can get approval on before committing themselves to an idea.” |
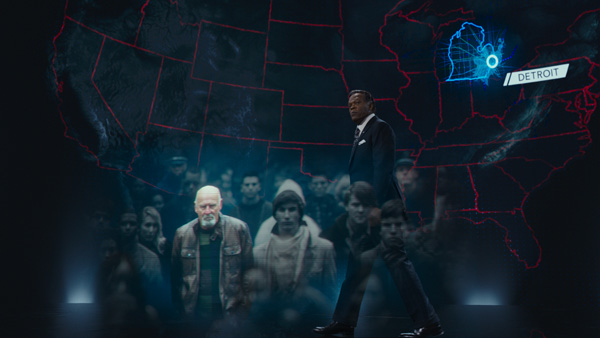 |
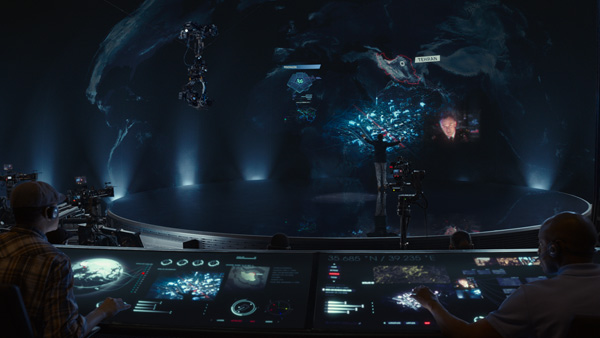
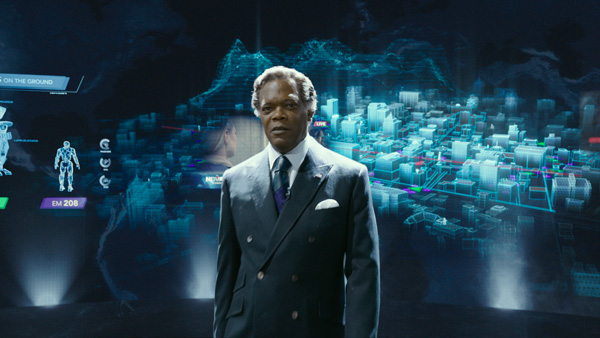
The Novak ElementThis was their process for ‘RoboCop’, and was used successfully on their original pitch to Jose for their ideas on an approach to ‘The Novak Element’ television program, giving it a distinctive look that fit well with the rest of the movie. The Novak sequences became the largest single segment of the project for Method, accounting for approximately one-third of their total 280 shots. The brief was, essentially, to define the future of television – at least in the RoboCop world – as well as putting forward critical story points as the plot accelerates. One of the design team’s first steps was deciding what a ‘virtual set’ could potentially be. They established a visual language for the TV show, incorporating Jose’s idea of utilising a map of the USA with other symbols of extreme patriotism. |
 |
 |
|
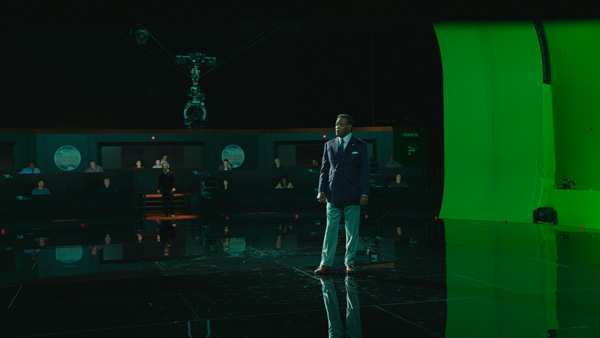
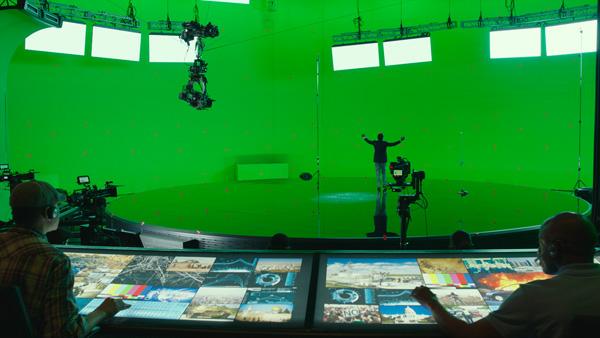
Once they turned to the compositing stage, they could start specifying the set dimensions. The Novak character had been shot on a relatively small, empty green screen stage with only a few tracking markers at the back. “We wanted to create the illusion that he was walking through a large domed space in which holograms could be projects virtually anywhere at any depth, which meant introducing parallax,” Mike said. “For example, a map of Teheran appears to come forward more in some shots, and recede in others, suggesting depth. Novak seems to be walking through an art exhibit as much as a TV show set.” The initial 3D set up involved building a full CG version of the set, with the dome as a mesh. Thus, although the cameras on the set – that is, working as a part of the show itself – were conventionally positioned, the artists could still work with data from any of the production cameras. The dome, sections of the dome and the lights all worked from shot to shot. More important, their 3D scene let them build the elements and work with the compositors to locate everything correctly and consistently. |
 |
 |
|
They needed to figure out thoroughly how to deal with the green screen footage and set, and plan and finalise the position and movement of each holographic element, some time before the actual content arrived, due to the timing of the video clip shoots. The designers and compositors worked out the mattes they would need for content and make sure they could be easily changed if footage came in quite late or if content on the consoles had to be swapped. Futuristic NewsroomAiming to portray the way a futuristic newsroom works, the audiences sees the camera monitors on Novak’s set displaying the final composites. On other displays we see different angles of the same shot, which need to reflect what we see through the production’s cameras. In fact, to keep all of these views straight, the cameras in the scene were actually rolling and Method could also access their footage for the monitor inserts. If this footage wasn’t available, they used closely matching production camera footage. |
 |
|
“Meanwhile, we needed to constantly refer to Jose about story points and levels of complexity in the UIs we were designing, and make sure that our UIs matched the existing ones on set,” Mike said. “Fortunately, our graphic work on the Novak show opened the door to further display monitor and UI screen work inside the Omnicorp and Police HQ buildings.” The use of such screens on tablets and consoles is a trademark of this movie. Method designed and created a large proportion of these and made the final composites on many shots containing pre-composited screen inserts from various studios. Some consoles contained stand-in graphics visible in the plates, which needed rotoscoping before adding the correct inserts. To help with the extensive interactions, the same technique used for the laboratory UIs was applied here as well – generating UV grids from Nuke from the plates to use as a guide for the 2D design work in After Effects.www.methodstudios.com |
| Words: Adriene Hurst Images: Courtesy of Framestore and Method Studios © Sony Pictures Releasing |


