|
VFX Supervisor on ‘Captain America: The First Avenger’, Chris Townsend, coordinated the work of 13 different visual effects vendors, located around the world. After forming a small in-house VFX team to work with, he moved to London, the main shoot location, in April 2010 with the production and Art Dept to lay the groundwork that would provide continuity and consistency for the VFX teams straight through from pre-production to production to post. “VFX departments stand out within filmmaking because of their involvement, alongside the director and producers, at all three stages,” he said.
Worldwide Team
Chris previously worked at ILM for about 11 years and has worked as overall VFX supervisor on titles from the Star Wars, Pirates of the Caribbean and Narnia series. Nevertheless, Captain America was the largest film he has worked on in this role in terms of number of vendors. He feels this factor made his responsibility to the client even larger. “Since becoming a freelance VFX supervisor, I’ve gained experience with quite a few smaller, more specialized studios, but ‘Captain America’ posed a challenge to keep track of so many.”
Although the shoot was delayed until July, he and his team stayed on in London, familiarizing themselves with the story, the director Joe Johnston’s working style and with the art work. They worked through the script, locating potential VFX challenges and finding solutions in advance. “On shows using a lot of previs, an initial edit might even be cut so the crew can plan how to shoot some sequences,” said Chris.
“But Joe had stated that he didn’t want to do previs on ‘Captain America’. He preferred to arrive with storyboards, the script and rough shot plans, and only finalise his decisions on set. This meant that we had to prepare ourselves for any decision he might make rather than developing a specific plan. I had to react effectively, and be flexible and ready with alternatives of what could be done in post, and still get all the material for the teams.”
Environmental Challenge
Chris and the second unit VFX Supervisor Stephane Ceretti had a data wrangler and a coordinator working with them gathering VFX data for the vendors’ teams. Double Negative was one company that sent their own supervisors to get more familiar with the production and sets. The Senate Visual Effects [interviewed later in this article] also sent a street survey team to the shoot in Manchester for the
Brooklyn chase sequence.
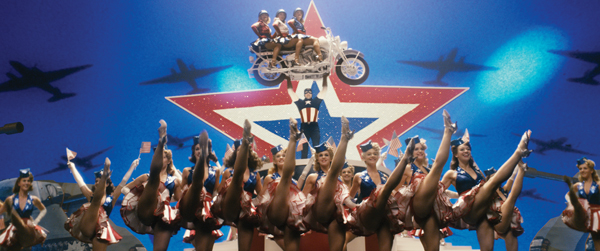
“Aspects of this film that stretched the artists most were certainly the CG environments," Chris said. "Double Negative in London was responsible for some very large, VFX heavy environment extensions. The work didn’t require extraordinary techniques – it was more a matter of managing the size and level of detail. Maintaining consistency across the different environments in the film was a large part of my work, for example, with teams like Fuel VFX in Sydney [interviewed later in this article] who created the underwater environment for the submarine sequence and Radio City Music Hall for the USO show.
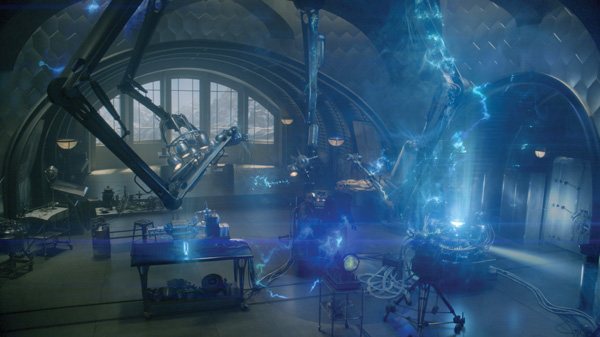
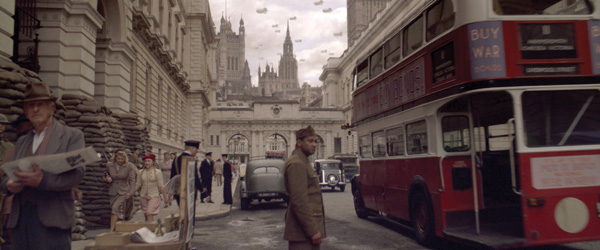
“Red Skull’s laboratory, a large retro-futuristic set, was virtually all in-camera. Various effects had to be added to it and the elaborate machinery and detailing gave the VFX teams an aesthetic to follow. In contrast, many of the wartime environments were mostly CG, including the massive aircraft hangar interiors, and required quite a bit of research. The Senate created some very interesting set extensions on a three-block section of Manchester, with buildings resembling Brooklyn’s red brick architecture in the 1940s. The Art Dept initially redressed streets and alleyways and added some signage, and The Senate extended the streets and added the Brooklyn Bridge.”
Preserving Performance
Effects achieved by such teams as Lola VFX, responsible for trimming lead character Steve Rogers, aka Captain America, down to size for his skinnier incarnation in the first part of the story were much more obvious. This transformation needed significant R&D before deciding on the best approach to taking a big, robust actor like Chris Evans and shrinking him down to a weedy young man. They investigated several existing techniques including full CG heads and re-projecting his face onto 3D geometry.
They decided that what was most important was preserving the essence of Chris Evans’ performance. In fact, Lola took a 2D approach to the image, literally shrinking it by thinning him down and making him look slightly gaunt. Chris said, “Consistency in this case required both making him look the same in all the ‘skinny’ sequences and making sure he was recognisable as the same person once he had become Captain America. Chris Evans was aiming to make him a real and believable character, which made their task more demanding in terms of the audience’s acceptance of the transformation. It wasn’t the easier choice and required quite a complex process to achieve, but it paid off in the result.”
Behind the Mask
The character Red Skull’s face required work with a prosthetic, a silicon mask created for the actor Hugo Weaving by David White in England. It had a translucent quality that kept the audience wondering – was it bone, muscle, blood? It was flexible enough to allow actor’s performance but rigid enough to be skull-like. However it built up the surface of his face, which is actually fairly bony and gaunt.
“In post, the job was to pare his face down again, tighten the cheeks, square the chin and remove wrinkles in the silicon. We hollowed out the nose to appear as if you could look right up through it,” Chris said. “The face was started at Framestore and then Lola took over the assets later to finish. It needed a lot of manipulation, even thinning Hugo’s lips and removing eyelashes. I liked the fact that it still looked like a mask. It was a good marriage of CG and practical effects.”
To create the flashback sequence, artists at Trixter focused on making the footage look very different to the rest of the film, as well as converting the shots into stereo. StereoD dimensionalised most of the rest of the film but Trixter handled their shots to maintain that different look and feel. Chris also remarked on some excellent matte paintings in the film including a candy coloured, Marvel-style impression of the 1939 World’s Fair created by Matte World Digital and Whiskey Tree’s spectacular view of 1940s New York City with Brooklyn Bridge in the foreground.
Vital Links
Communications were very important to this production, and Chris kept in contact with teams and carried out reviews via CyneSync. Given the far flung locations he was sometimes tempted to work around the clock. He did not necessarily involve himself with the individual vendors’ pipelines or techniques, as long as the results were consistent and working in the film, trusting his eyes to tell him that tasks had been done correctly.
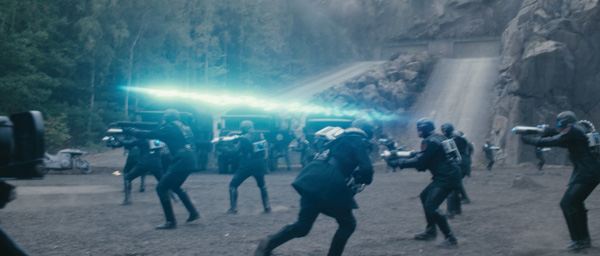
“The teams were quite collaborative in their work. In terms of sharing scripts and assets, most artists these days will create set ups or build in a way that can be shared. Double Negative’s swirling blue energy bolts that emerged from the guns throughout the film was a very complex set up requiring lengthy look development in spite of its simple appearance. It then took them a while to package it up in a shareable form to make sure all teams using it could access it regardless of the software they used. The teams shared the Nazi death-effect in the same way, and Fuel built a number of assets and military vehicles that other companies could replicate.”
Ready for Anything
While Chris’ team couldn’t plan every sequence in advance in complete detail, they could get familiar enough with the project’s resources, teams and locations to respond to most situations. “There is never only one way to achieve a shot. The idea is to be efficient and deal with the practicalities of shooting. For example, is it worth taking the effort and expense of setting up a green screen shoot on location? Or is it more efficient to shoot it normally and rotoscope, given the time frame and budget? I also try to maintain as small a VFX footprint as possible during production, although Joe was aware of VFX requirements and the need to shoot clean plates and safety shots.”
|
In Design
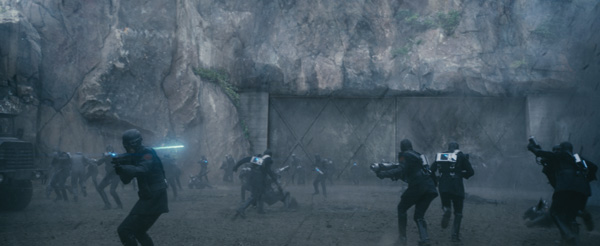
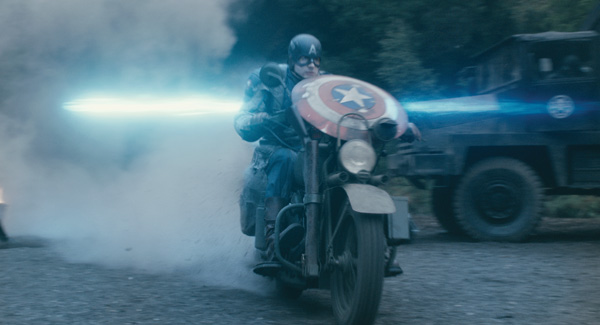
‘Captain America’ is Fuel VFX’s third film with Marvel, following ‘Iron Man 2’ and ‘Thor’. The 120 shots completed for this project represented a good mix of tasks for the team that involved considerable problem-solving. For the extensive motorbike sequence, for example, the whole Hydra base area where Captain America heroically blasts his way in through an iron gate came to the team as plates and it was up to them to design the look and feel of the mountainscape surrounding it. They did extensive research into the Swiss Alpine terrain and how the textures of the rock faces should look.
Fuel’s VFX Supervisor Dave Morley said, “We did matte painting designs of the Hydra base environment and had them approved, and then the modelling department made simplistic geometry of the entire environment.
This layout and geometry was passed off to digital environment artist Dudley Birch, who created more detailed models and textures in Maya and Photoshop to be projected onto the geometry in Nuke. This gave the compositing team the ultimate flexibility to tune each shot and layout as required.”
The look of the iron gate that Captain America rides his bike into and blows up, letting the troops pour in, was also designed in-house based on production design sketches for the large factory structures inside where a lot of the ensuing action takes place, aiming for a consistent look.
Similarly, when it came to working on the bathysphere, sent to the ocean floor to pick up the glowing tube, production sketches were sent but Joe still wasn’t satisfied with its arms at that stage. Fuel’s team worked on the design, going back to some early ‘Iron Man’ concepts for inspiration and put some creativity into working out the moves.
Blow Up
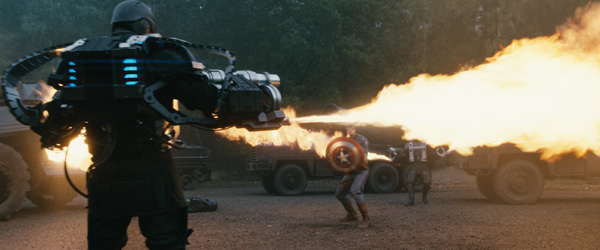
The motorbike sequence included extensive explosions, initially captured in-camera. They had a good supply of explosion elements to use, plus additional debris, that needed considerable enhancement. The shot when Captain America’s bike hits the gate is mostly a digitally constructed shot. A couple of shots needed CG fire as well, which in turn needed careful matchmoving and rotomation. “We had to matchmove the in-camera stunt people and add the fire to them, which means simulating the fire to stick to their bodies and digital double work when we took control of in-camera stunts. For example, if an actor fell slightly short of the right spot, we could extend his trajectory,” said Dave.
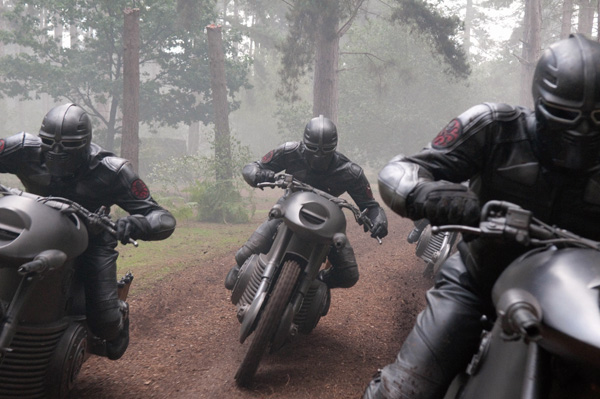
“We also increased the number of Hydra bikers in the sequence with doubles. We had scans of bikers and bikes, and had to build Cap’s bike, tanks, military vehicles. All these assets had to go through the usual lighting, texturing and rigging set up for animation. Most had to be built ready for dynamic simulations. For example, if we knew we had to blow up a tank, we couldn’t get away with building a single-sided object. It had to be a built as a solid volume to put through a hard body simulation and able to fracture into other objects.”
This sequence was an opportunity for Fuel to stretch all of their artists’ skills, from building digital doubles to fluid effects for the fire, the blue bolt effect, environments and the numerous CG assets. Because Captain America was generally shot on green screen whenever he was on the bike, a lot of background plate manipulation and proper lining up of the perspectives was needed to complete them. The environment work included bringing him in and out of mist and sending dust clouds out from under the wheels. To make it feel even more speedy and forested, the Art Dept had placed 12ft tree stumps along the road, to which the artists added the trees overhead and created interactive and dappled light shining down on him through the branches.
Dappled Light
Light wasn’t typically an issue for Fuel’s shots, and the in-camera light was usually consistent. But this sequence was shot over roughly two weeks just outside London. “The conditions changed hourly, so we needed to smooth the balance and feel of each shot so they would cut together more seamlessly, generally through selective grading overall,” Dave explained. “But it also came into play when compositing the blue screen plates. For instance, we had shots where the Hydra bikers were in the background and Cap had to be composited into the foreground.
“At that particular place in the forest, dappled light came though the trees and hit the ground. This same dappled light need to be translated to the blue screen element, so we needed to isolate Cap and his bike, allowing us to dimensionally cast the same dappled looks onto him as he passed through the light. To also match the levels of fog, we rendered fog elements out of Houdini to use in comp in a similar way in terms of sitting him within the fog, timed with the in-camera plate.”
Submarine
Most of Fuel’s shots needed a large range of CG assets plus environments. The submarine sequence required a full underwater wharf environment, including a boat hull with propellers and associated water effects. Steve Rogers pursues an agent through the streets to the wharf and tries to escape by diving into the water and into a small submarine. “Because it was shot in a tank of clean water, we not only created the illusion of the sub moving much faster than it was shot, but also build an environment around it.
The submarine that Fuel worked with was a full-sized practical model, although miniatures, all-CG replacements and other options had been considered. In the end the model gave the best looks, and the special effects department had built it complete with a rig to travel it through the water for the shoot. It was first shot at Stanley Docks in Liverpool to capture it emerging and submerging, and then the underwater tank shots were captured at Pinewood studios, which allowed Fuel to add the underwater environment elements and effects.
“It was shot moving through the water, but of course it lacked the cavitation bubbles that an engine produces and so we added these digitally. Also, because it could only move through the water relatively slowly, the existing motion bubbles disturbed the illusion of the intended speed and had to be replaced with more appropriate bubbles. We introduced dirt and particulates into the water as well, and removed the rigging,” Dave said.
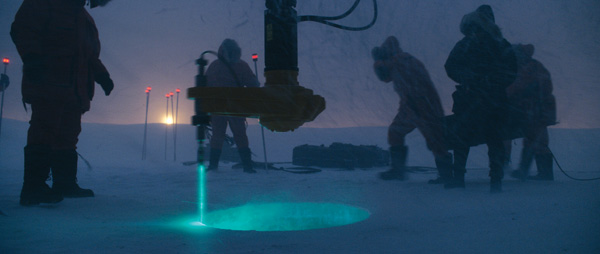
Arctic Discovery
The movie’s opening sequence depicts the arctic discovery of Captain America’s airplane. It had been shot at Shepparton Studios, showing the expedition truck moving toward camera. Any wide shots revealed line rigs and ends of sets, requiring extensions and clean up. “We added a lot of digital snow, and the first shot, as you see the headlights resolving through the snow, was fully constructed CG. We took over a shot starting at ground level, looking at the wing tip extending from the ice. To complete the handover, everything including the wing, people and the arctic environment had to be recreated in 3D and the in-camera snow had to be matched. We also marked out the extent of the airplane below the ice with marker lights.
Several shots required the blue energy bolt effect from Double Negative. Fuel had received templates of all the layers, design and look, which the team set up in their pipeline to achieve the same result. “Different companies use different fluid solvers and other hand written tools that can’t be handed over directly but they can share an outline of the layers and how they were combined to get the final look. You can re-construct an effective process using your own set up, without needing their proprietary tools. I don’t think you could ever tell by watching the film that that four different vendors had actually worked on it,” Dave said.
Chris Townsend remarked that some of the shots with environment work done at Fuel were among his favourites in the movie, knowing what the plates they started with were like and how they arrived at the finished shots. “The work didn’t require any extreme or new effects, but it is almost invisible and very easy to miss, which is how it should be.”
|
Building Brooklyn
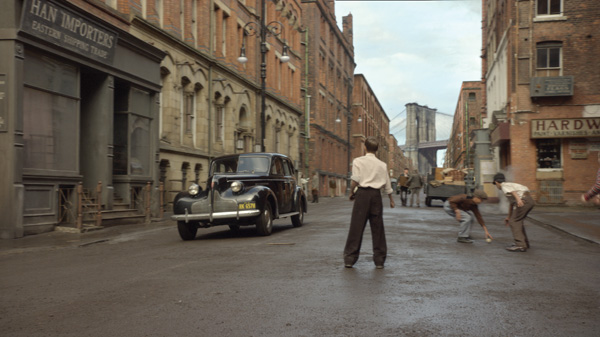
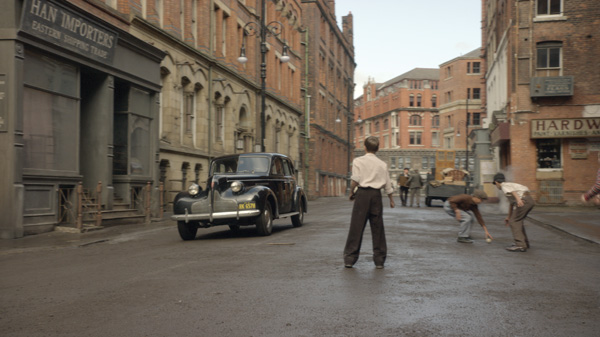
The Kruger chase sequence, just preceding Fuel’s submarine work, was The Senate Visual Effects’ main focus. Locations of the shoot were a few streets in Manchester, England plus one in Liverpool, that resembled 1940s Brooklyn architecturally. The team’s main role was taking the existing environments and extending them into the background, using 3D projections onto geometry instead of full 3D modelling, due as much to the tight deadline as to the fast cut of the sequence.
“It would have involved modelling 50 to 60 buildings,” said VFX Supervisor Richard Higham. “It’s a fairly long sequence and the camera turns several corners, so that we had to supply a number of different views. To gather enough varied reference photography, we also shot buildings around London with a similar look and feel to what had been shot on set, matching the brief. Joe especially didn’t want this scene to be dominated by well-known New York City landmarks and skylines – he wanted the attention on the chase.” After all, this was Steve’s first appearance in his newly emerged, Captain America body. Part of the work involved adjusting and repairing any distracting details in the existing live action.
To overcome the problem of varying the look of the two or three streets the set occupied, the team first roughed out a map of the edit as it wound and turned through the area. From there, they calculated how many different views they would need to accommodate this. Achieving the final shots then required rotoscoping out the live action to replace the backgrounds, only tricky when fine hairs appeared in the plate, or smoke from an explosion, which needed to be re-introduced and blended in with the foreground action.
Perspective Shifts
The day of the live action shoot was mostly overcast, fortunately, and they had also taken reference shots for the projections under a range of conditions to cope with most scenarios, as well as at various angles. With a few grade tweaks, they could blend the plate and the photo elements quite well.
When the live action plates arrived from production, they tracked them to export a 3D scene into Maya, producing a point cloud of indicators that showed where buildings begin, and from what point the artists should start to build their geometry for building replacements. A camera was exported at the same time. This camera moves in the same way as the live action and reveals any perspective shifts or parallax. As these effects are visible, the geometry needs to be pretty accurate, though not very complex.
“We usually start with simple shapes and planes, and give this version to the matte painters as an exported image,” Richard explained. “They can use the grid lines in this geometry to start matching with the reference photography. This goes back to the 3D team, who can further adjust and dimensionalise the geometry according to the image, allowing it to move and shift in the camera more accurately. Then the matte painter can add finishing touches before rendering it out to Maya for the compositor. He receives it with the 3D camera, which he can also read in Nuke.
Barefoot Sprint
“Having the camera also means that he can start populating the background with some life, because at this stage the shot only consists of the live action in the foreground plus the buildings at the back that include no action at all. For this, we cut out cars and people from other plates, and created, lit and shaded some 3D cars – all to make the scene look like bustling Brooklyn. Unfortunately in a way, the idea was to create such a natural looking scene that no one would notice our work.” This complete sequence had to be ‘Americanised’ as well with period and local detail, particularly the Brooklyn fire escapes. These were added to the projected renders with lamp posts and US flags created with a cloth simulation.
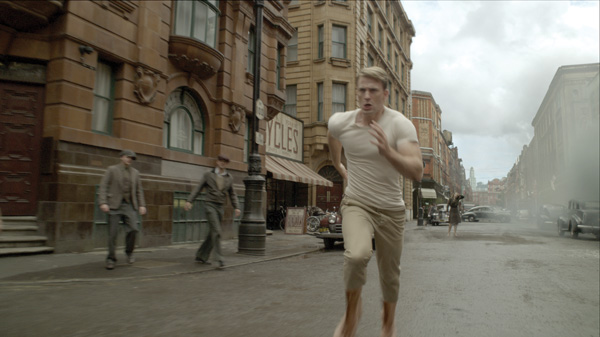
Steve Rogers was also meant to be running barefoot through the streets. As it wasn’t practical to do in-camera, the actor wore prosthetic boots that the Senate then had to paint out and replace with 3D animated running feet with a fully articulated, rigged system, flexing muscles and veins.
“The challenge on these feet was interesting,” said Richard. “When we started object tracking what the boots were doing for the matchmove, we found that they were restricting the normal, barefoot movement of his feet far too much and looked clunky. We had to enhance the performance with our animation. The 3D artisits ran around the studio, filming each other’s feet to replicate natural actions. Feet move in many surprising ways! We animated them both creatively to make it feel right, and physically accurately to articulate the rig.”
Camera Motion
Richard explained the way the 3D tracking software they used, 3DEqualizer or PFTrack, begins by looking for and identifying tiny details within a shot. As the plate moves, it will search a chosen screen area for these details. Tolerances are set for slight changes over time. Once the application has enough points, it calculates their movement relative to each other. “These comparisons allow it to follow the motion of the camera. This camera information can be exported to a Maya scene. Typically, you also tell it which lens is in use but it can usually tell anyway.
“Using this technique for Steve Rogers’ feet was complicated by their extensive movement and motion blur. The artists were almost hand tracking them frame by frame. A ground plane had to be tracked and collision detection used so when the foot touched the plane it would resist realistically. The video reference helped us emulate just how his feet would look running at full sprint or coming to a halt, and at different angles. It couldn’t be an exact procedure - it simply had to look right.”
Two Perspectives
In one scene at the start, Steve rushes out, jumps into a car and fires a gun at two men right through another car. A simulation of the two windows smashing had to be created in the intervening car, from two perspectives. Although the artists were using a Maya simulation with accurate dynamics, the camera angle could have spoiled the believability.
They consulted with Joe to determine how, and how far, to push the effect. In one view, the actor shoots toward camera with the glass flying straight forward before the shot cuts to a wider view in which the glass needs to fly away to frame left and, for continuity, hit the bonnet. Therefore geometry was added to the simulation for collision detection. When the bullets hit the wall, Joe wanted a much more violent impact, so they added more hits, cracks and debris and matte painted the damage to the wall. Richard said, “The whole gunshot cycle may only have lasted 24 frames or so but it leaves an impression on the audience.”
Bridge Model
A model of Brooklyn Bridge was needed to finish the sequence, dressed in to give the viewer a location reference point. The shot required a bit of license to angle the bridge to look attractive, realistic and in the right spot, but they had a good set of textures for it in their library from previous work in New York.
The Senate worked on ‘Captain America’ five to six months, completing close to 200 shots. Their VFX line producer Ed Randolph and one of the artists went on set for the photo shoots although there was little opportunity for effects shots and like all teams, mostly relied on Chris to supply on-set data. “We knew that there would be a lot of rotoscoping and extensions to do, and armed ourselves with photography of the beautiful period cars to model or drop in as cards for the backgrounds,” said Richard. “Decisions about whether to model or use 2D elements were based on continuity, camera angles and the ability to vary the sequence enough.”
Fateful Flight
Method in Los Angeles handled the fateful airplane sequence when Captain America is on board Howard Stark’s plane on his way to parachute behind enemy lines. It comprised three or four exterior and 25 interior shots, awarded to Method in February 2011 and all were completed within a 10-week schedule. Stephane Ceretti, the 2nd Unit VFX Supervisor loaned out from Method in London, helped shoot helicopter plates of the Swiss Alps that served as background plates for their composites.
Stephane had captured views from every possible angle, looking out from the helicopter in all directions. Editorial also provided a list of the preferred background plates for each shot. They still required some retiming, offsets and shifting of elements but knowing these preferences was very helpful when starting each shot. The plates had been shot on film and the foregrounds on the Genesis HD.
For the establishing exterior shot, Olivier Pron at Method London created a matte painting of additional Alpine mountains to place in the distance, as if the plane were approaching a major mountain range.
This painting helped provide continuity through to the interior shots which showed the airplane flying among large mountains. Below, they needed backgrounds that started over open farmland and ended up over mountains, so they removed evidence of too many houses and infrastructure on the ground from some plates. The exterior shots required CG clouds to set the look and give a sense of speed and depth.
Shining Exterior
All shots required a day for night colour treatment, the exterior shots in particular. First, the plates were rotoscoped apart into sky, plane and mountain elements to be able to treat them individually. What VFX Supervisor at Method, Sean Faden, feels really sells the exterior shots is the handling of the surface of the aircraft itself. The production shot a real Beechcraft airplane which has a distinctive aluminium finish. It couldn’t simply be darkened down with a regular day-for-night colour correction. Method built a digital model of the plane, tracked it and rendered a nighttime environment with a full moon in V-Ray out of Maya, which created realistic reflections and highlights on their digital plane.
The compositors then knocked back the daylight reflections and sun hits in the original plates and replaced them with these moonlight glints, making the exterior scene much more convincing. Their Flame artist Paul Kirsch made the windows glow with the interior lights and added small figures for Steve Rogers and Peggy Carter inside.
Full Moon Night
Sean lives in the Santa Monica Mountains and, early in the project, took a Canon 7D out on a full moon night and shot stills of the terrain under the light. This helped them understand the relationship between the dark blue sky the moonlight and the hilly country. He also shot images from inside his car with the interior lights switched on, on the same night. These formed a start point for the interior shots from the airplane looking out, helping them with relative brightness between inside and out, strength of reflections and so on.
The interior plates had been shot on a gimbal in a partial plane interior set. The camera was mounted on a techno crane inside the gimbal with a large, bright green screen outside. Consequently, not many reflections were left in the windows. “A simple improvement we made to the realism was adding good window frame reflections, haze and reflections of the actors in the glass where appropriate.
“The gimbal-camera set-up proved to be fairly tricky for us. Anytime you put a camera inside a moving vehicle, getting the background to feel realistic means recreating the motion.” Method tracked this motion but working purely with the movement of the gimbal made the plane appear to be moving too fast and too much in the final comp. This had to be toned down by trial and error with hand animation, keeping it in sync with the original but reducing it depending on what the actors were doing.
Subtle Explosions
When the plane comes under fire, CG Supervisor Doug Bloom set up systems to produce flak explosions and tracers in Houdini with interactive lighting in the clouds to help integrate the effects. As the flak exploded, they also produced bright orange interactive reflections in the plane’s surface. While setting up pipelines for this type of effect was not new to Method, they had never worked on a period film before and like the other teams, devoted time to researching WW2 looks and colours. Sean feels it was worth the effort and helped them avoid creating an exaggerated Hollywood version of explosions and tracer fire.
Chris Townsend trusted their judgement, explaining that Joe was looking for subtlety in the shots. Flak explosions weren’t required in every frame. To help define the look for the flak, he and the editor compiled a still frame of the effect he wanted. They were also advised on timing and placement, which saved them a lot of time and let them focus on looks.
Last Leap
Opening the doors of the plane created new concerns for the composite. They had no glass, reflections or haze to buffer whatever was happening outside or to use for integration. Instead they created a mist layer in the extreme foreground rushing by the airplane to help break up the exterior background plate slightly. This was combined with the layer of CG cloud acting as their speed reference, the tracers and flak. Compositing was done in both Nuke and Flame under compositing supervisor Patrick Ferguson. Nuke was useful for sharing looks set-ups between artists.
When Captain America jumps out with his parachute, Doug Bloom created the digital double for him. They had received a scan of the actor and parachute, but he wasn’t wearing the correct jumpsuit. CG Modeller Masa Narita was able to sculpt, texture and detail a complete jumpsuit with ZBrush and animate the jump in Maya. The parachute was a combination of animated blend shapes and nCloth, also rendered in V-Ray. It was more effective to render out the explosions and similar effects from Houdini in Mantra but they find V-Ray works well for character renders.
|