

Foundry Mari 5.0 improves the brush engine to include colour jitter, has a new export workflow for USD material networks and helps users to take better advantage of proceduralism in Mari.
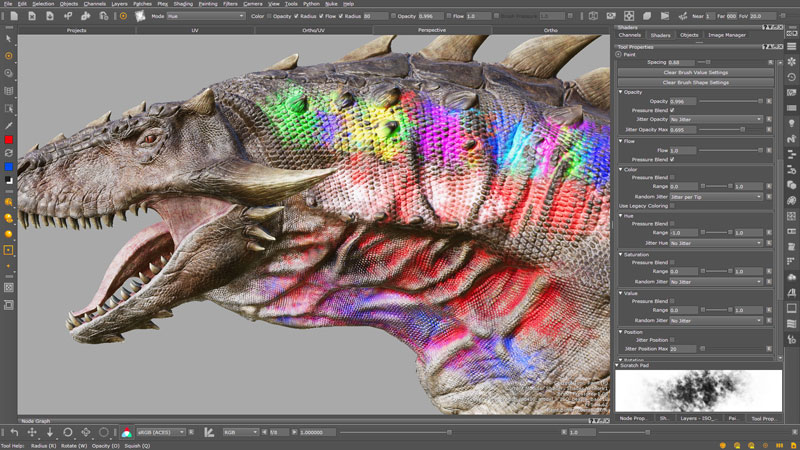
Dynamic brush colour
Foundry Mari 5.0 improves the brush engine to include colour jitter, has a new export workflow for USD material networks and helps users to take better advantage of proceduralism in Mari.
The updated brush engine is one of various improved artist tools in Mari 5. Brush properties generally apply to a splat, or stamp – that is, a single application of the brush tip. From there, a stroke is a continuous application of splats.
Custom Brushes

Some properties allow random colour variation, called jitter, to help achieve a look that comes closer to how a physical paintbrush works. In that case, the HSV (Hue, Saturation, Value) properties of a brush can be jittered per stroke, per paint splat or according to pen pressure. In Mari 5, jitter can now be used to change the brush tip colour for each of the multiple splats within a brush stroke, or change between each brush stroke, precisely adjusting the range of each of these effects together or in isolation. Combined, they result in very stylistic brush strokes.
When generating custom brush tips, artists can specify whether the Alpha of a brush tip is generated from the Red, Green, Blue, Alpha or Luminance Channels of an image file, allowing complete control over the process. Colour-managed images can also become custom brush tips now. With the ability to utilise the full RGBA colour data from an image file, including colour space controls, users can paint full colour decals instead of solid colours.
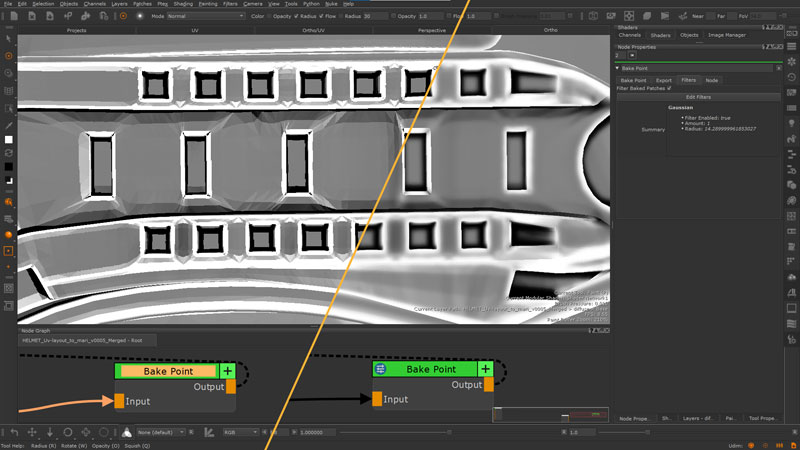
Filters for Bake Points
Users can now apply Filters to Bake Points to non-destructively blur graph networks. Bake point nodes are used to optimise scenes when node graphs become complex or heavy. Anything the user inputs into the node is cached, which helps to keep scenes running smoothly. Until now, filter effects like blur could only be applied to a paint layer or node. Performing a blur operation on a graph network of procedural nodes meant converting the graph into a paint node, and then applying the filter, which is a destructive workflow.
Proceduralism
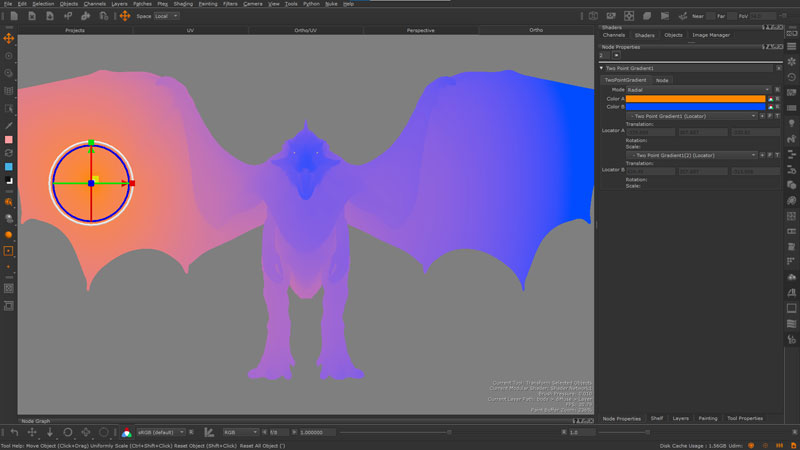
The new workflow is less disruptive and increases Mari's proceduralism – artists can now place a bake point in the node graph network and apply a stack of filters to the baked result. Also enhancing proceduralism are new Procedural patterns for layers and nodes, consisting of Camera or Object Distant Gradient, Camera or Object Facing Gradient and Two Point Gradient. Artists can use the patterns to make soft, area-driven procedural masks using Projectors and Locators in their Project scene. A procedural approach also helps reduce the lengthy task of repainting gradients by hand should a model or UVs change later in production.
Mari 5.0’s Node Graph now comes with Grid Snapping, with fine-tuning controls for grid cell height and width. The ability to snap nodes inline with a grid helps to make Node Graph networks easier to follow.
Flattening Shaders
Further optimisations to Mari’s core operations include an improved flattening engine. Flattened shaders are more efficient, more robust and already compiled. They consume less overhead when processing, and form a better interface for adjusting parameters. To support this kind of optimisation, shader flattening speeds in Mari 5.0 are accelerated when converting procedural layers to paint, flattening a node network to a Bake Point or committing paint to layers. Mari’s GPU and CPU, as part of its flattening engine, now run more closely in parallel.
USD Preview Looks
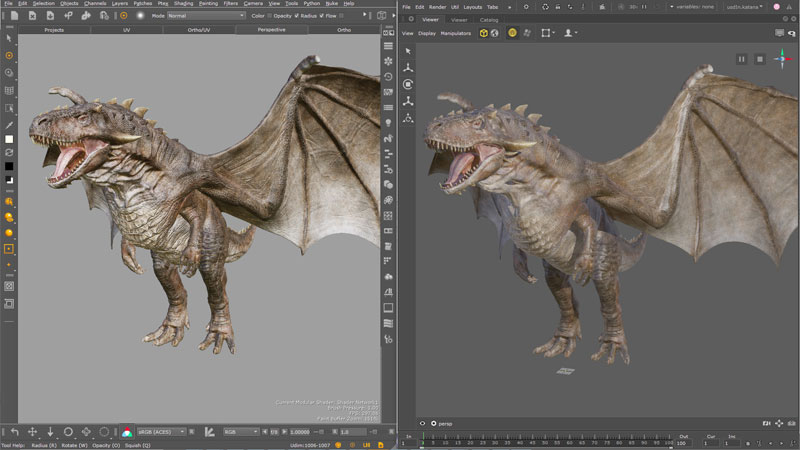
For assets using Mari 5.0 for look development, the software has a new workflow for authoring Preview looks with your flattened USD material networks. These may be used in content creation packages with Hydra-powered viewports – like Foundry’s Katana. This workflow includes the USD preview surface, introduced as a new shader type and used alongside the primary vendor shader, or Mari’s principled BRDF. This means you can develop the Preview and the final look of assets in the same project. The result is better looking Preview assets for Hydra viewports, and a way to reduce friction in the pipeline between Mari and Katana by using the USD format.
Foundry continues to align with the VFX Reference Platform. Mari’s third-party libraries have been upgraded in order to match the ones specified by the VFX Reference Platform CY2020, which means VFX vendors can build in-house software to work within Mari more easily. OCIO in Mari now adheres to the CY2021 specification of 2.0 so that artists and studios can use OCIO v2 config files. www.foundry.com